background image

-4-

WARNING AND PRECAUTION

Installation Of Remote Control Battery

Place two AAA size batteries in the remote controls battery compartment, making sure to
match the polar-ity markings inside the compartment.

Precautions For Using Remote Control

Use the remote control by pointing it towards the remote sensor. The items between the 
remote control and the remote sensor will interfere the normal operation.

Do not make remote control vibrate violently. Also, do not splash liquid on the 
remote control, also do not put the remote control in high humidity place.

Do not place remote control under direct sunlight which will cause deformation 
of the unit by heat. 

When the remote sensor is under direct sunlight or strong lighting, the remote 
control will do not work. If so please change the lighting or TV's position, or 
operate the remote control closer to the remote sensor.

Precautions For Using Battery

Improper using of the battery will cause leakage.   So please do as the following methods 

and use carefully.

1. Please note the batteries  polarity, to avoid short circuit.

2. When the battery s voltage is insufficient which affect the use range, you  should replace 

    new battery. Remove  the batteries from the remote control unit if you do  not intend to use it for a    

    long time.

3. Do not use different types of batteries( for  example, Manganese and Alkaline batteries) 

    together.

4. Do not put the battery into fire,  and charge or decompose the battery.

5 .Please dispose batteries abide by relevant environmental protection  regulation.

'

'

Operating  Environment

Do not install this equipment in a confined space such as a bookcase or similar unit. 

Do not use the set near damp, and cold areas, protect the set from overheating. 

Keep away from direct sunlight.

Do not use the set near dust place.

Do not attach candle to accessible opening area, to avoid flammable foreign material from 
entering the TV.

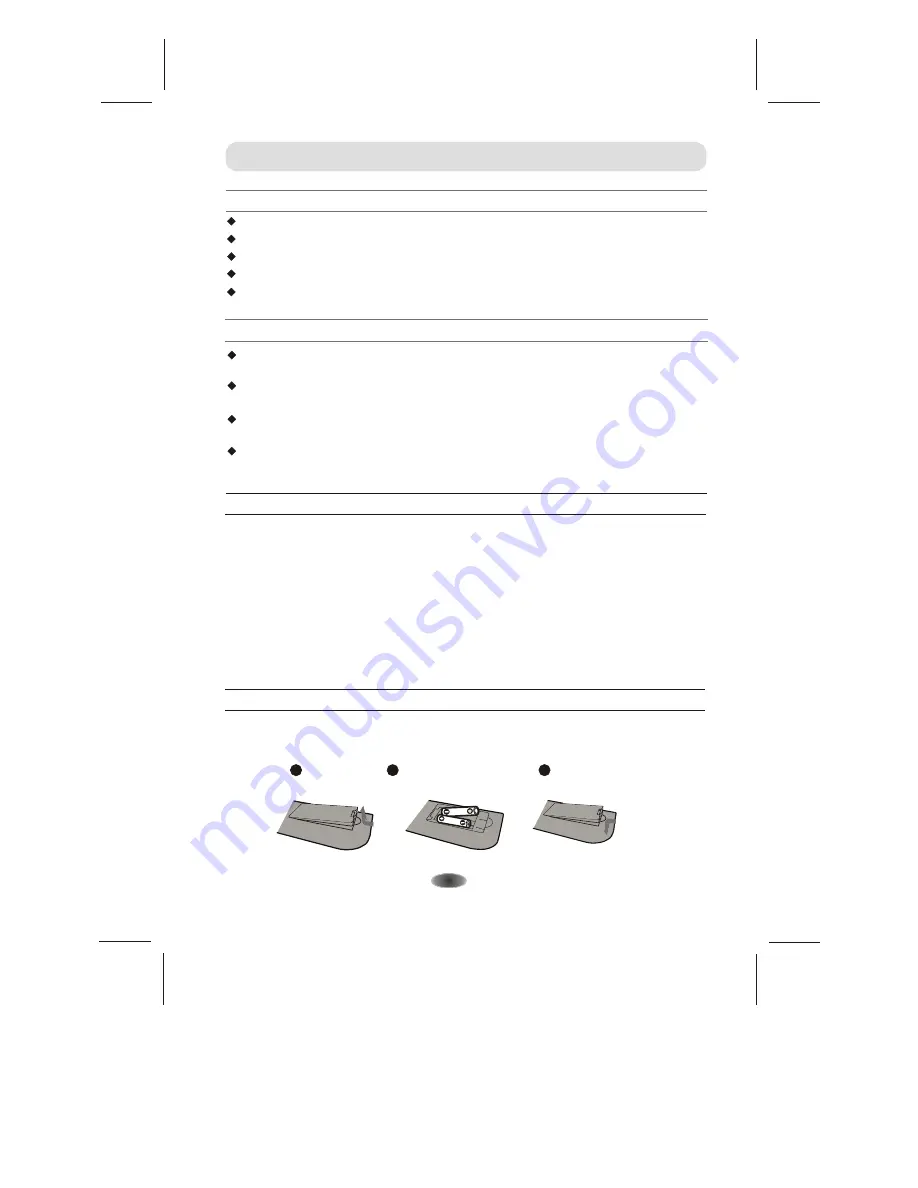
Note: Pictures are only for reference. Actual items may differ. 

Open.

1

Make sure the
polarity is correct.

2

Close.

3

Summary of Contents for 39e36

Page 1: ......

Page 2: ...l 8 10 Menu Operation 11 Picture 11 Sound 12 Installation 13 Time 14 Setup 13 TROUBLESHOOTING 18 Back Panel 7 FUNCTIONS AND FEATURES 5 EXTERNAL SCHEMATIC AND INSTALLATION 6 10 MENU CONTROL 11 15 PC 12 USB CONTROL 16 17 Video Menu 16 Music Menu 16 Photo Menu 17 Text Menu 17 USB Menu 15 Advanced 14 ...

Page 3: ...lume to a safe comfortable level and reduce the amount of time listening at high levels The battery battery or batteries or battery pack shall not be exposed to excessive heat such as sunshine fire or the like Excessive sound pressure from earphones and headphones can cause hearing loss When not in use and during movement please take care of the power cordset e g tie up the power cordset with cabl...

Page 4: ... the television and supporting furniture WEEE Directive Correct Disposal of this product This marking indicates that this product should not be disposed with other household wastes throughout the EU To prevent possible harm to the environment or human health from uncontrolled waste disposal recycle it responsibly to promote the sustainable reuse of material resources To return your used device ple...

Page 5: ...attery Improper using of the battery will cause leakage So please do as the following methods and use carefully 1 Please note the batteries polarity to avoid short circuit 2 When the battery s voltage is insufficient which affect the use range you should replace new battery Remove the batteries from the remote control unit if you do not intend to use it for a long time 3 Do not use different types...

Page 6: ...mption in standby mode to save energy 9 Latest high integrated digital processor chip 3D Features Brief Introduction Thanks for your purchase of our digital high definition LED television This product with diverse functions is designed to fulfill the optimum requirements from commercial industrial and household uses LED television possesses the display function of both TV and PC It features advanc...

Page 7: ...enu or source menu shows on the TV 1 Power Indicator Remote Sensor 2 Speakers 3 Program Up Down Button 4 Volume Up Down Button 5 Menu Button 6 Source Button 7 6 5 4 3 2 2 1 Note This model has two kinds of silkscreen on the front panel one is symbol such as indicating volume up down the other is character such as VOL VOL indicating volume up down ...

Page 8: ...y 6 AUDIO IN Connect AUDIO input signal from signal source such as DVD 7 COMPONENT Y VIDEO Pb Pr IN Connect COMPONENT signal from signal source such as DVD VIDEO share the same port with Y port 8 EARPHONE Audio output speakers will be muted when earphone is plugged in and the headphone is selected speaker will be not muted when an audio output plug is inserted and line output in the menu is select...

Page 9: ... desired item on the TV menu Remote Control 14 Information INFO Press to display the current information including screen format source etc 3 4 2 6 7 8 8 QUICK No use 9 10 9 Menu Press to enter or exit from the TV menu 10 Source Press to select the input source mode 11 12 13 13 Exit Press to exit from any menu 14 15 15 3D This TV is not a 3D TV The 3D button on the remote will not work and is not ...

Page 10: ... execute the prompt function in DTV mode Note In DTV mode PVR done at any time after you press this button to eject the PVR program list the list can choose to watch recorded programs PVR 26 25 25 USB Play Control Buttons Play Pause Press to pause playback press again to continue playback Fast Backward Button Press to fast reverse Fast Forward Press to fast forward Previous Press to play the previ...

Page 11: ...concealed information such as solutions to riddles or puzzles Press again to remove the information from the display MIX Press this button to superimpose the teletext over the TV program Press again to return to normal teletext mode SIZE Enlarge the teletext display Press this button once to enlarge upper half of the screen Press this button again to enlarge lower half of the screen Press this but...

Page 12: ...rk areas of the picture To get better picture value Contrast should be adjusted to the proper value Adjusts the brightness of the picture and usually is adjusted together with Contrast Adjusts the richness of colour This function is not available in PC mode Adjusts the sharpness of the picture This function is not available in PC mode A Only can be done under the NTSC system Color Temperature Cont...

Page 13: ...ion of the television djust the updating frequency of the picture djust the phase of the picture PC Sound Mode Balance AVL Surround SPDIF Mode SOUND Sound Mode Contain Standard Music Film News and Personal Balance Control the sound balance between the right and left loudspeaker earphone AVL This function may be set as On or Off Surround Contain On and Off SPDIF Mode Options include PCM and AUTO SO...

Page 14: ...VR File System Sticker Demo User Reset SETUP INSTALLATION Auto Search DTV Manual Search ATV Manual Search Programme Edit Signal Information Auto Search Search and save all programs at current source by automatically DTV Manual Search Search and save the digital programs at AIR source by manually ATV Manual Search Search and save the analog programs at current source by manually Programme Edit Edit...

Page 15: ... password 0000 Block Program Set the blocked programmers you desired Parental Guidance Set the parental controlling level TIME Time Zone Auto Sleep TIME Auto Sync Contain On Off Can set TV time synchronize with the system or not It is working when you receive DTV signal Clock Set the time Only available when Auto Sync is set to Off Summer Time Choose between On and Off Sleep Timer Set the auto Off...

Page 16: ...files from USB You can view video music photo and text files from your USB storage devices 1 Connect USB storage device to USB input terminal 2 3 Press to select the types of media modes VIDEO MUSIC PHOTO and TEXT Press the source to select the USB USB Menu MUSIC TEXT PHOTO USB2 0 VIDEO MENU CONTROL ...

Page 17: ... stop music playing and return to music list 4 Press RETURN to the previous menu screens Video Control Bar Fast Reverse Previous Stop Zoom In Zoom Out Press INFO to display Video Control Bar while playing the video Press to select the desired settings Press to exit from Video Control Bar A A A A A B A B Pause Fast Forward Next Play Mode Repeat Play LIST Current Information Selection Play Move Musi...

Page 18: ...ing 3 Press to stop text playing and return to text list 4 Press RETURN to the previous menu screens Current Information Zoom In Clockwise 90 Degrees Counterclockwise 90 Degrees Zoom Out Photo Control Bar Pause Previous Next Stop Play Mode List Background Music Move A A Press INFO to display Photo Control Bar during photo slide show Press to select the desired settings Press to exit from photo Con...

Page 19: ...0Hz SNOWY DOTS AND INTERFERENCE If the antenna is located in the fringe area of a television signal where the signal is weak the picture may be marred by dots When the signal is extremely weak it may be necessary to install a special antenna to improve the reception 1 Adjust the position and orientation of the indoor outdoor antenna 2 Check the connection of antenna 3 Fine tune the channel 4 Try a...

Page 20: ...ltiple options RF aerial input 75 ohm unbalanced AV video input 75 ohm 1 0Vp p RCA AV audio input 10k ohm 0 5Vrms TV PAL SECAM BG DK PAL I NTSC M AV PAL NTSC SECAM o o Working temperature 5 C 45 C Working humidity 20 80 o o Storage temperature 15C 50 C Storage humidity 10 90 Environment only for Tropical climates zone o o Working temperature 5 C 35 C Working humidity 20 80 o o Storage temperature ...

Reviews: