background image

19

7

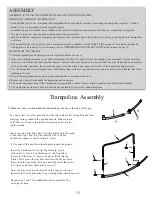
. Tie the straps that are sewn on the edge of the enclos-

ure mesh around the outside of the cap. Make sure to 

secure the knot tightly, see insert drawing A..

Note: The enclosure poles are high, be careful when

you attach the straps. If needed, please use a ladder.

Inset drawing

5

5

Leg

Leg

Socket

Jump Mat

T-joint

Frame Pad

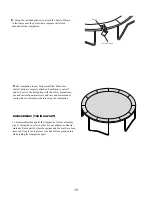
6.

Note:

In Step 6 you will secure the enclosure poles

to the frame of the trampoline.

Start from the enclosure door,  lift one of the poles assembled

in Step 1, see the insert drawing. Insert the Straight Tube(5)

into the top hole of the Square Socket on  trampoline frame

as shown.

Make sure the bent side of the enclosure poles 

are facing toward the center of the trampoline.

Note:

 The end of the straight tubes(5) are sharp.  Use 

caution when assembling.

Repeat this process to assemble the remaining five poles

to the trampoline frame.

Strap

6

1

A

Strap

1

Enclosure 

 Door

Poles

Pad

Summary of Contents for SWTC1500

Page 1: ...e to winds Be sure to secure your trampoline and enclosure Wind Damage is not covered in the warranty of your trampoline IMPORTANT Read all precautions and instructions in this manual before using this equipment Save this manual for future reference Maximum user weight 200 lbs WARNING ...

Page 2: ...If the trampoline is indoors or in a shady areas you may need to use artificial electrical lighting in the area 4 Secure the trampoline and enclosure against unauthorized and unsupervised use 5 Remove any objects from under the trampoline and enclosure 6 The owner and supervisors of the trampoline are responsible to make all users aware of practices specified in this manual 7 The trampoline enclos...

Page 3: ...you have hooked one Spring 8 into one of the V rings on the Mat 5 count exactly 24 V rings and 24 frame holes in a clockwise direction Attach a second Spring to the V ring and frame at this point Count 24 V rings and 24 frame holes in a clockwise direction and attach a third Spring Count 24 V rings and 24 frame holes in a clockwise direction and attach a fourth Spring Flip two of the leg sections ...

Page 4: ... jumping the Springs 8 must be attached as described As you attach Springs carefully count the V rings and frame holes If a V ring or hole is skipped reattach the Springs in the proper position 6 Lay the Frame Pad 6 on the frame Adjust the posi tion of the Frame Pad so that the slits of the pad are just above the holes of the socket of frame as shown Inset drawing 9 Caution Do not use the trampoli...

Page 5: ...e trampoline with the safety precautions use and instructional materials and care and maintenance instructions in this manual before using the trampoline Frame DISASSEMBLY TAKING APART To disassemble take apart the trampoline follow assembly steps 1 through 8 in reverse order Do not attempt to disasse mble any frame parts before the springs and the mat have been removed Use gloves to protect your ...

Page 6: ...together not shown 4 5 6 1 Enclosure Assembly V ring Jump mat 7 2 Warning label Opening of the enclosure Inspect the attachments of the enclosure Netting to the trampoline mat bed Make certain each of the V rings on the trampoline mat bed is threaded through the corresponding buttonhole in the Netting Be sure to place the door opening in the enclosure net ting so it is centered in between the two ...

Page 7: ... 1 with a nut inside as shown A Insert the pole cap 1 though one strap ring on the top edge of the enclosure mesh 7 as shown in Inset Drawing B Make sure the Hexagon hole side of the cap is against the mesh and the holes on both the strap ring and the caps are aligned Hold the pole cap close to a curved tube 6 with foam as shown in Inset Drawing C Insert the curved tube 6 into the pole cap Make su...

Page 8: ...l secure the enclosure poles to the frame of the trampoline Start from the enclosure door lift one of the poles assembled in Step 1 see the insert drawing Insert the Straight Tube 5 into the top hole of the Square Socket on trampoline frame as shown Make sure the bent side of the enclosure poles are facing toward the center of the trampoline Note The end of the straight tubes 5 are sharp Use cauti...

Page 9: ...mbled put together Make sure that all parts are securely attached Familiarize yourself and all users with the trampoline and enclosure with the safety precautions use and instructional materials and care and mainte nance instructions in this manual before using the trampoline and enclosure 8 Insert the end cap 3 into the bottom hole of the Socket Insert end cap 3 into end of Socket 3 socket ...

Page 10: ...me padding netting enclosure tubes or foam sleeves punctures frays tears or holes worn in the mat frame padding netting or foam sleeves deterioration in the stitching or fabric of the mat frame padding or netting ruptured or missing springs bent or broken frame leg or enclosure tubes sagging bed or netting sharp protrusions on the frame suspension system or enclosure tubes If any of these conditio...

Page 11: ...p us assist you please provide the following information when calling the MODEL of the trampoline see the front cover of this manual the KEY NUMBER and DESCRIPTION of the part see the PART LIST above the quantity needed the desired method of shipping 6 5 8 3 4 1 2 3 Key No Qty Description 1 6 Top Tube with T joint 2 6 Top Tube with Socket 3 12 Leg extension 4 6 Brace 6 1 Frame Pad Key No Qty Descr...

Page 12: ... DESCRIPTION of the part see the PART LIST above the quantity needed the desired method of shipping 23 EXPLODED DRAWING AND PARTS LIST FOR ENCLOSURE y e K y e K n o i t p i r c s e D y t Q o N n o i t p i r c s e D y t Q o N e b u T d e v r u C 6 7 M5x50mm Bolt 6 2 m a o F 12 8 w 1 spare parts e r c S g n i p p a t f l e S 7 4 e b u T t h g i a r t S 6 5 l a u n a M s r e s U 1 1 6 Mesh with strap...

Reviews: