background image

22

All Rights Reserved. 

Sky

Vue

®

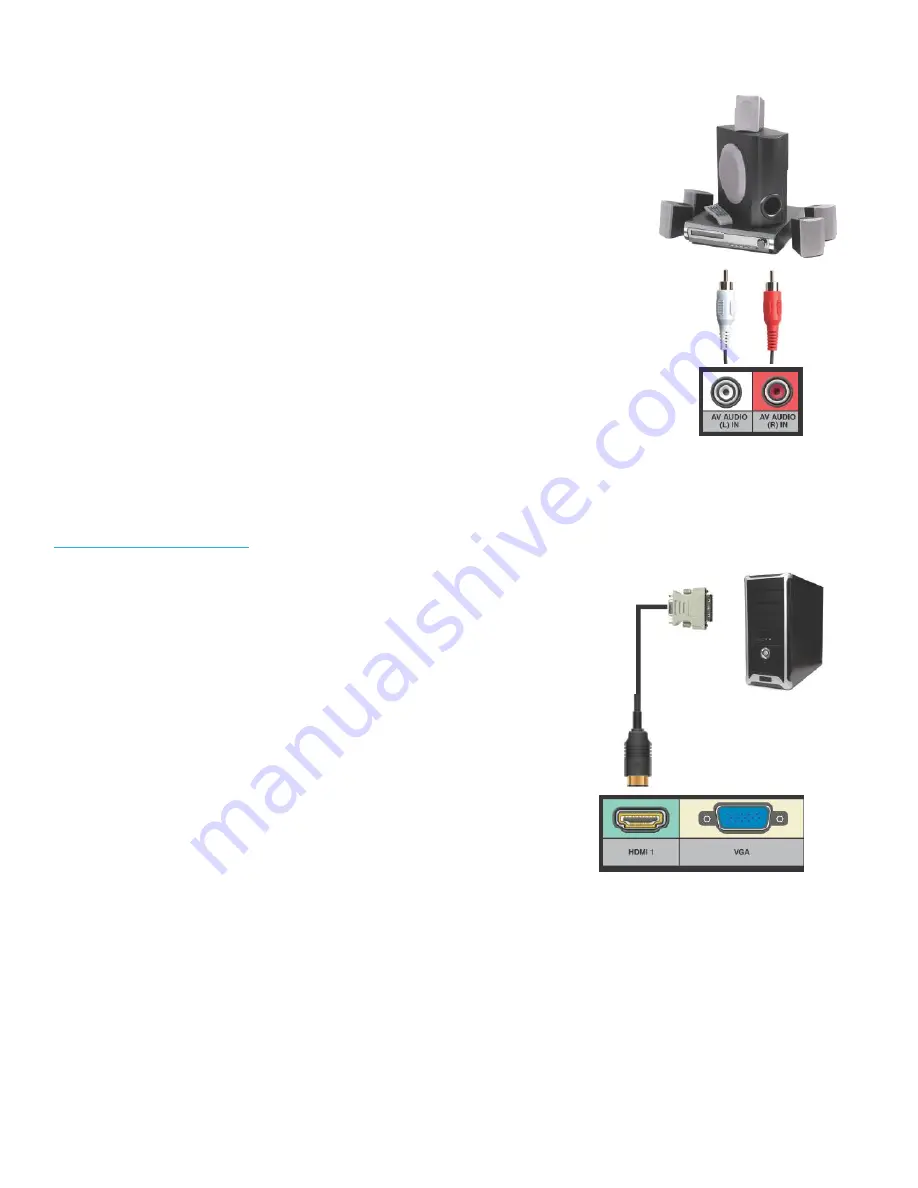
Connecting with RCA Audio Analog 

(For use when Skyvue Speakerbar is not in use)

1.  Make sure the power of the TV and your receiver is turned off.

2.  Obtain a 3.5mm stereo/audio cable (if your amplifier audio connection re-

quires RCA audio out jacks you will need to obtain an 1/8” Stereo Mini Plug 
to RCA adapter cable). Connect it to your receiver’s audio input  
connection and the 3.5mm stereo/audio connection on the Analog Audio 
port on the back of the TV.

3.  Turn on the TV and your receiver.

Please Note :
1.  If you want pure digital stream for your receiver to decode, you must also configure 

the TV’s OSD Sound- >Digital Audio Out function. Make sure the option is on Bit 

Stream.

2.  If your receiver is making static noises when receiving Bit
3.  Stream, you must use the PCM option instead.
4.  Refer to the receiver’s manual to make sure the receiver is configured to receive sig-

nals correctly from the TV.

Connecting to a PC

Connecting with DVI Digital (Best Option)

1.  Make sure the power of the TV and your receiver is turned off.

2.  Obtain a HDMI to DVI conversion cable; connect the DVI side of the 

conversion cable to the DVI output of your PC, and the HDMI side of 
the conversion cable to the HDMI port off the back of TV.

3.  Obtain a 3.5 mm Mini-jack, connect to the audio out of your PC and 

the other end to the VGA Stereo Input Port.

4.  Turn on the power to the TV and the PC.

5.  From the remote control’s input button, or the input button from the 

TVs panel, switch to HDMI.

Please Note :
1.  For the best picture, set your PC resolution to 1920 x 1080 at 60 Hz. Refer 

to the PC or graphic card manual for further instructions on how to set your 

resolution and refresh rate.

2.  Refer to your PC manual for video output requirements of the video card.
3.  The TV will turn off automatically if there’s no signal present for more than 15 minutes.
4.  If HDMI 1 is already occupied, use HDMI 3 as your connection port, and switch source to HDMI 3.

Located on Back of TV

Located on Back of TV

Summary of Contents for C-OBX-6573-P

Page 1: ...Owner s Manual Weatherproof Televisions IMPORTANT Please read this owners manual before starting or operating the equipment C OBX 6573 P MODEL...

Page 2: ......

Page 3: ...with the goals of operating with unparalleled customer service and extensive research and development Upon extensive research of national competition we realized that yet all outdoor television manuf...

Page 4: ......

Page 5: ...e accompanying the product CAUTION RISK OF ELECTRIC SHOCK DO NOT OPEN CAUTION TO REDUCE THE RISK OF ELECTRIC SHOCK DO NOT REMOVE COVER OR BACK NO USER SERVICEABLE PARTS INSIDE REFER SERVICING TO QUALI...

Page 6: ...ed operation Wireless Radio For product available in the USA Canada market only channel 1 11 can be operated Selection of other channels is not possible This device is going to be operated in 5 15 5 2...

Page 7: ...for long periods of time 13 Refer all servicing to qualified service personnel Servicing is required when the apparatus has been damaged in any way such as power supply cord or plug is damaged does n...

Page 8: ...cause the cabinet to deform and cause the paint to peel off LC 60LE632U 70LE732U E 01 indd 4 2011 02 21 15 45 56 2012 SKYVUE 6 2012 SKYVUE 6 IMPORTANT SAFETY INSTRUCTIONS Outdoor Antenna Grounding If...

Page 9: ...facturer s recommendations for the safe installation and use of your flat panel display Carefully read and understand all enclosed instructions for proper use of this product Don t allow children to c...

Page 10: ...e SkyVue Outdoor TV s will resist water exposure from normal rain sprinklers garden hoses etc however it is not designed to withstand pressure washers high pressure water jets hurricane type weather o...

Page 11: ...SD Functions 26 On Screen Display Menu 27 Channel Menu 27 Picture Menu 27 Audio Menu 27 Time Menu 28 Setup Menu 28 Lock Menu 28 Adjusting On Screen Displays Channel Menu 29 Adjusting On Screen Display...

Page 12: ...play guide for ca Up Arrow Push to move m Left Arrow Push to move m Right Arrow Push to move Menu Push to access the televisio Exit Push to exit current me Vol Push these to increase or d CC Push to d...

Page 13: ...connectors 1 The Internal Component Source is inside the Component Cover located on the back of the unit 2 Loosen the 6 thumbscrews located on the back cover of your SkyVue TV and slide the cover towa...

Page 14: ...also can accept a HDCP video device for video or PC for monitor display usage Use the SOURCE button to select HDMI2 on your MAIN SOURCE to view this connection Please note when using HDMI your sound...

Page 15: ...posite video is not as accurate as component video 11 Composite Audio In Used in accompanyment with composite Video and component video jacks AV audio in L R delivers analog sound from gaming consoles...

Page 16: ...Satellite Box HDCP devices Skyvue Speakerbar Composite non HD 480i Only Non High Definition Cable or Satellite Box VCR Older Game Consoles Camcorder Cable Name Cable End Images HDMI or HDMI DVI Coaxi...

Page 17: ...proper screw removal 2 Position the Speaker bar in place and secure with the same 4 8 32 screws that were removed in step 1 3 Screw securely 4 Loosen the 3 latches and open the Component Cover Take t...

Page 18: ...16 All Rights Reserved SkyVue Figure 2 Figure 3 Figure 4 Figure 5 Remove for Speakerbar Do Not Remove Figure 1 Installation Mounting Notes...

Page 19: ...e or Antenna through VCR 1 Make sure the power of the TV is turned off 2 Make sure there is an antenna or cable connection to the VCR already 3 Use a Coaxial RF cable and connect from your VCR s Anten...

Page 20: ...ayer is turned off 2 With a Component Cable connect the green connector to the DVD Blu ray player and Component green connector port on the TV 3 Connect the blue color connector to your DVD Blu ray pl...

Page 21: ...lu ray player s manual to make sure the DVD Blu ray player is configured to output correctly to the TV 2 This TV will turn off automatically if there s no signal present for more than 15 minutes Conne...

Page 22: ...d Component red connector port off the back of your TV to the right side of your green blue red component connection 7 Turn on the TV and your set top box 8 Use the remote control s input button or th...

Page 23: ...nnecting to an External Amplifier or Amplified Speakers Connecting with Digital Coax Best Option 1 Make sure the power of the TV and your receiver is turned off 2 Obtain a Coaxial SPDIF cable connect...

Page 24: ...ig nals correctly from the TV Connecting to a PC Connecting with DVI Digital Best Option 1 Make sure the power of the TV and your receiver is turned off 2 Obtain a HDMI to DVI conversion cable connect...

Page 25: ...ut port 4 Turn on the power of the TV and your PC 5 Use the remote control s input button or the input button the TV to switch to VGA Please Note 1 For the best results please set your PC resolution t...

Page 26: ...logo Front Panel Lights and Sensors INPUT This button switches between the different sources of the TV When the On Screen Display OSD is active this button acts as the enter button and confirms the me...

Page 27: ...p or down in channel numbers Numbers Push these to enter channel numbers and passwords Sleep Push to activate the sleep timer For use with Streaming Stick Devices Home Push to directly access apps men...

Page 28: ...s the OSD by going to the previous level of the OSD This button exits the OSD entirely Via the TV Panel Buttons Adjusting the On Screen Display from the TV Panel Buttons CH This button changes the cha...

Page 29: ...t on the TV s side panel or Input button on the Remote Control Press TV from the Input Select option Channel Menu This menu manages Channel functions including Air Cable Channel Label Auto Scan DTV Si...

Page 30: ...setting Setup Menu This menu manages Setup functions including Lock Menu This menu manages Lock functions including System Lock Change Password Hotel Mode Input Block Menu Language Transparency menu C...

Page 31: ...le Auto Scan Press the buttons to highlight the Air Cable adjustment Press the button to begin the Auto Scan process A screen will appear with the message Are You Sure You Want to Auto Scan Press the...

Page 32: ...nel number for which you wish to change the Channel Label or view the signal strength on the DTV Signal meter Channel Label Press the buttons to highlight the Channel Label adjustment Press the button...

Page 33: ...o highlight Contrast adjustment then use to adjust contrast This adjustment is available only when Personal picture mode is selected Brightness Press the buttons to highlight Brightness adjustment the...

Page 34: ...Backlight Press the buttons to highlight Backlight adjustment then use to adjust backlight brightness Dynamic Light Control Press button when you are at the bottom of the Picture menu to highlight DL...

Page 35: ...s available only when Personal sound mode is selected 1 5 kHz Press the buttons to highlight 1 5 kHz then use to adjust the 1 5 kHz upper midrange audio band This adjustment is available only when Per...

Page 36: ...d audio system can decode Dolby Digital This function operates only when TV is selected as the source Surround Sound Press the buttons to highlight the Surround Sound adjustment then use to switch the...

Page 37: ...ghlight the Auto Sync adjustment then use to turn auto sync on and off Auto sync automatically sets the time on your TV based on information from TV signals Clock setting and DST adjustments are not a...

Page 38: ...se to select to what degree the picture shows through the on screen menus 0 25 50 75 or 100 At 0 none of the underlying picture will show through the menus Restore Default Press the buttons to highlig...

Page 39: ...nd size font color and background color then use to adjust these options Setup Wizard Press the buttons to highlight Setup Wizard then use to start the Setup Wizard You will see the first of four subm...

Page 40: ...to highlight the HDMI Mode adjustment then use to select Video or PC HDMI mode The PC mode shows every pixel in the image The Video mode crops off a few percent of the image on each size and zooms th...

Page 41: ...uctions below Enter Password You will have to enter the TV s password to turn the System Lock feature on and off Use the numeric keypad on the remote to enter the password The default password is 0000...

Page 42: ...enu cont Input Block To use the Input Block function you must enter the Input Block submenu shown at left After activating System Lock Mode press the buttons to highlight the different inputs in the s...

Page 43: ...the Input button on the remote or on the side control panel of the TV then press buttons to highlight USB Now press to select the USB input The main USB menu seen below left will appear Selecting the...

Page 44: ...image The image will appear along with a text screen that shows data about the image Note that the image will not fill the screen Listening to Music from the USB Stick Use to highlight the song you wa...

Page 45: ...s remote sensor is housed in the same place as the power indicator light Make sure there is line of sight from the remote control s first sensor to the remote sensor of the TV Cannot receive sufficie...

Page 46: ...Blu ray player digital satellite or digital cable box Standard 480i TV programs will be noticeably inferior to HD quality Some pixels are always displaying the same color SkyVue Outdoor TV s LED scree...

Page 47: ...e ordered from SkyVue Outdoor TV When the TV is not in use keep it covered with a Deluxe SkyVue Outdoor TV Cover When the unit is not being used the SkyVue team strongly recommends using the all weath...

Page 48: ...Coaxial SPDIF Audio Out VGA PC In Analog RGB PC In 15 pin mini D sub female connector HDMI1 HDMI HDMI2 HDMI MHL HDMI3 HDMI AV In Video Y Audio L W Audio R R AV Audio Out Audio L W Audio R R Available...

Page 49: ...t appear bright and unchanged in size when a LED TV screen displays a black pattern Dark dots are dots that appear dark and unchanged in size when a LED TV screen displays a pure red green or blue pat...

Page 50: ...0 55 FF 09 F6 DVR List A0 F0 55 FF 57 A8 Play Pause A0 F0 55 FF 16 E9 Fast Reverse A0 F0 55 FF 47 B8 Fast Forward A0 F0 55 FF 13 EC Stop A0 F0 55 FF 12 ED Record A0 F0 55 FF 48 B7 USB A0 F0 55 FF 4D B...

Page 51: ...0 F0 55 FF 4B B4 Zoom A0 F0 55 FF 51 AE Surround A0 F0 55 FF C7 38 Sound Mode A0 F0 55 FF 5B A4 Captions A0 F0 55 FF 59 A6 VOL 25 A0 F0 55 FF 21 dE VOL 50 A0 F0 55 FF 22 dD VOL 75 A0 F0 55 FF 23 dC VO...

Page 52: ......

Reviews: