14
Aligning the Red Dot Finder
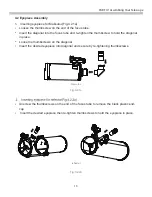
Please open the battery cover and remove the insulation sheet.
PART V: Operating Your Telescope
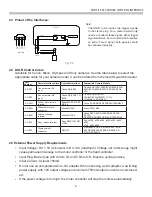
Fig.5.1
5.1 Using the Red Dot Finder
Altitude
Adjustment
Control
Battery
cover
insulation
sheet
Sight Tube
Azimuth
adjustment
control
ON/OFF
Brightness
Control
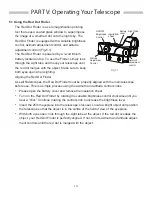
The Red Dot Finder is a zero magnification pointing
tool that uses a coated glass window to superimpose
the image of a small red dot onto the night sky. The
Red Dot Finder is equipped with a variable brightness
control, azimuth adjustment control, and altitude
adjustment control (Fig.5.1).
The Red Dot Finder is powered by a 3-volt lithium
battery located on top. To use the Finder, simply look
through the sight tube and move your telescope until
the red dot merges with the object. Make sure to keep
both eyes open when sighting.
Turn on the Red Dot Finder by rotating the variable brightness control clockwise until you
hear a “click”. Continue rotating the control knob to increase the brightness level.
Like all finderscopes, the Red Dot Finder must be properly aligned with the main telescope
before use. This is a simple process using the azimuth and altitude control knobs.
Insert the 25mm eyepiece into the telescope’s focuser. Locate a bright object and position
the telescope so that the object is in the centre of the field of view of the eyepiece.
With both eyes open, look through the sight tube at the object. If the red dot overlaps the
object, your Red Dot Finder is perfectly aligned. If not, turn its azimuth and altitude adjust-
ment controls until the red dot is merged with the object.


