background image


8 | ANOA EX+ User Manual 


Copyright owned by Skutis Corporation Pte. Ltd.


Important 


*

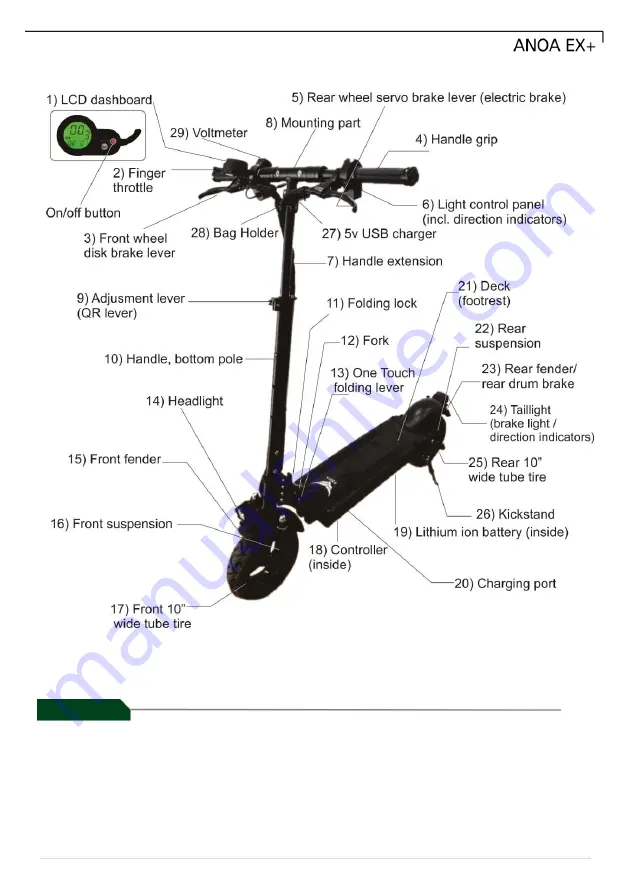
To start your skutis put the ignition key into the keyhole, turn the key to the right 

side until the voltmeter is on and now push the on/off button for 3 seconds until 

your LCD is on too. 


Summary of Contents for Anoa EX+

Page 1: ...UserManual Revolutionizing Your Personal Mobility ...

Page 2: ...0 kg It inhabits mainly the mountains and lowland rainforest of Sulawesi Indonesia It matches the power colour and uniqueness of the ANOA skutis brand Company Introduction Skutis Corporation SC is one of the leading distributors for e scooters skutis and accessories in Southeast Asia as well as the first skutis manufacturer in Indonesia Under the Skutis Tours brand SC is also organizing guided sku...

Page 3: ...t Components 7 How to use the Anoa Ex 9 1 How to assemble 9 2 How to unfold your skutis 10 3 How to fold your skutis 11 4 How to charge your skutis 12 5 Memo space 14 6 Checklist before using your skutis 15 7 How to start your skutis 17 8 How to stop your skutis 18 9 How to control the dashboard P settings 19 Maintenance 21 Technical Specifications 25 Maintenance Record 26 ...

Page 4: ...system This can cause malfunction or fire In such a case damages will not be reimbursed even during the warranty period 4 Wear safety equipment and abide by the local road traffic law All vehicles involve risks and require certain safety measures Make sure to wear a helmet and further protective gear e g knee and elbow protection and follow the local road traffic law 5 For safety reasons beginners...

Page 5: ...r skutis with the dedicated charger provided A non compliant charger will damage the circuit or battery Such damages will not be reimbursed even during warranty period 16 If your skutis was flooded disconnect it from the power supply inside the battery box and do not try to charge it Your maintenance provider will need to check the skutis for you Note that water damage is not covered by any warran...

Page 6: ...ttery s lifetime and capacity might get reduced 6 If the battery protection circuit is damaged the battery emits an unusual smell or the battery leaks contact an authorized service center immediately and get technical support 7 Keep the lithium ion battery in a safe place out of the reach of children and pets 8 Do not reverse the polarity of the battery This may lead to a short circuit 9 Connectin...

Page 7: ...u must stop charging and using the product immediately In such a case move the product outdoors as quick as possible and use a fire extinguisher to extinguish any fire Do not use water to extinguish fire on the product since this can create additional danger Battery maintenance in summer 1 Avoid rain or wet roads The battery and core components may get damaged by flooding or strong water splashing...

Page 8: ...Set only occasionally included After your skutis is assembled Check your product serial number After your skutis is unpacked note the serial number and keep it to recognize your personal ANOA easily In case your ANOA gets stolen the serial number might help you to get it back Please check if all the components listed above are inside your box immediately If you need assistance assembling the produ...

Page 9: ... owned by Skutis Corporation Pte Ltd Important To start your skutis put the ignition key into the keyhole turn the key to the right side until the voltmeter is on and now push the on off button for 3 seconds until your LCD is on too ...

Page 10: ...y load when you lift your skutis only by grabbing the handlebar Always have at least one hand under the whole skutis body 2 Installation of LCD 1 The LCD is not attached to the product at first 2 Use an Allen key inside the dotted circle to release the screws 3 Adjust the position of the LCD as shown in the picture Make sure that there is sufficient space between the finger throttle and the front ...

Page 11: ...nlock the height adjustment lever QR lever and use one finger to push the metal ball inside the height adjustment hole into the front stem Now you can choose between two different heights After you chose your favorite height the QR lever must be locked and the metal ball must be fixed in one of the height adjustment holes again 3 Unfold the Handlebar To unfold the handlebar raise it in the directi...

Page 12: ...n the picture push the small metal ball stopper inside the front bar while pushing the handlebar down 1 Handlebar Folding Opening of Folding Lock Fold the handlebar first To fold the handlebar put your first hand on the end of the handle bar grip and use the second hand to push the automatic handlebar locking mechanism in the direction of your first hand Now push the respective handle bar down and...

Page 13: ...lly charged or your charger is not properly connected to either your skutis or to the power socket 3 Make sure to close the charging port cap before riding or storing your skutis Only open it for charging purposes Never let the charging port get in touch with any kind of liquid 4 When connecting the charger to the charging port metallic sparks due to the voltage difference may occur but this is no...

Page 14: ... in places with high humidity or flammable materials 6 Do not modify the charger 7 A charger failure may cause fire while charging Hence you should disconnect the charger before you leave the charging place for a long time 8 If the charging process is not completed after a long time e g more than 14 hours do not continue using the charger and contact an authorized service center 9 Children may onl...

Page 15: ...14 ANOA EX User Manual Copyright owned by Skutis Corporation Pte Ltd MEMO ...

Page 16: ...ackwards While Riding Downhill If you accelerate while riding downhill the braking distance might become too long which causes danger If you are riding downhill for a very long distance the brakes may overheat and stop working properly For these reasons you should not accelerate while riding downhill To avoid turning over the front you should lean a bit backwards while braking and focus on using t...

Page 17: ...y loosen due to vibration from continuous riding If you lost any part stop riding immediately and replace the part or visit the nearest authorized service center 7 Check Whether the QR Levers Are Fixed Before Riding Make sure that the QR levers are correctly fixed as shown in the picture before riding If any QR lever is loose the front bar may suddenly fold while riding which may lead to an accide...

Page 18: ...tton to switch between mode 1 2 and 3 fastest To confirm press the power button once again 3 Correct Riding Position After pivoting the kickstand up find a stable position on the deck and hold the handle grip comfortably with both hands You need to figure out if you prefer having your left or right foot in the front 4 Acceleration and Deceleration Accelerate by using the throttle of the LCD after ...

Page 19: ...forget to lean backwards and to bend your knees a bit 3 Regenerative Electric Drum Brake System Use the LCD settings to choose the strength of your electric drum brake system or whether you would like to switch it off default switched on with full strength The electric brake is applied by using the rear brake left lever which increases the braking power and recharges your battery 4 Check Your Brak...

Page 20: ...ily differ to the actual speed When speed mode 3 high speed is selected during acceleration the speed displayed on the LCD may temporarily differ to the actual speed 2 How to Change the Detailed LCD P Settings 1 Changing Speed and LCD Modes Change the speed mode while the LCD is on To display the current speed mode press The number for the speed mode will start blinking Then press multiple times t...

Page 21: ...ry consumption Starting the cruise function a Activate the cruising mode through the P settings before riding as explained above b If the throttle is kept at the same acceleration for about 6 seconds the cruise mode will start automatically Deactivating the cruising function When you use the brake while the cruising mode is running the cruising mode will be automatically deactivated Caution while ...

Page 22: ...le is broken the braking mechanism might become ineffective Make sure that the bolts nuts and the various fixing parts of the brakes are not loose and that the front disc is not deformed or damaged 2 Check Tire Pressure and Condition Check the condition of the front and rear tire before each ride Try to keep the pressure at 45 PSI optimum and make sure there are no signs of wear or puncture When t...

Page 23: ...riodic inspection and maintenance is required As with all machines this product may fail due to a number of factors The durability of each part may differ depending on riding habits Brake cables and other cables as well as forks or brackets can be worn off or bent depending on the riding style and environment As the deterioration of parts often is not visible it is highly recommended to visit an a...

Page 24: ...on key Allen key to unscrew the brake arm mounting bolt slightly Lift the brake arm so that the brake cable space narrows This will make your brake stronger 2 How to Adjust the Rear Brake Hold the end of the wire with long nose pliers as shown in the picture Now turn the brake adjusting nut clockwise with a wrench to make the brake stronger Attention If the nut is turned too much the brake pad may...

Page 25: ...ighten or loosen the handlebar folding mechanism as shown in the picture If the green circled screw see left picture below sticks out more the handle bar will be more stable 4 How to Adjust the Folding Lock Fixing Lever When the 10mm tension adjusting nut 1 is loose the folding lock 2 of the folding part may become loose too As a result the locking part of the lever may get released automatically ...

Page 26: ...ed handle width 13 5cm LCD Finger throttle LCD dashboard Power ON OFF Battery level voltage trip ODO riding time riding speed and mode change function Brake System Front Disc brake Rear Mechanical expandable drum brake electric brake can be switched off Electric brake charges battery automatically Suspension Front and rear dual spring suspension Light High brightness headlight taillight Taillight ...

Page 27: ...tis and to keep its market value higher we recommend recording all maintenance work that was done on your skutis Please ask your qualified maintenance service provider to fill out the maintenance record table below Model Serial Number Date of Purchase Owner Maintenance Data Date of Service Service Provider Service Description ...

Page 28: ...27 ANOA EX User Manual Copyright owned by Skutis Corporation Pte Ltd Maintenance Record Model Serial Number Date of Purchase Owner Maintenance Data Date of Service Service Provider Service description ...

Page 29: ...28 ANOA EX User Manual Copyright owned by Skutis Corporation Pte Ltd Maintenance Record Model Serial Number Date of Purchase Owner Maintenance Data Date of Service Service Provider Service Description ...

Page 30: ...29 ANOA EX User Manual Copyright owned by Skutis Corporation Pte Ltd Be Part of the Revolution Skutis Corporation Pte Ltd info skutis co ...

Reviews: