


23
0°-45°
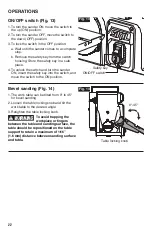
Surface sanding on the sanding
belt (Fig. 15a & 15b)
WARNING
To avoid injury from slips,
jams, or thrown pieces,
adjust the work support to clear the sand-
ing surface by no more than 1/16” (1.6 mm).
When checking clearance between the belt
and work support, press the belt flat against
the metal beneath it.
1. Hold the work piece firmly with both hands,
keeping fingers away from the sanding belt
(Fig. 15a).
2. Keep the end closely against the work
support and move the workpiece evenly
across the sanding belt. Use extra caution
when sanding very thin pieces.
3. Apply only enough pressure to allow the
sanding belt to remove some material.
4. When sanding long pieces, remove the work
support (Fig. 15b).
WARNING
The sanding belt is de-
signed to rotate down
towards the table. Avoid kickback by feeding
workpieces against the direction of rotation of
the sanding belt.
End sanding on the sanding belt
(Fig. 16)
1. It is more convenient to sand the ends of
long workpieces with the sanding belt in a
vertical position.
2. Move the work evenly across the sanding
belt. For accuracy, use the miter guide.
WARNING
To avoid trapping the
workpiece or fingers
between the table and sanding surface, the
table edge should be no more than 1/16"
(1.6 mm) from sanding surface.
Note: The belt/disc sander can sand both
vertically and horizontally. Depending on the
workpiece, use the work support for horizontal
sanding operations and use the work table for vertical sanding operations.
Fig. 15a
Fig. 15b
Fig. 16


