


18
Installing the sanding belt
(Fig. 5 & 6)
WARNING
To avoid injury from
accidental start, turn the
switch ‘OFF’ and remove the safety key, and
remove the plug from power source outlet
before removing or installing belt.
Ensure the work support is removed from belt
bed. Place belt bed at 45 degrees angle to
facilitate belt changing (see "Auxiliary mounting
for vertical sanding" for belt bed adjustment).
On the smooth (back) side of the sanding belt,
you will find ‘directional arrows’. The sanding
belt must run in the direction of these arrows,
so that the splice does not come apart.
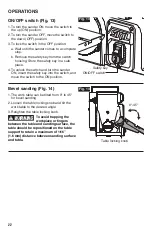
1. Pull the tension lever out to release the belt
tension (Fig. 5).
2. Place the sanding belt over the drums
with the directional arrows pointing
counterclockwise (Fig. 6). Make sure the belt
is centered on both drums.
3. Push the tension lever back into place to
apply belt tension.
WARNING
To avoid injury, use 4” x 36”
(10.2 cm x 91.4 cm) abra-
sive belts only.
Fig. 6
Fig. 5
Tension lever


