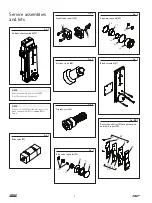
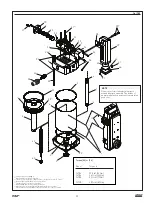
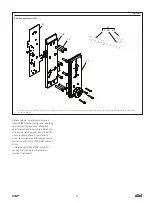
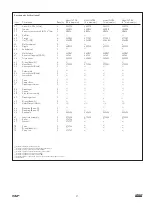

Cylinder tube and
muffler
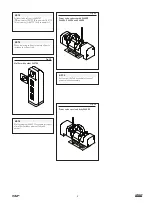
1
Remove air brakes subassembly
(
Air brake subassembly
,
page 7
)
2
Remove two screws (
30
) and pull off
muffler (
29
)
3
Remove gasket (
28
)
4
Remove four nuts (
26
)
5
Lift upward and remove
upper casting (
8
)
6
Remove four tie rods (
25
)
7
Remove air tube (
7
)
8
Lift upward and remove cylinder tube (
6
)
9
Remove piston and piston rod (
5
)
10
Remove four connecting rods (
41
)
11
Reverse procedure to reassemble
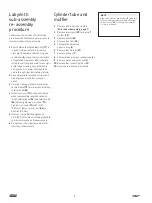
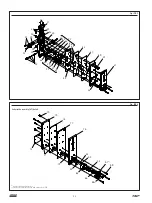
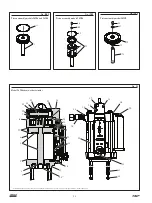
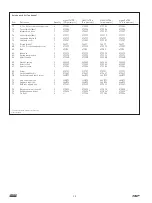
Labyrinth
sub-assembly
re-assembly
procedure
Follow reverse directions of disassembly
procedure with the following precautions to
reassemle labyrinth subassembly:
1
Ensure plastic laminated labyrinth (
77
) is
in good condition before re-assembly
Clear plastic laminate should be in good
condition without any tears or indications
of separation from brass labyrinth plate
inside Inspect labyrinth plate for any signs
of blockage including, but not limited to,
dirt, grease, oil or water that should be
visible through clear laminating material
2
Keep all labyrinth components clean and
free of grease, oil and dirt, except as
noted
3
Very light coating of grease may be used
to retain balls (
79
) in place when installing
selector knob (
84
)
4
Install six screws (
73
) but do not tighten
when reassembling labyrinth sandwich
Install selector knob (
84
) and selector bolt
(
86
) before tightening six screws (
73
)
Tighten six screws (
73
) to 12 in lbf
(1,4 Nm)
Tighten selector bolt (
86
) to
50 in lbf
(5,6 Nm)
5
Use four screws (
80
) and tighten to
12 in lbf
(1,4 Nm)
when installing labyrinth
sub-assembly onto air brake assembly
6
Do not cut or trim clear laminate plastic
from labyrinth assembly
NOTE
Align two holes on cylinder tube (
6
) with two
holes on air brake subassembly before tight-
ening tie rods (
25
) so that proper seal with
o-rings is achieved
8


