background image

4

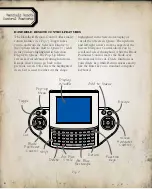
The Handheld Remote Control offers many 
robust features (see 

Fig. 1

) . Toggle takes 

you to and from the Selection Display to 
the Options Menu . Add to Queue (+) adds 
items you have highlighted in Selection 
Display to Queue. The Pop-Up Menu 
reveals several advanced cutting functions . 
Escape allows you to go back to the 
previous screen . OK selects the highlighted 
item . Cut is used to either cut the shape 

highlighted in the Selection Display or 
cut all the objects in Queue . The up/down 
and left/right arrows work as expected; the 
Screen Navigator Control allows you to 
scroll and select throughout, while the Blade 
Positioner Control moves the blade over 
the material to be cut . Delete functions as 
your delete key, while Return works exactly 
like the Enter key on a standard computer 
keyboard .

Blade 

Positioner

Control

Delete

Alt Blue

Rectangle

Screen 

Navigator

Control

Function 

Keys

Add to Queue

Display 

Window

Pop-Up 

Menu

Toggle

Escape

Return

Alt Pink 

Circle

Shift

Fig. 1

Cut

HANDHELD REMOTE CONTROL FEATURES

Summary of Contents for 657957

Page 1: ...No 7 ...

Page 2: ...iones de la Pantalla Bildschirmfunktionen Definitions 7 Définitions Definiciones Definitionen Stamp2Cut Instructions 8 Consignes Stamp2Cut Instrucciones Stamp2Cut Anweisungen Stamp2Cut Image Directory 15 Répertoire d Images Guía de Imágenes Bildverzeichnis Contact Information 38 Contacts Información de Contacto Kontaktinformationen Warranty Information 39 Informations sur Garantie Información de G...

Page 3: ...de función Funktionstasten KEYPAD Clavier Teclado Tastatur MAIN DISPLAY Affichage principal Panel Principal Hauptanzeige OPTIONS MENU Menu Options Menú opciones Menü Optionen POP UP MENU Menu éclair Menú de ventana emergente Pop Up Menü QUEUE DISPLAY Affichage file d attente Panel de la cola Anzeige der warteschlange RETURN Retour Retorno Eingabetaste SCREEN NAVIGATOR CONTROL Contrôle de Navigateu...

Page 4: ...hlighted in the Selection Display or cut all the objects in Queue The up down and left right arrows work as expected the Screen Navigator Control allows you to scroll and select throughout while the Blade Positioner Control moves the blade over the material to be cut Delete functions as your delete key while Return works exactly like the Enter key on a standard computer keyboard Blade Positioner C...

Page 5: ...Cortar se utiliza para cortar la forma resaltada en el panel de selección o para cortar todos los objetos que están en la cola Las flechas arriba abajo e izquierda derecha le permiten moverse hacia las respectivas direcciones control de navegador de pantalla le permite desplazarse y realizar selecciones y control de posicionador de hoja mueve la hoja por el material que se va a cortar Borrar funci...

Page 6: ...ci dessous Chaque fonction d affichage vous guide facilement au fil de la procédure de découpage de forme voir page 4 Funciones de la Pantalla Una vez insertado el cartucho y encendido por primera vez el conjunto le indicará cómo configurar los valores predeterminados A partir de ahí verá muchas opciones diferentes en su pantalla véase la Figura 2 a continuación Cada función de la pantalla lo guía...

Page 7: ...a fuente o forma en la que se han eliminado las líneas interiores Definitionen Bitte beachten Sie dass nicht alle Designs alle hier aufgeführten Merkmale enthalten Original Nicht dekorierte Form oder Schriftart Stücke Alle Teile die eine Form ausmachen Schattiert Der Schnitt erstreckt sich 2 mm über die Originalform oder schriftart wobei die inneren Linien entfernt werden Gefüllt Silhuette der For...

Page 8: ...ce if necessary 4 Remove template The top left registration mark must be at least 1 2 1 27cm below the top line on Cutting Mat Feed mat under rollers of eclips Machine 5 Find the stamp image on the eclips cartridge The stamps are organized into sets see the template for the set number Scroll through the set folder with the Screen Navigator Control Once you ve found your set number press Setup Spac...

Page 9: ...additional stamped images by following these steps in order Find the set folder Select image Press Setup Space P R to cut the shape Repeat steps 7 8 from above Features Available Solid option Use Setup Space P R to move to the Options Menu Highlight Solid option and press Setup Space P R Follow steps 7 and 8 above Shadow option Use Setup Space P R to move to the Options Menu Highlight Shadow optio...

Page 10: ... R Pour localiser rapidement et de façon précise les marques de repère déplacez le laser sur le point fait au stylo ou le trou pratiqué avec le Pic de Poinçon La lumière du laser sera estompée et plus petite lorsque la marque de repère sera localisée 8 Appuyez sur Setup Space P R pour découper la forme Maintenant que la fonction Stamp2Cut est activée vous pouvez découper des images estampées suppl...

Page 11: ...erda e inferior derecha de la plantilla Si fuera necesario use adhesivo reubicable para sostener la plantilla en el lugar 4 Quite la plantilla La marca de registro superior izquierda tiene que estar al menos 1 2 1 27cm por debajo de la línea superior de laTabla de Corte Coloque el material de la tabla debajo de los rodillos de la máquina de eclips 5 Busque la imagen del sello en el cartucho de ecl...

Page 12: ...ita los pasos 7 8 anteriores Características disponibles Opción sólida use el para pasar al Menú de Opciones Options Menu Resalte la opción Sólido Solid y pulse el Setup Space P R Siga los pasos 7 y 8 anteriores Opción Sombra use el para pasar al Menú de Opciones Options Menu Resalte la opción Sombra Shadow y pulse el Setup Space P R Siga los pasos 7 y 8 anteriores Opción de piezas si estuviera di...

Page 13: ...lage stechen Sie mit dem Sizzix Stanzpick ein Loch in die Mitte des schwarzen Punktes auf den Registrationsmarken in der oberen linken und oberen rechten Ecke derVorlage Fixieren Sie dieVorlage bei Bedarf mit einem abziehbaren Klebeband 4 Entfernen Sie dieVorlage Die linke obere Registrationsmarke muss mindestens 1 27 cm unter der oberen Linie der Schnittunterlage platziert werden Schieben Sie die...

Page 14: ...die Schritte 7 bis 8 oben Verfügbare Funktionen Option Ausgefüllt Drücken Sie auf Setup Space P R um zum Optionsmenü zu gehen Markieren Sie die Option Ausgefüllt und drücken Sie auf Setup Space P R Wiederholen Sie die Schritte 7 und 8 Option Schatten Drücken Sie auf Setup Space P R um zum Optionsmenü zu gehen Markieren Sie die Option Schatten und drücken Sie auf Setup Space P R Wiederholen Sie die...

Page 15: ...84 Mariposa desgastada Satz 84 Fliege im Grungestil Set 84 Rabbit 27 Ensemble 84 Lapin Conjunto 84 Conejo Satz 84 Kaninchen Set 99 Postage 1 28 Ensemble 99 Affranchissements 1 Conjunto 99 Sello postal 1 Satz 99 Briefmarke 1 Set 99 Postage 3 29 Ensemble 99 Affranchissements 3 Conjunto 99 Sello postal 3 Satz 99 Briefmarke 3 Set 99 Postage 4 30 Ensemble 99 Affranchissements 4 Conjunto 99 Sello postal...

Page 16: ...Pieces Solid Shadow Original Stamped Image sold separately 16 ...

Page 17: ...17 Pieces Solid Shadow Original Stamped Image sold separately ...

Page 18: ...Pieces Solid Shadow Original Stamped Image sold separately 18 ...

Page 19: ...19 Solid Shadow Original Stamped Image sold separately ...

Page 20: ...20 Pieces Solid Shadow Stamped Image sold separately Original ...

Page 21: ...Pieces Solid Shadow Original Stamped Image sold separately 21 ...

Page 22: ...Pieces Solid Shadow 22 Stamped Image sold separately Original ...

Page 23: ...Pieces Solid Shadow 23 Stamped Image sold separately Original ...

Page 24: ...Solid Shadow Stamped Image sold separately 24 Original ...

Page 25: ...Pieces Shadow Original Stamped Image sold separately 25 Solid ...

Page 26: ...Solid Shadow Stamped Image sold separately 26 Original Pieces ...

Page 27: ...27 Solid Shadow Original Stamped Image sold separately ...

Page 28: ...Solid Shadow Original Stamped Image sold separately 28 ...

Page 29: ...29 Solid Shadow Original Stamped Image sold separately ...

Page 30: ...30 Solid Shadow Original Stamped Image sold separately ...

Page 31: ...31 Solid Shadow Original Stamped Image sold separately ...

Page 32: ...32 Solid Shadow Original Stamped Image sold separately ...

Page 33: ...33 Solid Shadow Original Stamped Image sold separately ...

Page 34: ...34 Solid Shadow Original Stamped Image sold separately ...

Page 35: ...35 Solid Shadow Original Stamped Image sold separately ...

Page 36: ...Pieces Solid Shadow Original Stamped Image sold separately 36 ...

Page 37: ...37 ...

Page 38: ...nfrei Outside USA 949 598 8821 En dehors des états Unis Fuera de EE UU Außerhalb der USA Address 25862 Commercentre Drive Lake Forest CA 92630 8804 Adresse Dirección Adresse EUROPE Europe EUROPA EUROPA INTERNET sizzix co uk EMAIL europecustomerservices ellison com PHONE 0844 499 8181 téléPHONE TELÉFONO TELEFON Outside UK 44 0 845 345 2277 En dehors du Royaume Uni Fuera del Reino Unido Außerhalb vo...

Page 39: ...es détails s il vous plaît voir le Guide de Utilisateurs de eclips Machine de Découpage Electronique etTélécommande Portable ou visiter Sizzix com warranties Garantía Limitada de 90 días Para los detalles por favor vea la Guía de Usuarios de eclips Máquina Corte Electrónica etTelemando de Mano o visita Sizzix com warranties 90Tagesbegrenzte Garantie Für Details bitte sehen Sie Eclips elektronische...

Page 40: ...657957 sizzix com 2012 Ellison All Rights Reserved T11 0625 Printed in China Art Tim Holtz Tim Holtz is a trademark of Tim Holtz LLC Tim Holtz LLC Used under License ...

Reviews: