background image


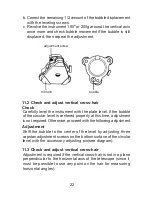
Check

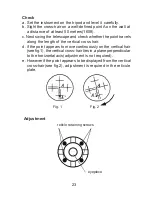
a. Set the instrument on the tripod and level it carefully. 

b. Sight the cross-hair on a well-defined point A on the wall at

    a distance of at least 50 meters(160ft).

c. Next swing the telescope and check whether the point travels

    along the length of the vertical cross hair.

d. if the point appears to move continuously on the vertical hair

    (see fig.1), the vertical cross-hair lies in a plane perpendicular

    to the horizontal axis(adjustment is not required).

e. However if the point appears to be displayed from the vertical

    cross-hair(see fig.2), adjustment is required in the reticule 

    plate.


23

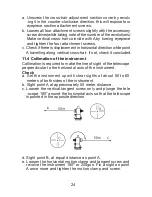
Adjustment

       Fig. 1                             Fig. 2

reticle retaining screws

eyepiece

Summary of Contents for 26-DT05

Page 1: ......

Page 2: ...rtation 3 Keep it clean Clean dust of the instrument surface with cotton wool or small brush after using the instrument Dry the instrument on time after it exposed in the rain Make sure not to use chemicals to clean battery case and plastic parts If necessary damp soft cloth is permissible High aborbent cotton and lens cleaning paper are used for exposed optics Never use handkerchief and clothes 4...

Page 3: ...data 6 1 RS 232 serial communication interface 6 2 Recording measurement data 7 Memory mode 8 Function setting 8 1 Function setting 8 2 Function setting method 8 3 Time setting 9 Vertical angle 0 error and collimation error and tilt angle compensator 0 error 10 Other function 10 1 Measuring distance 10 2 Tilt correction function 10 3 Illuminate and the timing close 11 Check and adjustment 11 1 Che...

Page 4: ...OUT 1 Nomenclature 1 13 10 4 8 11 16 12 15 14 3 6 2 7 5 9 3 ...

Page 5: ...splay window 10 eyepiece 11 base plate 12 foot screw 13 focusing knob 14 battery 15 horizontal tangent screw and motion clamp 16 base locking lever Display Function Display Function SD HD VD VA slope distance horizontal distance height difference vertical angle hold the horizontal angle HOLD m gon percent grade distance unit m angle unit 4 REP SFT HA CRN Tilt correction horizontal angle right the ...

Page 6: ... the horizontal angle repeat measurement horizontal angle turn on or off illumination select the second function switch horizontal angle right or left switch SD HD VD display percent grade of vertical angle record measurement power switch 5 4 Preparative before measurement 4 1 Level the instrument Level and center the instrument correctly to ensure the best performance ...

Page 7: ...ular level until the bubble of the circular level is located on a line perpendicular to a line running through the centers of the two leveling screw adjusted b Revolve the leveling screw 3 to shift the bubble to the center of the circular 6 4 1 4 Further leveling the instrument with plate level a Loose horizontal motion clamp and revolve the instrument By adjusting leveling screw 1 2 the plate lev...

Page 8: ... optical plummet telescope Carefully move the instrument in order to make it steady 4 1 6 Final leveling of the instrument Repeat procedure of 4 and check whether the level bubble is in the center of the level vial Finally tighter adjusting screw 4 2 Power switch on 1 Press all segments of display with light on The display shows that vertical angle should be sent to zero 2 Rotate the telescope to ...

Page 9: ...ark meanings sufficient battery power 90 100 effective battery power 50 90 effective battery power 10 50 poor battery power 0 10 need to replace battery measurement is impossible the power will be cut off in one minute 4 3 Battery power display 4 4 Change the battery 4 4 1 Removing the battery case a Press the release button of the battery case and hold it on b Pull the battery case toward your si...

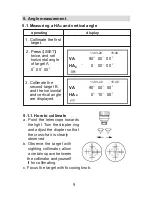
Page 10: ...03 20 15 48 11 03 20 15 48 HA R a Point the telescope towards the light Turn the diopter ring and adjust the diopter so that the cross hair is clearly observed 3 Collimate the second target B and the horizontal and vertical angle are displayed operating display 9 b Observe the target with sighting collimator allow a certain space between the collimator and yourself if for collimating c Focus the t...

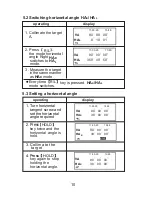
Page 11: ...sed HA HA mode switches operating display 5 2 Switching horizontal angle HA HA 5 3 Setting a horizontal angle 1 Turn horizontal tangent screw and set the horizontal angle required VA 90 00 00 R 30 00 00 2 Press VA 90 00 00 HAR 30 00 00 3 Collim ate the target 4 Press HOLD VA 90 00 00 HAR 30 00 00 11 03 20 15 48 11 03 20 15 48 11 03 20 15 48 HOLD HA HOLD key twice and the horizontal angle is hold k...

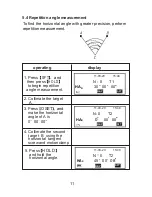
Page 12: ...Collimate the target 0 N 0 T2 HAR 0 00 00 REP SFT 11 03 20 15 48 N 0 T1 HAR 30 00 00 REP SFT 11 03 20 15 48 5 4 Repetition angle measurement 3 Press make the horizontal angle of A is 11 operating display 4 Collimate the second target B using the horizontal tangent screw and motion clamp HOLD 5 Press and hold the horizontal angle N 0 T2 HAR 45 00 08 11 03 20 15 48 REP SFT ...

Page 13: ... is OSET 0 N 1 T2 HAR 45 00 06 HOLD N 2 T1 HAR 45 00 07 SFT 8 Recollimate the second target B using the horizontal tangent screw and motion clamp 9 Press The average of angle is shown 10 Repeat 2 9 to measure the desired number of repetitions The maximum number of angle measurements that can be made is 9 Press to exit from this mode 11 03 20 15 48 REP SFT 11 03 20 15 48 REP SFT ...

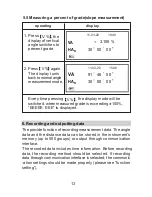
Page 14: ...mation Before recording data the recording method should be selected If recording data through communication interface is selected the communic ation settings should be made properly please see function setting 13 V V V 1 Press display of vertical angle switches to percent grade 2 Press The display turns back to normal angle measurement mode Every time pressing the display mode will be when measur...

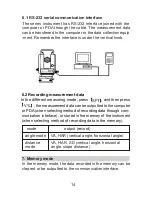
Page 15: ... record angle mode VA HAR vertical angle horizontal angle distance mode VA HAR SD vertical angle horizontal angle slope distance 6 1 RS 232 serial communication interface The series instrument has RS 232 interface joined with the computer or PDA through the cable The measurement data can be transferred to the computer or the data collection equip ment Remember the interface is under the vertical k...

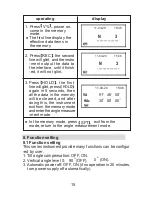
Page 16: ...ry will be cleared and after doing this the instrument exit from the memory mode and enter the angle measure ment mode VA 91 46 50 HAR 30 00 00 11 03 20 15 48 SFT In the memory mode press mode return to the angle measurement mode the first again in 5 seconds then exit from the 8 Function setting 8 1 Function setting This series instrument provide many functions can be configur ed by user 1 Tilt an...

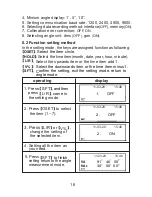
Page 17: ...em month date year hour minute Select the upwards item or the time item add 1 V Select the downwards item or the time item minus1 SFT Confirm the setting exit the setting mode return to angle mode SFT and then L R come in 1 OFF SET 2 OFF L R V 2 ON SFT to finish VA 91 46 50 HAR 30 00 00 1 Press press the setting mode 2 Press 3 Press 4 Setting all the item as you need 5 Press setting return to the ...

Page 18: ...Press select the item month data year hour minute second the selected item will glint 3 Press minus it 4 Finish setting of all item 8 3 Time setting operating display and or add or 17 9 Vertical angle 0 error and collimation error and tilt angle compensator 0 error correction With this option making both face angular observations you ...

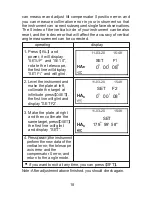
Page 19: ... telescope the first line will display SET F1 and will glint 11 03 20 15 48 if you want to exit at any time you can press 2 Level the instrument and make the plate at left collimate the target at infinitude press the first line will glint and display SET F2 OSET OSET OSET 3 Make the plate at right and then collimate the same target press the first line will glint and display SET 4 Press the instru...

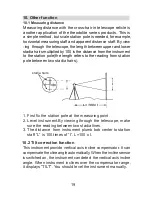
Page 20: ...a hairs 10 Other function 10 1 Measuring distance 1 First fix the station pole at the measuring point 2 Level instrument By viewing through the telescope make sure the reading between two stadia lines 3 The distance from instrument plumb bob center to station staff L is 100 times of I L 100 x I 19 10 2 Tilt correction function This instrument provide vertical axis incline compensator It can compen...

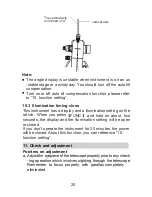
Page 21: ...you press FUNC and hold on about two seconds the display and the illumination setting will be open or closed If you don t operate the instrument for 20 minutes the power will be closed About this function you can reference 10 function setting 20 11 Check and adjustment Pointers on adjustment a Adjust the eyepiece of the telescope properly prior to any check ing operation which involves sighting th...

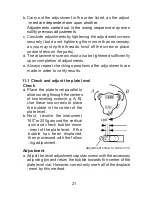
Page 22: ... adjustments are made in order to verify results 11 1 Check and adjust the plate level Check a Place the plate level parallel to aline running through the centers of two leveling screw e g A B Use these two screws to place the bubble in the center of the plate level b Next revolve the instrument 180 or 200g around the vertical axis and check bubble move ment of the plate level If the bubble has be...

Page 23: ... centered properly at this time adjustment is not required Otherwise proceed with the following adjustment Adjustment Shift the bubble to the center of the level by adjusting three capstan adjustment screws on the bottom surface of the circular level with the accessory adjusting pin see diagram 22 o 11 3 Check and adjust vertical cross hair Adjustment is required if the vertical cross hair is not ...

Page 24: ... travels along the length of the vertical cross hair d if the point appears to move continuously on the vertical hair see fig 1 the vertical cross hair lies in a plane perpendicular to the horizontal axis adjustment is not required e However if the point appears to be displayed from the vertical cross hair see fig 2 adjustment is required in the reticule plate 23 Adjustment Fig 1 Fig 2 reticle ret...

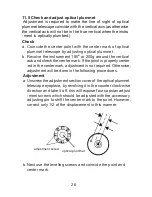
Page 25: ...check it concluded 11 4 Collimation of the instrument Collimation is required to make the line of sight of the telescope perpendicular to the horizontal axis of the instrument Check a Set the instrument up with clear sights of about 50 to 60 meters of both sides of the instrument b Sight point A at approximately 50 meter distance c Loosen the vertical tangent screw only and plunge the tele scope 1...

Page 26: ...ation c Shift the vertical cross hair and coincide it with point D by turning capstan adjustment screws in upper lower left and right sides Upon completing the adjustment repeat the check ing operation once more if point B and C coincide further adjustment is not required Otherwise repeat the adjustment Adjustment Note To move vertical cross hair first loose the capstan adjustment screw in one sid...

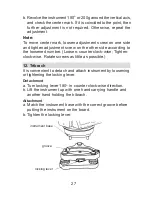
Page 27: ...check the center mark If the point is properly center ed in the centermark adjustment is not required Otherwise adjustment will be done in the following procedures Adjustment a Unscrew the adjustment section cover of the optical plummet telescope eyepiece by revolving it in the counter clock wise direction and take it off this will expose four capstan adjust ment screws which should be adjusted wi...

Page 28: ...number Loosen counter clock wise Tighten clock wise Rotate screws as little as possible 12 Tribrach It is convenient to detach and attach instrument by loosening or tightening the locking lever Detachment a Turn locking lever 180 in counter clock wise direction b Lift the instrument up with one hand carrying handle and another hand holding the tribrach Attachment a Match the instrument base with t...

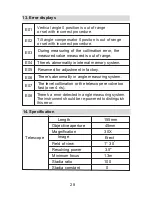
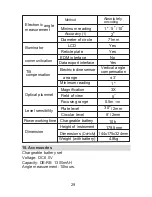
Page 29: ...cope revolve too fast over 4 r s E08 Vertical angle 0 position is out of range or set with incorrect procedure Tilt angle compensator 0 positon is out of range or set with incorrect procedure There s a error detected in angle measuring system The instrument should be re powered to distinguish this error 14 Specification Length 155mm Objective aperture 45mm Magnification 30X Image Erect Telescope F...

Page 30: ...ange 3 Tilt compensation Minimum reading 1 Magnification 3X Field of view 5 Optical plummet Focusing range 0 5m Plate level 30 2mm Level sensibility Circular level 8 2mm Power working time Chargeable battery 10h Height of instrument 179 5mm Dimension s DxHxM 144x175x324mm Dimension Weight with battery 4 8kg Chargeable battery set Voltage DC 6 0V Capacity DE RB 1300mAH Angle measurement 10hours 15 ...

Reviews: