background image

3

Table of Contents

Introduction   .  .  .  .  .  .  .  .  .  .  .  .  .  .  .  .  .  .  .4

Features    .  .  .  .  .  .  .  .  .  .  .  .  .  .  .  .  .  .  .  .  .  .  .  .  .  . 4

Safety and Care Information  .  .  .  .  .  .  .  .  . 5

What’s in the Box?    .  .  .  .  .  .  .  .  .  .  .  .  .  .  .  .  . 8
Sound Station Controls   .  .  .  .  .  .  .  .  .  .  .  .  . 9

Remote Control   .  .  .  .  .  .  .  .  .  .  .  .  .  .  .  .  .  .  .  . 11

Main Display Screens   .  .  .  .  .  .  .  .  .  .  .  .  .  .  . 12

Installation   .  .  .  .  .  .  .  .  .  .  .  .  .  .  .  .  .  .  . 13

Step 1: Connect to a Wireless 

   Network   .  .  .  .  .  .  .  .  .  .  .  .  .  .  .  .  .  .  .  .  .  .  .  .  .14

Step 2: Enter Your Username 

   and Password   .  .  .  .  .  .  .  .  .  .  .  .  .  .  .  .  .  .  .  . 18

Navigation Basics   .  .  .  .  .  .  .  .  .  .  .  . 20

Using the Sound Station  .  .  .  .  .  .  .  .23

SiriusXM Internet Radio   .  .  .  .  .  .  .  .  .  .  .  . 23

On-Demand:   .  .  .  .  .  .  .  .  .  .  .  .  .  .  .  .  .  .  .  .  .  . 23

Favorites:  .  .  .  .  .  .  .  .  .  .  .  .  .  .  .  .  .  .  .  .  .  .  .  .  . 23

Listening to Internet Radio    .  .  .  .  .24

Tuning a Channel  .  .  .  .  .  .  .  .  .  .  .  .  .  .  .  .  .  . 24

Viewing a Category:   .  .  .  .  .  .  .  .  .  .  .  .  .  .  . 24

Returning to Home Screen   .  .  .  .  .  .  .  .  . 25

Direct Tune   .  .  .  .  .  .  .  .  .  .  .  .  .  .  .  .  .  .  .  .  .  .  . 25

Favorite Channels   .  .  .  .  .  .  .  .  .  .  .  .  .  .  .  .  . 26

Parental Control  .  .  .  .  .  .  .  .  .  .  .  .  .  .  .  .  .  .  . 27

Advanced Features   .  .  .  .  .  .  .  .  .  .  .  .32

Pause, Rewind, and Replay   .  .  .  .  .  .  .  .  . 32

Alarm Clock   .  .  .  .  .  .  .  .  .  .  .  .  .  .  .  .  .  .  .  .  .  . 33

Snooze  .  .  .  .  .  .  .  .  .  .  .  .  .  .  .  .  .  .  .  .  .  .  .  .  .  .  . 35

Sleep Timer  .  .  .  .  .  .  .  .  .  .  .  .  .  .  .  .  .  .  .  .  .  .  . 36

Equalization Settings   .  .  .  .  .  .  .  .  .  .  .  .  .  . 37

Aux In .  .  .  .  .  .  .  .  .  .  .  .  .  .  .  .  .  .  .  .  .  .  .  .  .  .  .  .  37

Configuring the Sound Station   .  .38

System Setup   .  .  .  .  .  .  .  .  .  .  .  .  .  .  .  .  .  .  .  .  . 38

Troubleshooting    .  .  .  .  .  .  .  .  .  .  .  .  .  .52

Product Specifications   .  .  .  .  .  .  .  .  .56

Patent and Environmental 

   Information   .  .  .  .  .  .  .  .  .  .  .  .  .  .  .  .  .57

Patent Information   .  .  .  .  .  .  .  .  .  .  .  .  .  .  .  . 57

Environmental Information  .  .  .  .  .  .  .  .  .  57

FCC Statement    .  .  .  .  .  .  .  .  .  .  .  .  .  .  .58

Important Legal Information   .  .  .  .59

Summary of Contents for GDI-SXTTR2

Page 1: ...User Guide Sound Station Model GDI SXTTR2 ...

Page 2: ......

Page 3: ...On Demand 23 Favorites 23 Listening to Internet Radio 24 Tuning a Channel 24 Viewing a Category 24 Returning to Home Screen 25 Direct Tune 25 Favorite Channels 26 Parental Control 27 Advanced Features 32 Pause Rewind and Replay 32 Alarm Clock 33 Snooze 35 Sleep Timer 36 Equalization Settings 37 Aux In 37 Configuring the Sound Station 38 System Setup 38 Troubleshooting 52 Product Specifications 56 ...

Page 4: ...y SiriusXM Internet Radio in your home Use this manual to familiarize yourself with all of your Sound Station s features and capabilities For the latest information about your Sound Station and other SiriusXM products and accessories visit siriusxm com Please read this User Guide before using your SiriusXM Sound Station Introduction ...

Page 5: ...e to chemicals such as benzene and thinners Do not use liquid or aerosol cleaners Clean with a soft damp cloth only Do not expose to direct sunlight for a prolonged period of time and do not expose to fire flame or other heat sources Do not try to disassemble and or repair device yourself Do not drop your device or subject it to severe impact Do not place heavy objects on device Do not subject dev...

Page 6: ...g The wide blade or the third prong is provided for your safety When the provided plug does not fit into your outlet consult an electrician for replacement of the obsolete outlet Protect the power cord from being walked on or pinched particularly at plugs convenience receptacles and the point where they exit from the apparatus This product contains chemicals known to the State of California to cau...

Page 7: ...nd when the device will not be used for an extended period of time Use the power plug to disconnect the device from the power source To begin using the device again reconnect it to an AC outlet Connect the device to an easily accessible AC outlet so that the device can be quickly disconnected if necessary ...

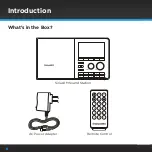
Page 8: ...8 What s in the Box SiriusXM Sound Station AC Power Adapter Remote Control Introduction HOME BACK 1 2 select vol vol back home 3 4 5 6 7 8 0 9 ...

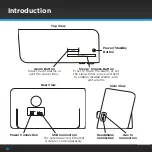
Page 9: ...essing the knob in a menu or user input screen selects the highlighted item Context Sensitive Buttons 4 These buttons change their functions according to the context Press to select the function shown on the display screen just above the button Volume Mute Knob Turn to adjust the volume press to mute and un mute audio 0 9 Number Buttons Press to tune to a favorite channel press and hold to set the...

Page 10: ...t alarms or edit the sleep timer Top View Sleep Snooze Button Press to mute the alarm or set the sleep timer press and hold to enable disable alarms also edit alarms Power Standby Button ALARM SLEEP SNOOZE Power Connection USB Connection For external wired Ethernet Adapter sold separately Rear View ...

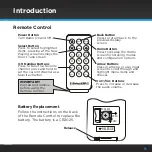
Page 11: ...tion options 0 9 Number Buttons Press to tune to a favorite channel press and hold to set the current channel as a favorite channel Release Arrow Buttons Press in a menu or user input screen to scroll through and highlight menu items and choices Vol Vol Buttons Press to increase or decrease the audio volume 1 2 select vol vol back home 3 4 5 6 7 8 0 9 IMPORTANT Pull tab and remove before using the...

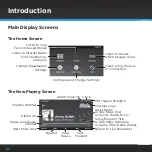
Page 12: ...isten to Shows which already Aired Listen using the Aux In Connection Configure and Change Settings Alarm Clock On Clock WiFi Signal Strength Channel Number Album Art Pause and Replay Timebar Channel Logo Artist Name or Talk Show Host or Sports Teams Score Song Program Title or Talk Show Schedule or Game Time Game Details Return to Live Broadcast Rewind Play Pause Fast Forward Start Show Now ...

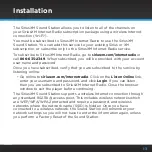
Page 13: ...t you are subscribed to the service by listening online Go online to siriusxm com internetradio Click on the Listen Online link enter your username and password and click Login If you can listen then you are subscribed to SiriusXM Internet Radio Close the browser window to exit the player before continuing The SiriusXM Sound Station supports a wireless Internet connection through any standard 802 ...

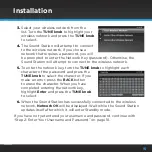
Page 14: ...ettings Refer to Manually Connecting to a Wireless Network on page 16 Easy Connection to a Wireless Network 1 Plug the AC Power Adapter into an AC outlet and plug the power plug into the connector on the rear of the SiriusXM Sound Station Press the Power button 2 If the Sound System has not previously connected to a wireless network wait while the Sound Station scans for wireless networks and go t...

Page 15: ...ork key turn the TUNE knob to highlight each character of the password and press the TUNE knob to select the character If you make an error press the BACK button to erase the character When you have completed entering the network key highlight Enter and press the TUNE knob to select 6 When the Sound Station has successfully connected to the wireless network Network OK will be displayed Wait while ...

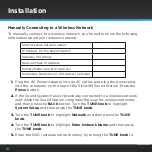
Page 16: ...d plug the power plug into the connector on the rear of the SiriusXM Sound Station Press the Power button 2 If the Sound System has not previously connected to a wireless network wait while the Sound Station completes the scan for wireless networks and then press the BACK button Turn the TUNE knob to highlight System Setup and then press the TUNE knob 3 Turn the TUNE knob to highlight Network and ...

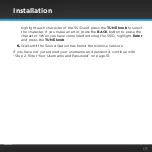
Page 17: ... the BACK button to erase the character When you have completed entering the SSID highlight Enter and press the TUNE knob 6 Wait until the Sound Station has found the wireless network If you have not yet entered your username and password continue with Step 2 Enter Your Username and Password on page 18 Installation ...

Page 18: ...will already be prompting your for your username Continue with the next step Otherwise press the HOME button turn the TUNE knob to highlight System Setup and press the TUNE knob to select Turn the TUNE knob to highlight Set Credentials and press TUNE knob to select Turn the TUNE knob to highlight Username Password Setup and press TUNE knob to select 2 Enter your SiriusXM Internet Radio username an...

Page 19: ...o scroll through the category choices and highlight a category Press the TUNE knob to display the sub categories in the category When you select a sub category the channels in the category will be displayed You can select a channel to begin listening The installation is complete ...

Page 20: ...down time is displayed on the display screen Snooze While the Radio is playing pressing the SLEEP SNOOZE button and pressing the TUNE knob enters the sleep mode The first press displays Sleep OFF or whatever time the sleep timer had been previously set to Turn the TUNE knob to adjust the amount of sleep time and press the TUNE knob to set the time and start the sleep timer To cancel the sleep time...

Page 21: ...ts the highlighted item VOL Knob Turning the VOL knob clockwise or counter clockwise increases or decreases the volume of the audio Pressing the mute the VOL knob mutes and un mutes the audio Number Buttons 0 9 The number buttons are used to store favorite channels in the button location by pressing and holding the button Then you can tune a channel just by pressing the button They can also be use...

Page 22: ...22 HOME Button Pressing the HOME button displays the Home screen showing the listening modes and configuration options for the Sound System HOME Navigation Basics ...

Page 23: ...g that interests you page 32 On Demand content can be added to your Favorites either a show you found in On Demand or you can subscribe to a recurring show so that each time it airs it is added to your Favorites Favorites Save individual shows using On Demand or subscribe to your favorite shows using On Demand and the Sound Station will conveniently save them for you in Favorites each time the sho...

Page 24: ...ob to tune the channel The Radio will momentarily tune the channel TIP Go to siriusxm com channellineup or for the latest SiriusXM Internet Radio channel lineup Viewing a Category Channels are organized into categories to make it easier for you to find the ones that suit your taste 1 To view the categories press HOME 2 Press the TUNE knob to select Categories 3 Turn the TUNE knob to highlight a ca...

Page 25: ...b 2 Use the 0 9 number buttons on the Sound Station or Remote Control to enter the channel number or turn the TUNE knob to highlight a number and press the TUNE knob to select and move to the next number If you make a mistake press BACK or turn the TUNE knob to highlight Delete and press the TUNE knob erase the character 3 When the channel number has been entered turn the TUNE knob to highlight En...

Page 26: ... favorite 2 Press and hold a number button 0 9 to assign the channel as a favorite preset to that button IMPORTANT If the button you choose already has a favorite channel assigned to it the number button will be replaced with the new favorite channel To tune a favorite channel 1 Press the number button 0 9 that is assigned to the favorite channel The channel will momentarily be tuned Listening to ...

Page 27: ...tered the channel will be tuned All locked channels become unlocked and will remain unlocked until you turn the Sound Station off The next time you turn the Sound Station On all channels will be locked again If the Sound Station is turned off while tuned to a locked channel the next time you turn the Sound Station on you will be prompted to enter your lock code If you cancel and do not enter your ...

Page 28: ...cted all 4 digits of your code turn the TUNE knob to highlight Enter and press the TUNE knob 4 If you were setting the code for the first time the code is now set If you are changing the code turn the TUNE knob to highlight Change Security Password and press the TUNE knob to select 5 You will be prompted to enter the new code Press BACK or turn the TUNE knob to highlight Delete and press the TUNE ...

Page 29: ...mber and press the TUNE knob to select and move to the next number If you make a mistake press the BACK button or turn the TUNE knob to highlight Delete and press the TUNE knob to erase the character When you have selected all 4 digits of your code turn the TUNE knob to highlight Enter and press the TUNE knob 4 Turn the TUNE knob to scroll to and highlight Channel Blocking and press the TUNE knob ...

Page 30: ...t Enter and press the TUNE knob 3 If you have entered the correct lock code the channel will begin playing Once you have unlocked one channel all locked channels become unlocked and will remain unlocked until you turn the Sound Station Off The next time you turn the Sound Station On all channels will again be locked To enable or disable the Front Panel locking The front panel buttons can be locked...

Page 31: ...TUNE knob to highlight Delete and press the TUNE knob to erase the character When you have selected all 4 digits of your code turn the TUNE knob to highlight Enter and press the TUNE knob 4 Turn the TUNE knob to scroll to and highlight Front Panel Lock and press the TUNE knob to select 5 Turn the TUNE knob to highlight either All or Enable Presets and press the TUNE knob to select 6 Press HOME to ...

Page 32: ...from the beginning Rewind Rewinds back through content When listening to live SiriusXM Internet Radio you can rewind 5 hours When listening to On Demand or Favorite content you can rewind back through the show to the beginning Play Pause Pause playing the channel or content and resume playing Fast Forward Fast forward through the channel or content When listening to SiriusXM Internet Radio in Repl...

Page 33: ...creen shows each alarm and alarm details and which are On or Off 2 To turn an alarm On or Off turn the TUNE knob to highlight an alarm from the list and press the TUNE knob to select the alarm 3 Turn the TUNE knob to highlight Enable Alarm or Disable Alarm and press the TUNE knob The alarm is now set on or off according to your selection To configure an alarm 1 Press the Alarm button turn the TUNE...

Page 34: ...to highlight a selection turn it to change a setting and press it to select a setting When setting the volume turn the TUNE knob to adjust the setting Time 12 00 AM 11 59 PM Frequency Once Every Day Weekly Weekdays Weekends Day of the week Sunday through Saturday Wake to Buzzer Aux In Currently tuned SXM channel Preset Volume Variable 5 When you are finish configuring the alarm Alarm Set will be d...

Page 35: ... minutes 2 Each immediate subsequent press of the Sleep Snooze button increases the snooze time to 10 15 30 45 or 60 minutes 3 For the snoozing alarm a countdown timer is displayed showing how many minutes are remaining before the alarm sounds again The alarm icon will also blink for the snoozing alarm 4 You can also check and change the remaining snooze time by pressing the Sleep Snooze button To...

Page 36: ...f or whatever time had last been set 2 Turn the TUNE knob to set the desired amount of time and press the TUNE knob to select Timer Set will be displayed confirming that the sleep timer is On 3 A countdown timer is displayed at the bottom of the screen showing how many minutes are remaining before the Radio turns off To turn the sleep timer Off 1 Press the Snooze Sleep button on the top of the Sou...

Page 37: ...ct 2 Turn the TUNE knob to highlight either Treble or Bass and press the TUNE knob to select 3 Turn the TUNE knob to adjust the equalization and press the TUNE knob to select the setting 4 Press HOME to exit Aux In You can listen to another device such as an MP3 player by plugging it into the Aux In connection on the Sound Station To listen using Aux In 1 Connect a device to the Aux In connection ...

Page 38: ... Home screen has the following menu items Alarms page 39 Brightness page 39 Clock set up page 40 Set Credentials page 42 Parental Control page 27 Network page 45 Factory Reset page 49 Software Update page 50 Info page 51 Refer to the indicated pages for each system setup option ...

Page 39: ...fer to Sleep Timer on page 36 for more information about the sleep timer Brightness Brightness has three selections that set the brightness of the display screen Each can be set to a brightness from 1 to 20 Active This setting controls the brightness of the display screen when the Sound Station is On and you are interacting with the Sound Station by pressing buttons etc After 30 seconds of inactiv...

Page 40: ...highlight Active Inactive or Standby and press the TUNE knob to select 4 Turn the TUNE knob to the desired setting 1 to 20 Press the TUNE knob to select your setting Press HOME to exit Clock set up Clock set up option has two selections Set Time Date This option allows you to change the time time zone and date Initially the time and date are set from SiriusXM Internet Radio but you can adjust the ...

Page 41: ...b to select Do the same for the minutes and AM PM settings 5 Next the time zone will be displayed Turn the TUNE knob to adjust the time zone setting and press the TUNE knob to select 6 Next the date will be displayed with the day blinking Turn the TUNE knob to adjust the day setting and press the TUNE knob to select Do the same for the month and year settings 7 Press HOME to exit To set the clock ...

Page 42: ...usly entered into the Sound Station To enter your username and password Before you can successfully enter your username and password the Sound Station must be connected to a wireless network with Internet connectivity The Sound Station verifies your username and password as you enter them by connecting to SiriusXM Internet Radio service 1 Press the HOME button and turn the TUNE knob to highlight S...

Page 43: ...ted that the username does not exist Repeat the previous step and enter the correct username 6 Next enter your password the same way as you entered your username Your password is case sensitive 7 When the Sound Station successfully connects to SiriusXM Internet Radio the Category Listing screen will be displayed Status The Status screen shows the current status of your SiriusXM Internet Radio serv...

Page 44: ...d press the TUNE knob to select 3 Press the TUNE knob to select Delete Sirius Credentials 4 You will be prompted to Enter Y to confirm delete Press the BACK button to erase the N in the entry area and turn the TUNE knob to highlight Y Press the TUNE knob to select 5 Turn the TUNE knob to highlight Enter and press the TUNE knob to select 6 The display will show username password deleted Press HOME ...

Page 45: ...Configuration This option allows you to edit the configuration settings of the wireless network saved in the Sound Station Wireless Standby This option is to select whether the Sound Station remains connected to the wireless network when it is in standby IMPORTANT To connect to a wireless network which restricts access by MAC address the MAC address of the Sound Station must be added to the allowe...

Page 46: ...anually Connecting to a Wireless Network on page 16 To view the current network configuration 1 Press the HOME button and turn the TUNE knob to highlight System Setup Press the TUNE knob to select 2 Turn the TUNE knob and highlight Network and press the TUNE knob to select 3 Turn the TUNE knob and highlight View Configuration and press the TUNE knob to select 4 The current wireless network configu...

Page 47: ... turn the TUNE knob to highlight System Setup Press the TUNE knob to select 2 Turn the TUNE knob and highlight Network and press the TUNE knob to select 3 Turn the TUNE knob and highlight Edit Configuration and press the TUNE knob to select 4 Turn the TUNE knob and highlight YES or NO for Auto DHCP and press the TUNE knob to select Note that if you select YES you will be returned to the Network me...

Page 48: ...TUNE knob to select Select Yes if you need to enter a second DNS Server IP Address Enter the DNS Server 2 IP Address in the same way as you entered the other IP addresses The Sound Station is now configured with the edited settings If the Sound Station cannot connect to the wireless network there is likely an error in the IP addresses that were entered To configure wireless standby 1 Press the HOM...

Page 49: ...back to the factory settings To restore the factory settings 1 Press the HOME button and turn the TUNE knob to highlight System Setup Press the TUNE knob to select 2 Turn the TUNE knob to highlight Factory Reset and press the TUNE knob to select 3 Confirm that you really want to proceed with the factory reset Turn the TUNE knob to highlight YES or NO and press the TUNE knob to select If you chose ...

Page 50: ... knob to highlight Software Update and press the TUNE knob to select 3 The Sound Station will check for a software update If no update is available the Sound Station will display No upgrade available If a software update is available you will be prompted to accept the update Turn the TUNE knob to highlight YES and press the TUNE knob to select 4 The software update will be applied to the Sound Sta...

Page 51: ...e versions To display the information 1 Press the HOME button and turn the TUNE knob to highlight System Setup Press the TUNE knob to select 2 Turn the TUNE knob to highlight Info and press the TUNE knob to select 3 The information will be displayed Press HOME to exit Configuring the Sound Station ...

Page 52: ...re If you get the message No Upgrade Available or New version available then the Radio is connected to the Internet If you get the message Login failed then you don t have an Internet connection Check with your network administrator for Internet connectivity on your network Turn your Sound Station Off and On again Buffering The Sound Station is loading the channel information If this message is di...

Page 53: ... connection you have entered one or more incorrect settings Verify and re enter the information Stream Closed Inactivity limit reached Already logged in elsewhere Your account user name and password has been used at another location to connect to the SiriusXM Internet Radio and your Radio has been disconnected from the service Turn your Radio Off and On again The Radio may have timed out due to la...

Page 54: ...y that you are subscribed to the service listen online Go online to siriusxm com internetradio Click on the Listen Online link enter your username and password and click Log In Listen Now If you can listen then you are subscribed to SiriusXM Internet Radio Close the browser window to exit the player before continuing If you don t have a SiriusXM Internet Radio subscription go to siriusxm com inter...

Page 55: ... your network Your network has DHCP disabled You ll have to manually configure your network connection Refer to Manually Connecting to a Wireless Network on page 16 The Scan for Network feature does not find your wireless network Your wireless network has a hidden name SSID If so you will have to manually configure your wireless network connection Refer to Manually Connecting to a Wireless Network...

Page 56: ...3 3 in H x 25 in D Weight SiriusXM Sound Station 85 kg 6 3 lbs Audio Outputs Headphone 3 5 mm diameter mini stereo jack Audio Input Aux In 3 5 mm diameter mini stereo jack Network WiFi 802 11n WEP WPA WPA2 Power Adapter Input 100 240V AC 50 60Hz 0 2A Output 12V DC 1A Amplifier Class D 30W 8 ohms Display TFT 4 3 color Specifications subject to change without notice ...

Page 57: ... are protected by copyright and other intellectual property laws and all ownership rights remain with the respective content and data service providers You are prohibited from any export of the content and or data or derivative thereof except in compliance with applicable export laws rules and regulations The user of this or any other software contained in a SiriusXM Radio is explicitly prohibited...

Page 58: ...n which can be determined by turning the equipment off and on the user is encouraged to try to correct the interference by one or more of the following measures Reorient or relocate the receiving antenna Increase the separation between the equipment and receiver Connect the equipment into an outlet on a circuit different from that to which the receiver is connected Consult the dealer or an experie...

Page 59: ...gue NHL 2012 All NHL logos and marks and NHL team logos and marks depicted herein are the property of the NHL and the respective teams and may not be reproduced without the prior written consent of NHL Enterprises L P The Home Ice channel is a registered trademark of XM Satellite Radio Inc The Swinger Golfer logo is a registered trademark of PGA TOUR Inc Visit www siriusxm com channellineup for up...

Page 60: ...siriusxm com Sirius XM Radio Inc 1221 Avenue of the Americas New York NY 10020 1 866 635 2349 2014 Sirius XM Radio Inc GDI SXTTR2 UG 141209a ...

Reviews: