SIP 01594 Instruction Manual Download Page 15

22 

  MAINTENANCE INSTRUCTIONS….cont 

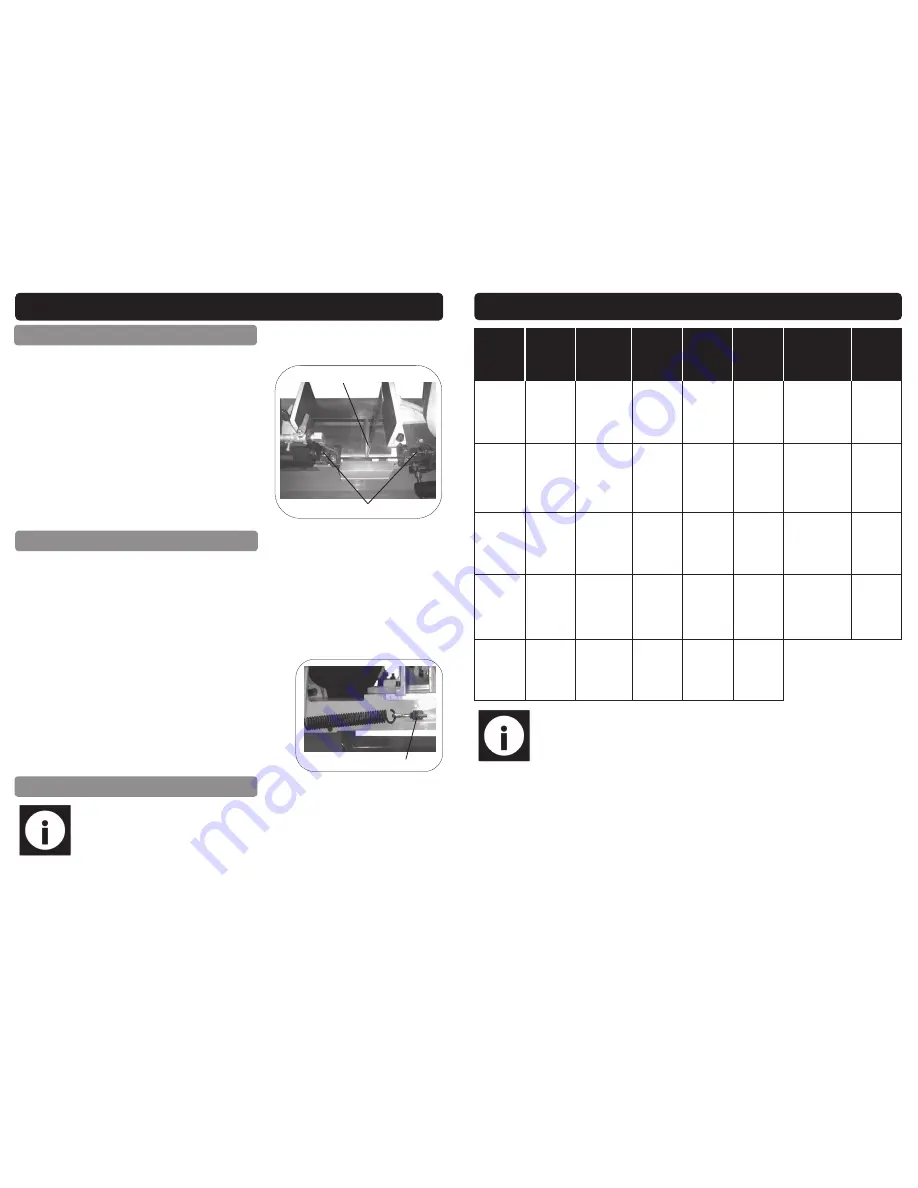
   SETTING THE BLADE SQUARE TO THE BED AT 90

˚


1.Ensure the bow is at its lowest position. 

2.Disconnect from the mains supply. 

3.Place  an  engineer`s  set  square  onto  the  bed 

and touching the blade (Fig.12). 

4.If any adjustment is needed  then loosen the two 

cap head bolts (Fig.12,A). 

5.Rotate  both  blade  guides  in  the  required  direc-

tion  until  the  blade  makes  contact  with  the  set 

square along the entire width of the blade. 

6.Once  set  correctly,  re-tighten  both  cap  head 

bolts. 

7.The blade guide bearings may need to adjusted. 

Fig.12 

Set square 

Note: 

The  correct  guide  bearing  adjustment  is  very  important,  this  will 

make the blade run smoother and evenly without any snagging or twisting 

whilst the blade is running. It will also prolong the blade life. 

   BLADE GUIDE BEARING ADJUSTMENT 

The  bow  weight  is  one  of  the  most  important  adjustments  on  the  saw.  If  the  bow 

weight is set incorrectly then expect poor performance, crooked cuts, teeth stripping 

from  the  blade,  stalling  and  the  blade  coming  off  the  blade  pulleys.  The  hydraulic 

cylinder feed rate will not compensate for improper bow weight. A new machine will 

have  the  bow  weight  pre-set,  if  you  need  to  adjust  the  bow  weight  then  follow  the 

steps below. 

1.Disconnect the mains from the supply. 

2.Ensure the bow is at its lowest position. 

3.Turn the hydraulic cylinder knob anti-clockwise until it 

stops. 

4.Place  a  scale  on  the  Blade  tensioning  knob,  lift  the 

saw bow up, the scale should read between 5-6kgs. 

5.If it doesn't then adjust the tension nut (Fig.7,A) until it 

reaches between 5-6kgs. 

Fig.7 

   ADJUSTING THE BOW WEIGHT 

15 

  OPERATING INSTRUCTIONS….cont 

Material 

Speed  

M/Min 

(FPM) 

Material 

Speed  

M/Min 

(FPM) 

Material 

Speed  

M/Min 

(FPM) 

Material 

Speed  

M/Min 

(FPM) 

Carbon 

steel 


60 - 108 


(196 - 354)         

Tool steel 


62 


(203) 

Alloy steel 


34 - 98 


(111 - 321) 

Free          

machining 

stainless steel 


46 - 62 


(150 - 203) 

Steel      

section 


54 - 67 


(180 - 220) 


High speed 

tool steel 


23 - 36 


(75 - 118) 


Mold steel 

75 


(246) 

Gray cast iron 


33 - 75 


(108 - 255) 


Thin tube 


54 - 67 


(180 - 220) 


Cold work 

tool steel 

95 - 213 


(29 - 65) 

Water 

hard 

tool steel 

242 


(74) 

Ductile          

austenitic cast 

iron 

65 - 85 


(20 - 26) 

Aluminium 

alloy  


67 - 163 


(220 - 534) 


Hot work 

tool steel 

62 


(203) 

Stainless 

steel 

26 


(85) 

Malleable cast 

iron 

98 


(321) 

Copper 

alloy 

70 - 147 


(229 - 482) 

Oil       

hardening 

tool steel 

62 - 65 


(203 - 213 

Cold 

rolled 

stainless 

Steel 

26 - 62 


(85 - 203) 


Note: 

The  above  table  is  an  approximate  guide  reference  only,  various 

factors  mean  some  materials  may  require  different  speeds  to  the  ones 

quoted. 

Summary of Contents for 01594

Page 1: ...ke the packaging to the local amenity tip and place into the appropriate recycling bin Never dispose of electrical equipment or batteries in with your domestic waste If your supplier offers a disposal...

Page 2: ...tal Cutting Bandsaw 1ph SIP Pt No 01594 12 Metal Cutting Bandsaw 3ph SIP Pt No 01595 Conforms to the requirements of the following directive s as indicated 2006 95 EC Low Voltage Directive 2006 42 EC...

Page 3: ...8 Electrical Connection 9 Guarantee 10 Technical Specifications 10 Contents Accessories 11 Getting to Know Your Bandsaw 13 Assembly Instructions 14 Operating Instructions 20 Maintenance Instructions 2...

Page 4: ...rs etc If you are unsure of its relative applications do not hesitate to contact us and we will be more than happy to advise you Before operating the bandsaw always check no parts are broken and that...

Page 5: ...r replace faulty damaged parts WARNING Only operate on a level and stable surface WARNING RISK OF ELECTRIC SHOCK Do not expose the bandsaw to water spray rain dripping water or moisture of any kind PR...

Page 6: ...achine is in operation failure to do this can lead to personal injury ALWAYS use adequate roller stands for supporting longer and heavier materials ALWAYS use the correct blade using the correct tpi b...

Page 7: ...rs which cannot be built into this product but must be ap plied SAFETY INSTRUCTIONS cont and safest performance ALWAYS wear approved eye and ear protection when operating the machine If any dust is pr...

Page 8: ...the same or marked Always secure the wires in the plug terminal carefully and tightly Secure the cable in the cord grip carefully Connecting to the 3 phase power supply The 3ph bandsaw comes with no...

Page 9: ...CAL CONNECTION cont Warning Never connect any phase wires to the earth terminal of the plug or bosrd Only fit an approved plug with the correct rated fuse If in doubt consult a qualified electrician N...

Page 10: ...178mm Rectangle 45 120 x 125mm 120 x 125mm Rectangle 90 178 x 305mm 178 x 305mm Blade speed 22 33 45 65 mtr min 22 33 45 65 mtr min Blade size 2362 x 0 9 x 19mm 2362 x 0 9 x 19mm Motor power 1 5HP 1 1...

Page 11: ...3 6A Transformer TC AC400 230 24v Limit switch SQ1 QKS7 250V 10A Current breaker QF1 DZ47 63 2P 10A Interlocking switch SQ2 QKS8 250V 10A Current breaker QF2 DZ47 63 2P 2A Start SB XB2 BE101 Current...

Page 12: ...n lit the machine is ready for operation 2 Coolant pump switch Turns the coolant pump on off 3 Start button Turns the machine on 4 Stop button Turns the machine off 5 Emergency stop button Interrupts...

Page 13: ...4 Hard spots or scale on the material 5 Blade installed backwards 6 Insufficient blade tension 7 Work hardened material especially stain less 1 Replace with a lower tpi blade 2 Reduce speed 3 Increase...

Page 14: ...d compressed air to clean the bandsaw this can cause metal fillings to go into the guide bearings and other parts of the bandsaw Always remove the metal fillings from the blade guides after use Wipe t...

Page 15: ...chine will have the bow weight pre set if you need to adjust the bow weight then follow the steps below 1 Disconnect the mains from the supply 2 Ensure the bow is at its lowest position 3 Turn the hyd...

Page 16: ...Fig 10 Blade tension is important for the correct operation of the bandsaw the blade tension should be set between 700 900kgs To set the blade correctly without using a blade tension gauge take the fo...

Page 17: ...the blade as this will warp and stretch the blade TENSIONING THE BLADE MAINTENANCE INSTRUCTIONS 17 OPERATING INSTRUCTIONS cont Note We recommend the use of water soluble coolant this will prolong the...

Page 18: ...secured and the blade has been lowered just above the material The hydraulic cylinder has an adjustable rate of de scent it can be adjusted by turning the knob Fig 6 A clockwise to slow down the rate...

Reviews: