background image


Service Manual 

Original issue 

May 2014 

Page

  17/64 

Model 

XL-420

| 17 

 
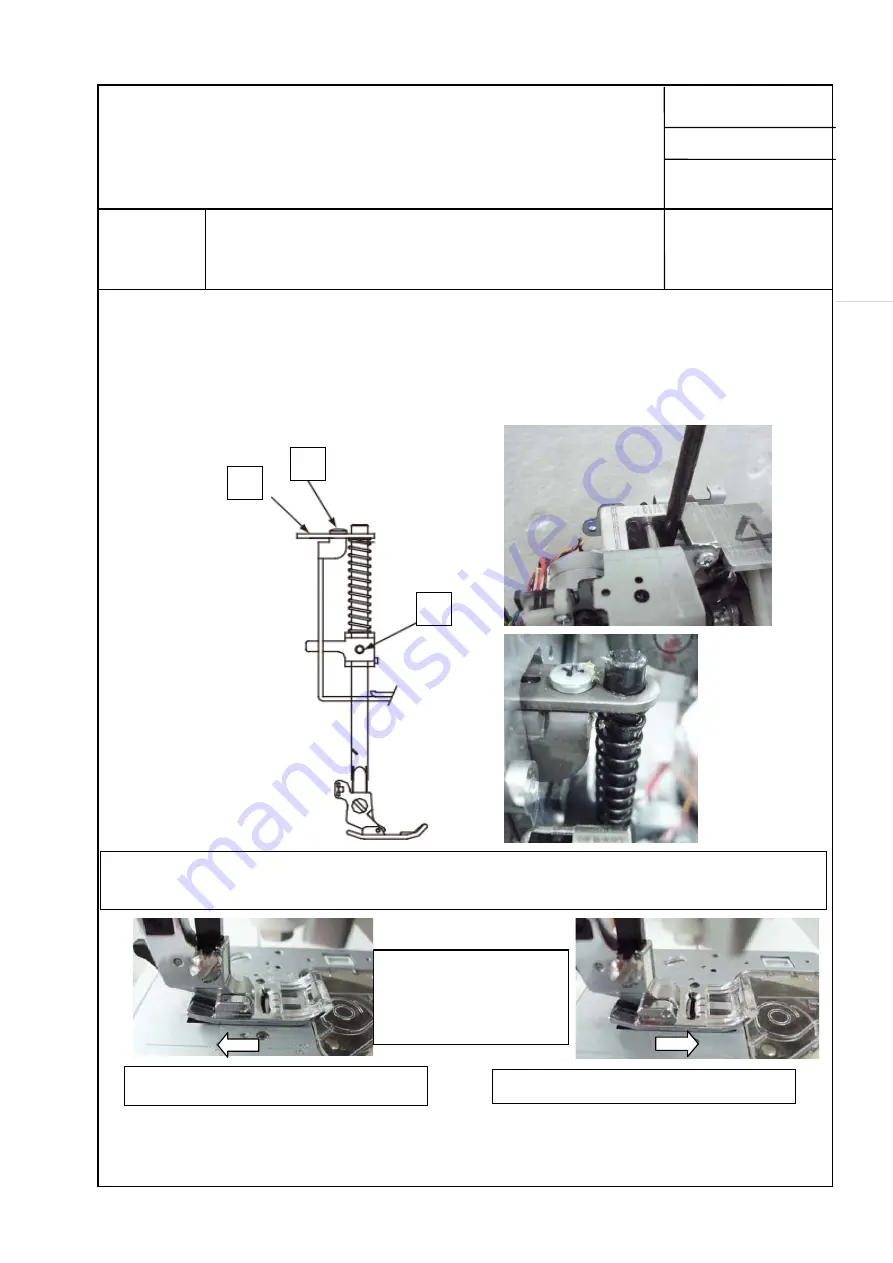
SEC.5-3    Presser foot height and direction (3) 


Adjustment-2 

  When needle ditch on the presser foot and needle hole at the needle plate do not match 

towards fabric feed direction. 

1. 

Insert screw driver as shown on picture below and loosen screw (D) at the upper 
part of needle bar bracket (C)   


2. 

After adjustment, tighten screw (D) securely and check to see whether presser foot 
is operated smoothly with presser foot lever. 

Shift presser foot backward to adjust. 

Please note that parts of needle bar driving unit are removed in order to explain upper part (C) 
and screw. 

B

Shift presser foot forward to adjust 

Note: The presser foot 
shown in this picture is 
not for FQ-4 

Summary of Contents for XL-420

Page 1: ...Service Manual Original issue May 2014 Page 1 64 Model XL 420 1 XL 420 First issue May 2014 ...

Page 2: ...uttle hook SEC 13 Adjustment of timing of take up lever to shuttle SEC 14 Adjustment of meshing position of gears for take up lever SEC 15 Retaining bracket for bobbin case SEC 16 Origin point positioning of feed zero SEC 17 Stitch length SEC 18 Ajustment of upper thread tension SEC 19 Adjustment of CAM sensor SEC 20 Check the Knee Lifter SEC 21 Sewing machine test mode SEC 22 Removing top cover a...

Page 3: ...3 64 Model XL 420 3 A Disassembling face cover B Disassembling bed cover 1 Pull out cap not shown in the center and remove screw 2 Loosen the screw behind 3 Remove face cover 1 Pull out cap at bed cover using needle SEC 1 1 Disassembling covers 1 ...

Page 4: ...nal issue May 2014 Page 4 64 Model XL 420 4 C Disassembling bobbin winder unit 2 Loosen M4 screw 3 Slide out bed cover 1 Remove M3 screw at bobbin winding latch 2 Remove bobbin winding latch SEC 1 2 Disassembling covers 2 ...

Page 5: ...y 2014 Page 5 64 Model XL 420 5 D Removing switch cover 3 Remove M4 screw at bobbin winder cover 4 Remove two hooks at the side of the cover from rear cover 1 Removing M4 screws at the side of the cover SEC 1 3 Disassembling covers 3 ...

Page 6: ...inal issue May 2014 Page 6 64 Model XL 420 6 E Removing base cover 2 Remove switch cover 1 Remove three M4 screws behind the sewing machine 2 Lay the machine and remove two M3 tapping screws SEC 1 4 Disassembling covers 4 ...

Page 7: ...2014 Page 7 64 Model XL 420 7 F Remove front and rear covers 3 Remove two M4 screws on the right 4 Remove two M4 screws on the center 1 Remove two M4 tapping screws near the handle at the top of rear cover SEC 1 5 Disassembling covers 5 ...

Page 8: ...ne and open a rid behind the front cover by using a small screw driver 3 Remove M3 screw and washer at the front cover You can only loosen a screw but if you do so be careful of a position of washer when re assembling 2 Remove M4 screw at rear cover SEC 1 6 Disassembling covers 6 ...

Page 9: ...the front cover to remove two covers as shown at left Once hooked portions A B and C as shown above are removed other mating portions may be removed easily A B C 6 Lay the machine on its back for easier removal of covers Remove front cover Remove CPU board and FFC 28 from front cover with care FFC is flexible flat cable SEC 1 7 Disassembling covers 7 B C ...

Page 10: ...wer the presser foot lever and then remove rear cover by lifting up and passing it under the presser foot taking care not to interfere with each other This is a view of machine without front cover This is a view of machine without rear cover SEC 1 8 Disassembling covers 8 ...

Page 11: ...resser foot lever and bobbin thread are deactivated 1 While pushing three switch buttons 1 2 5 at control panel at the same turn on sewing machine 2 Release three switch buttons after turning on the main power Press start button and sew straight stitch selected at default to check whether sensors are deactivated SEC 2 Test mode with warning function deactivated ...

Page 12: ...ove needle plate bobbin case and face cover 2 Shift shuttle hook at the rear of needle by turning hand wheel Check to see if needle clearance to shuttle within 0 05 to 0 15 mm Adjustment 1 Loosen screw for support shaft A and adjust needle position by moving support shaft back and forth To decrease clearance turn screw to clock wise Shuttle 0 05 to 0 15mm 0 05 to 0 15mm Extreme left Extreme right ...

Page 13: ...rt Loosen socket screw C located under bottom of support plate and adjust position of fulcrum 3 After adjustment tighten the bolt C securely If it touches at right side adjust position of fulcrum B for needle swing support to the left B B B SEC 3 2 Needle clearance to shuttle 2 C If needle touches with shuttle at left side adjust position of fulcrum B for needle swing support to the right ...

Page 14: ...is correctly positioned to the needle hole as shown below Adjustment 1 Remove needle plate and loosen hexagonal screw E which fix needle plate stopper plate D located at either side of feed dog Then adjust stopper plate D so that to needle plate may be positioned correctly to the needle 2 Tighten the screw E at the stopper plate securely SEC 4 Alignment of needle plate to shuttle E D ...

Page 15: ... 2 1 Check to see if the position of presser foot is parallel to the ditch of feed dog on the needle plate and carved line And also check to see if the presser foot and ditch of feed dog on the needle plate is equally balanced at left and right Checking 3 1 Check to see if the needle hole on the needle plate and the hole on the presser foot are positioned same towards direction of fabric feed SEC ...

Page 16: ... Adjustment 1 1 Remove the face cover and set the feed dog at down position 2 Lower the presser foot lever 3 Loosen screw B through hole A by using hexagon socket screw driver 2mm 4 Tighten the screw B securely after checking the presser foot is parallel with the holes for feed dog on the needle plate C B D A ...

Page 17: ...r as shown on picture below and loosen screw D at the upper part of needle bar bracket C 2 After adjustment tighten screw D securely and check to see whether presser foot is operated smoothly with presser foot lever Shift presser foot backward to adjust Please note that parts of needle bar driving unit are removed in order to explain upper part C and screw C D B Shift presser foot forward to adjus...

Page 18: ...anced to left and right direction 1 Loosen 3 screws at F G and H at rear part of board E 2 Shake the board E to left and right around screw F and adjust presser foot to balanced position as shown on below picture 3 Tighten screw B properly after adjustment E F G H Shift the presser foot to the arrow as shown on above pictures to make adjustment Note The presser foot shown in this picture is not fo...

Page 19: ...d to center temporally fix the screw 1 4 Turn on the main power and pinion gear will move so that screw 1 may be located upward and then loosen screw 1 After above steps the motor shaft will be excited so the shaft will not move and pinion gear can be rotatable Rotate pinion gear A again until it hits with stopper B then tighten screw 2 by inserting tool from lower as shown on picture below At thi...

Page 20: ... of eccentric axis located on the right and fix it 3 Check whether needle is located at the center of needle hole in the needle plate Adjustment 2 1 Pinion of the motor is stationary due to excitation while machine is turned on Loosen a screw C at Zigzag lever D which is tightened temporarily and adjust Zigzag lever to bring needle to the center of the needle hole 2 Tighten the screw C securely af...

Page 21: ...hing the needle lightly as shown by arrow mark Needle bar height is high if needle gauge hooks with the needle gauge when race is pushed by small screw driver towards the shuttle Simple checking method without needle gauge 1 Attach standard needle 90 and set needle at its highest position 2 Check to see the distance between needle plate and a tip of needle is about 14 6 15 mm as shown below Shuttl...

Page 22: ...sen hexagonal socket screw 1 and adjust needle bar height 3 Tighten the screw securely after adjustment Check to see if needle threader operates correctly and there is not interference in vertical movement of needle bar Tighten the screw securely after adjustment SEC 7 2 Needle bar height 2 1 Needle bar ...

Page 23: ...d above stopper B Fig Right At the time when needle threader is used Knock pin A for threading lever is positioned on the shelf of stopper B so that threading lever is not able to be lowered but it is only able to rotate Hock of needle threader will be inserted to the needle hole at this situation The distance between knock pin of needle threader lever and hock L1 must be matched with a distance b...

Page 24: ... hole moving the needle bar 5 While holding the above situation tighten the screw C attaching the threader stopper B onto stopper pin A 6 The direction of threader stopper should be facing toward you so that it may not hit the needle support bracket Insert the hook into the upper side of needle hole at all times as the smaller needle size the shorter needle hole C Insert the hook into the upper si...

Page 25: ...correct position adjust the hook position with the small screw driver in the accessory 8 If hook protrudes from needle hole too much or little it may affect threading condition Hook Hook protrudes too much Hook protrudes correctly Hook protrudes too little Needle Hook Hook holder Hook SEC 8 3 Needle threader height 3 ...

Page 26: ...ever to its lowest position Check and see if hook protrudes approx 1 5mm from needle Loosen nut F under threader support shaft and turn hook portion G in either way for adjustment Tighten the nut F securely after adjustment Reassemble outer pipe J to correct position K J approx 1 5mm F G F G SEC 8 4 Needle threader height 4 ...

Page 27: ...ing needle threader hock portion SEC 8 5 Needle threader height 5 1 Remove Outer pipe J 2 Remove Stopper ring E 3 Loosen the lower part of nut by wrench 4 Remove a nut 5 Rotate like a nut to remove hock portion from the shaft 6 When reattaching spiral spring smaller diameter must be lower ...

Page 28: ...checking hook position adjust position of outer pipe J so that there may be a clearance 0 4 to 0 6 mm between screw K and bottom of long hole 0 4 to 0 6mm Position of twin thread guide and hook is shown below with threading lever lowered Thread guide is locates too low It is located correctly It is located too high Hook 0 4 to 0 6 mm K J SEC 8 6 Needle threader height 6 ...

Page 29: ...hest position by turning hand wheel Check to see if feed dog height is as illustrated below Adjustment 1 Remove needle plate Loosen nut with wrench 8mm with across corner 2 Adjust height by turning screw as illustrated Tighten nut securely after adjustment 0 9 1 1 mm SEC 9 Adjustment of feed dog height ...

Page 30: ... shuttle gear and lower shaft gear due to thread jamming bunching and fabric snagging Too strong tension may result in incorrect operation due to increased machine torque This checking is needed before adjusting Needle timing to shuttle 2 Loosen two screws on support plate for idler pulley and shift the position of idler pulley for adjustment SEC 10 Tension for timing belt ...

Page 31: ... the angle of timing gear to lower shaft with two screws on timing gear loosened and hexagon socket screw driver 2 5mm inserted into one of the screws by turning main shaft with hand wheel If feed dog motion too early Turn hand wheel towards you If feed dog motion too late Turn hand wheel away from you 3 Tighten one of two screws temporarily and check feed dog motion 4 Tighten two screws securely ...

Page 32: ...hand wheel Then check to see distance between shuttle hook and upper end of needle hole when shuttle hook meets the right side of needle by raising needle slowly Adjustment 1 Remove front cover Lay the machine on its back for easier adjustment 2 Insert hexagon socket screw driver 2 5mm as shown Fig 1 and then loosen two screws Turn hand wheel to adjust timing of shuttle while holding the gear by i...

Page 33: ...ght condition Adjustment of play between shuttle gear and lower shaft gear is made by turning eccentric ball bushing A loosen screw B on pressing plate so that the ball bushing A may be turned Turn the ball bushing A in either way by using concave portion The ball bushing is to be placed with mark C positioned at upper side within angle of 180 degrees 3 Tighten the screw C securely after adjustmen...

Page 34: ...ver and then move the take up lever to the position where tip of the lever may catch thread 2 Remove needle plate and bobbin case 3 At the position of take up lever above check to see if portion A of shuttle is located nearly at the spring plate of bobbin case stopper B A B Take up lever thread guide Take up lever Top thread SEC 13 1 Adjustment of timing of take up lever to shuttle 1 ...

Page 35: ...operating gear B 3 While inserting screw driver into accessible hex screw turn main shaft in either way to get correct timing of take up lever to shuttle 4 Tighten 2 screws securely after adjustment Note Gear A is fixed by collar C and B If collar B is adjusted make sure gear A must be tightened securely SEC 13 2 Adjustment of timing of take up lever to shuttle 2 B A C A B ...

Page 36: ...s of the gear and it should not be tightened too much 3 Also check to see if there is no play of gear A vertically Adjustment 1 Loosen screws C D fixing eccentric gear shaft B Rotate gear clockwise to hit slightly to another gear this will be eccentric situation 2 Adjust by turning gear shaft C slightly while pushing it with screw driver as shown since the gear shaft tends to pop up 3 Tighten the ...

Page 37: ...spring and lower side of projection A of bobbin case align with alignment line D as illustrated below 3 Loosen screw A B move the retaining bracket in either direction as illustrated by arrow and tighten screw B temporarily SEC 15 Retaining bracket for bobbin case Note this bobbin case no 89210 should be solely used with model 600E Projection ...

Page 38: ...ig 1 3 Turn on the main power and select Button sewing Zero feed Loosen screw 1 at pinion gear A At this time motor is excited so the two screws are in loosened situation 4 Rotate pinion gear A and then tighten screw 2 at a position where pinion gear hits with stopper B 5 Turn off the main power and then tighten screw 1 Fig 2 Max forward feeding Fig 1 Feeding Zero A 1 Fig 3 Reverse feed at 3mm Ref...

Page 39: ...cket screw driver 3 0 running machine with a little thick paper placed under presser foot 4 After adjustment of Feed Zero with needle only re check feed balance of actual patterns under following conditions Fabric Demo swatch Thread Coats Clark 60 Presser foot Satin foot Actual patterns to be checked Sew larger size of keyhole buttonhole and balance head portion at right and left sides 5 Tighten f...

Page 40: ...y base plate removed 1 Remove base plate 2 Lay machine down and remove cap 3 Loosen fixing bolt A on motor bracket using hexagon socket screw driver 2 5 4 Turn position adjusting bottom side of bolt B on motor bracket in either direction using regular screw driver 5 Check to see if adjustment is desired or not readjust again After finishing adjustment tighten socket screw A securely ...

Page 41: ... dial A Making sure to remember the default S position 3 Rotate Knurled part B to adjust tension to be set Standard is 55 65gr at S position Rotate anticlockwise to increase tension Rotate clockwise to decrease tension Adjust tension while measuring it by tension gauge SEC 18 1 Ajustment of upper thread tension 1 A ...

Page 42: ...knurled part after adjustment It is needed to fit the dial at same position as it used to be Tighten screw with washer at the knurled part 5 After adjustment check to see if the tension is correctly set at the favorable setting SEC 18 2 Ajustment of upper thread tension 2 B S position ...

Page 43: ...ustment 1 Loosen two screws 1 2 on collar A fixing sensor cam 2 Raise needle to its highest position 3 Turn collar A with fixing sensor cam in either direction until needle start to move left or right when needle goes up 9 to 10mm from surface on needle plate 4 If there is no problem tighten two screws 1 2 securely SEC 19 Adjustment of CAM sensor A 1 2 B ...

Page 44: ...e 2 If the screws A are loosened lever B will be pulled up due to spring And then press down the lever B which is connected with rod D and tighten screws A when the knee lifter and arm are still attaching with each other like C on the picture 3 The tip of screw H on the picture 4 should be directed into flat surface on the drawing 1 flat surface SEC 20 1 Check the Knee Lifter 1 ...

Page 45: ... at the center of oblong hole And regarding the parts F keep tilling up about 10 degrees from a vertical line and tighten two screws H J 4 Adjust Cam L with two screws K so that the knee lifter may move about 15 degrees as drawing 2 and uplift of presser foot may be 11 mm to 12 mm SEC 20 2 Check the Knee Lifter 1 ...

Page 46: ...XL 420 46 Put bobbin onto bobbin winder shaft Set bobbin winder latch Press and hold the Reverse button Turn off the machine on this condition above Release bobbin winder latch and reverse button when you see sand clock SEC 21 1 Sewing machine test mode 1 5 ...

Page 47: ...Feed Zero Mode 2 Needle position Center Feed Zero Mode 3 Needle position Center Feed 11 stitches forward in 2mm and 11 stitches backward in 2mm then stops Mode 4 for upper thread detection Needle position Center Feed 0 5mm forward Deactivated top thread detection Mode 6 for aging Needle position 7mm Feed 2 5mm forward 2 5mm reverse Mode 7 for checking main shaft torque SEC 21 2 Sewing machine test...

Page 48: ... cover and carriage cover of embroidery unit 1 Removing top cover 1 Lay embroidery unit upside down and then remove accessory drawer and three tapping screws at drawer side 1 2 3 4 and5 And also remove another four screws 6 7 8 and 9 marked with symbol and one screw 10 at lock lever side ...

Page 49: ...Service Manual Original issue May 2014 Page 49 64 Model XL 420 49 SEC 22 2 Removing top cover and carriage cover of embroidery unit 2 ...

Page 50: ...e of carriage cover 2 Remove two screws on the back of carriage cover 3 Remove carriage cover by removing it from hooks Note Make sure to attach two square holes into projections correctly on the board at motor side when you attach carriage cover SEC 22 3 Removing top cover and carriage cover of embroidery unit 3 ...

Page 51: ...ust position of braking plate B which passes through sensor A Then check the position again Adjustment Y axis 1 Loosen screw 2 and adjust position of braking plate D which passes through censer C Then check again the position 1 B A C 2 D SEC 23 Adjustment of stop position of embroidery carriage along X Y axis ...

Page 52: ...3 Sew 4 corners lower left upper left upper right lower right lower left and stop Mode4 Sew 4 corners lower left lower right upper right upper left lower left and stop Mode5 Sew diagonal from upper right lower left continuously Mode6 Sew diagonal from upper left lower right continuously Mode7 Sew large diamond shape continuously with maximum 400rpm Mode8 Sew small diamond shape continuously with m...

Page 53: ...Service Manual Original issue May 2014 Page 53 64 Model XL 420 53 Mode1 Mode2 Mode3 Mode4 Mode5 Mode6 Mode7 Mode8 SEC 24 2 Embroidery unit test mode 2 ...

Page 54: ...Service Manual Original issue May 2014 Page 54 64 Model XL 420 54 SEC 25 1 Trouble contents with LED on panel 1 Nil ...

Page 55: ...Service Manual Original issue May 2014 Page 55 64 Model XL 420 55 SEC 25 2 Trouble contents with LED on panel 2 Nil ...

Page 56: ...ed In case if main axis rotates faster than 300rmp for more than 300ms while main axis motor is not been turned on Replace CPU board is needed In case if main axis motor rotates more than 3 rotation while main axis motor is turned off Replace CPU board is needed 4 Trouble of main shaft rotation detected abnormal speed In case if main axis motor rotates faster than 1000rmp for 10ms Replace CPU boar...

Page 57: ... Cam1 signal Signal of Cam1 is not inputted while main axis motor is operating Replace cam sensor is needed 11 Problem in Cam2 signal Signal of Cam2 is not inputted while main axis motor is operating Replace cam sensor is needed 12 Problem in Cam3 signal Signal of Cam3 is not inputted while main axis motor is operating Replace cam sensor is needed 13 Problem in B H lever signal Both signal of forw...

Page 58: ... to check button 16 nil 17 Trouble of PWM output If exceed amount of electric current has followed to bobbin winder motor more than 50ms out of 250ms at condition of PWM output is off and connecting to protection relay while main power is on Replace CPU board is needed Trouble of main shaft stop detected it is moving even though it should be stopped If exceed amount of electric current has followe...

Page 59: ...Service Manual Original issue May 2014 Page 59 64 Model XL 420 59 CPU circuit board SEC 26 1 Wiring diagram part1 ...

Page 60: ...Service Manual Original issue May 2014 Page 60 64 Model XL 420 60 SEC 26 2 Wiring diagram part2 ...

Page 61: ...Manual Original issue May 2014 Page 61 64 Model XL 420 61 SEC 27 1 Main circuit board and functions of each connector 1 CN16 CN15 CN14 CN17 CN18 CN19 CN1 CN2 CN3 CN4 CN5 CN6 CN13 CN11 CN10 CN9 CN12 CN20 CN7 CN8 ...

Page 62: ...d material with lever switch CN7 Drawer connector for embroidery unit CN8 Not use CN9 Not use CN10 Not use CN11 Foot control jack CN12 USB connector CN13 Bobbin winder switch CN14 CAM sensor switch CN15 BH sensor CN16 BH lever switch CN17 Top thread sensor CN18 LED lamp CN19 Motor for bobbin winder CN20 Switch control panel circuit board SEC 27 2 Main circuit board and functions of each connector ...

Page 63: ...anual Original issue May 2014 Page 63 64 Model XL 420 63 Control switch panel circuit board SEC 27 3 Main circuit board and functions of each connector 3 Operation Switch panel start stop Speed control CPU board ...

Page 64: ...Service Manual Original issue May 2014 Page 64 64 Model XL 420 64 Power supply circuit board AC board CPU circuit board Power switch SEC 27 4 Main circuit board and functions of each connector 4 ...

Reviews: