


20
1.
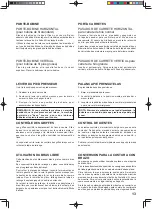
7KUHDGWKHPDFKLQHZLWK\RXUOHIWKDQGZKLOHJULSSLQJWKH
WKUHDG ZLWK \RXU ULJKW KDQG
Hook thread to the thread
JXLGH RQ WKH QHHGOH EDU DQG SXOO LW WRZDUG \RX OHDYLQJ
about 4” (10 cm) clear.
+RRNWKUHDGWRWKHWZLQWKUHDGJXLGH$DQG%
3XOO WKUHDG JHQWO\ LQWR WKH WKUHDG FXWWHUKROGHU WR FXW DQG
hold it in place.
3XOOGRZQWKHWKUHDGLQJOHYHUWRLWVORZHVWSRVLWLRQXQWLOWKH
WZLQWKUHDGJXLGHURWDWHVDQGVWRSV
5HOHDVH WKH WKUHDGLQJ OHYHU DQG QHHGOH ZLOO EH WKUHDGHG
DXWRPDWLFDOO\,IWKHWKUHDGLQJOHYHUVKRXOGQRWUHWXUQWRWKH
RULJLQDOSRVLWLRQUDLVHLWJHQWO\E\KDQG
3XOOWKUHDGORRSDZD\IURP\RX
1.
(Q¿OH]OH¿OGHODPDFKLQHDYHFYRWUHPDLQJDXFKHWRXWHQ
WHQDQWOH¿OIHUPHPHQWGHODPDLQGURLWH,QVpUH]OH¿OGDQV
OHJXLGH¿OGHODEDUUHG¶DLJXLOOHHWWLUH]OHYHUVYRXVG¶HQYLURQ
10 cm (4 po).
)DLUHSDVVHUOH¿OGDQVOHJXLGH¿OGRXEOH$HW%
3. Tirez le fil doucement vers le coupeur et reteneur de fil
pour le couper et le retenir.
$EDLVVH]OHOHYLHUG¶HQ¿ODJHHQSRVLWLRQEDVVHMXVTX¶jFHTXH
OHJXLGHGH¿OGRXEOHWRXUQHHWV¶DUUrWH
5HOkFKH] OH OHYLHU G¶HQILODJH HW O¶DLJXLOOH VHUD HQILOpH
DXWRPDWLTXHPHQW6LOHOHYLHUG¶HQ¿ODJHQHUHWRXUQHSDVj
oDSRVLWLRQG¶RULJLQHVRXOHYH]OHGRXFHPHQWjODPDLQ
7LUH]ODERXFOHGX¿OYHUVO¶DUULqUHGHODPDFKLQH
USING AUTOMATIC NEEDLE THREADER
¹
Be sure to raise the presser foot lifter and raise the needle
WRLWVKLJKHVWSRVLWLRQEHIRUHWKUHDGLQJ
Don’t pull thread with strong force or thread may
be pulled off from needle hole after threading.
Ne tirez pas trop fort sur le fil car le fil pourrait
UHVVRUWLUGXFKDVGHODLJXLOOHDSUqVDYRLUpWpHQ¿OpH
Make sure that the guide doesn’t touch fabric, etc.
Assurez-vous que le guide ne touche pas au tissu, ect.
If the needle has not been threaded correctly, re-
thread from step 1.
6LODLJXLOOHQHVWSDVHQ¿OpHFRUUHFWHPHQWUpSpWH]
le processus depuis l'étape 1.
IMPORTANT: If the needle cannot be threaded due to
the nature of thread, manually thread the needle after
hooking thread to the thread guide on the needle bar.
,03257$17VLODLJXLOOHQHSHXWrWUHHQ¿OpHGXHDXW\SH
GH¿OHQ¿OH]ODLJXLOOHPDQXHOOHPHQWDSUqVDYRLULQVpUp
OH¿OGDQVOHJXLGHGHODEDUUHGDLJXLOOH
NOTE:
º
For smooth threading, it is recommended that the
machine be set for straight stitch (in center needle
position) when using the automatic needle threader.
º
Heavy thread cannot be threaded through fine
needle.
º
Don’t lower the threading lever while the machine is
in operation or the threading hook may be broken.
REMARQUE:
º
Afin de faciliter l’enfilage, il est recommandé
de régler votre machine au point droit lors de
O¶XWLOLVDWLRQGHO¶HQ¿OHXUG¶DLJXLOOH
º
8Q¿OpSDLVQHSHXWVLQVpUHUGDQVXQDLJXLOOH¿QH
º
N'abaissez pas le levier d'enfilage lorsque la
machine est en marche.
2
1
7ZLQWKUHDGJXLGH
*XLGH¿OGRXEOH
*XtDGREOHKLOR
7KUHDGLQJKRRN
)RXUFKHWWHGHQ¿ODJH
Gancho del ensartador
7KUHDGJXLGH
*XLGH¿O
*XtDKLOR
B
$
Felt disc
Disque de feutre
'LVFRGH¿HOWUR
UTILISATION DE L’ENFILEUR DE CHAS
D’AIGUILLE
¹
$VVXUH]YRXV GH VRXOHYH] OH SLHG SUHVVHXU HW GDPHQHU
O¶DLJXLOOH HQ SRVLWLRQ KDXWH HQ WRXUQDQW OH YRODQW YHUV YRXV
VHQVDQWLKRUDLUHDYDQWGHQ¿OHUODPDFKLQH
3
Thread cutter/holder
&RXSHXUHWUHWHQHXUGH¿O
Cortador de hilo


