Sindoh 3DWOX 2X User Manual Download Page 108

Printable Verification

4

-4

4

1.2  Improving Printing Quality


1

  Nozzle, Bed temperature


    Depending on the material (PLA, ABS etc.), optimum temperature for the nozzle and bed can be different.


    Environmental factors (temperature, humidity) can affect the quality of the printed product.


    There is no absolute value for optimum temperature. Testing various temperatures and finding the   


    optimum temperature are needed.


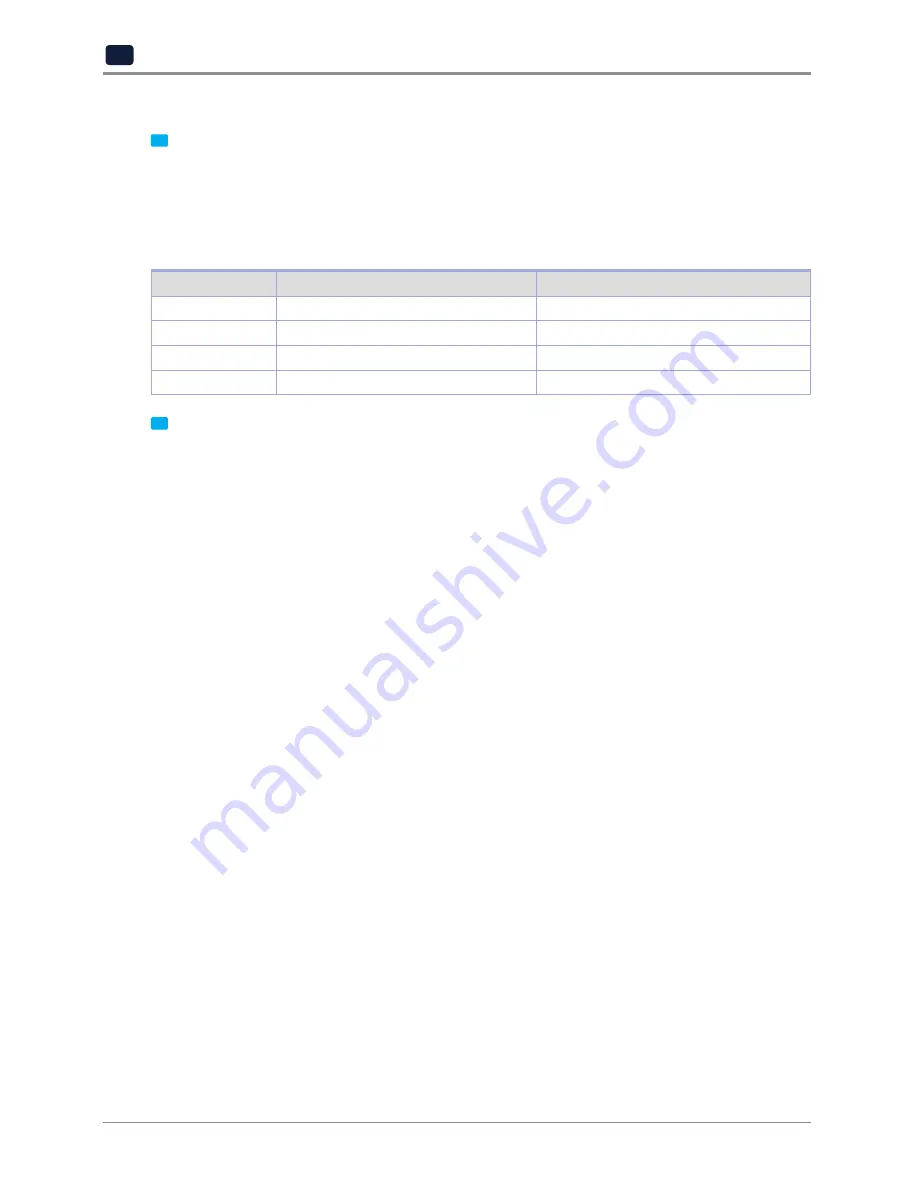
    Temperature options can be changed in the 3DWOX Desktop slicer.

Material

Appropriate nozzle temperature

Appropriate bed temperature

PLA

190 °C ~ 210 °C

40 °C ~ 60 °C

ABS

210 °C ~ 240 °C

Above 80 °C 

FLEXIBLE

210 °C ~ 240 °C

50 °C ~ 60 °C

PVA

190 °C ~ 210 °C

50 °C ~ 60 °C


2

 Support


    For higher printing quality, minimize the use of supports.


    However, shapes that are located in midair needs a support. If it’s the case, control the distance so it can  


  easily separate. 

Summary of Contents for 3DWOX 2X

Page 1: ...Read the User Manual before operating the product and keep the manual at a convenient place near the product USER MANUAL 3dprinter sindoh com Series...

Page 2: ...pied for a long period of time as it may cause abrupt fire accidents Protect device from humid or wet conditions eg rain snow etc Remove power cord from receptacle on the wall before moving device Be...

Page 3: ...re not responsible for the direct and or indirect loss or damages caused by results of handling or operating the product in any case and for results occurring from user s negligence 3 The copyrighted...

Page 4: ...ory Disclaimer 16 Chapter 1 Preparations for Machine Operation 1 Machine Specifications 1 2 1 1 Printing 1 2 1 2 Temperature Speed 1 2 1 3 Machine 1 2 1 4 Software Support 1 2 1 5 Default Setting of P...

Page 5: ...INT 2 36 ACTIVE LEVELING 2 37 SECURITY 2 39 VOICE GUIDE 2 40 LANGUAGE 2 42 E MAIL 2 44 UNIT 2 48 TIME SETTING 2 49 TIME ZONE 2 51 POWER SAVING MODE 2 52 BEEP SOUND 2 54 LAMP 2 55 WEB 2 57 S W UPDATE 2...

Page 6: ...essage and Solutions 5 10 3 Problems and Solutions 5 12 3 1 If filament does not come out of the nozzle Fix for EC401 5 12 3 2 In Cases where Filament is Cut Between the Extruder and Nozzle 5 13 3 3 W...

Page 7: ...d or personal use other usage is prohibited by law The above details present only a part of the applicable laws and regulations and the details of the law may not be stated as they are Sindoh is not r...

Page 8: ...e operations of the machine Important Indicates points to pay attention to when using the machine and explanations of likely causes of filament misfeeds damage to originals or loss of data Be sure to...

Page 9: ...ndle unitl you are told you can touch the bed Caution Electric Shock Proceed your work after turning off the machine and unplugging the power cord from the outlet in case of accessing the system board...

Page 10: ...rature have been lowered to room temperature Turn the power switch off then unplug the power cord from the power outlet Unplug and release all the cords and cables before moving the machine Only use t...

Page 11: ...t ventilated make sure to ventilate the area appropriately time to time Important Install the machine with its vents spaced at least 10 cm away from walls and other equipments Secure properly sufficie...

Page 12: ...r cord from the outlet When moving the printer it is recommended that two people lift and move the printer for safety Hold the bottom handles of the machine when moving it Bend your knees enough to pr...

Page 13: ...orter Make sure that the water doesnot exceed 35 C otherwise the shape of the PLA can be deformed Stir the water to lessen the dissolution time After 10 min of dipping the output in water the PVA supp...

Page 14: ...rning This product uses chemicals known to the State of California to cause cancer and birth defects or other reproductive harm This appliance and its accessories can cause low level exposure to chemi...

Page 15: ...for your health Ventilate it on a regular basis Do not block vents Inappropriate cooling may lead to high temperatures inside the machine In general a new machine may produce small amount of gaseous c...

Page 16: ...of the FCC Rules Operation is subject to the following two conditions 1 This device may not cause harmful interference and 2 this device must accept any interference received Including interference th...

Page 17: ...consumption Mode Description Power Consumption W Printing A device is printing using electronic input data 350W Standby A device is in standby mode 80W Power Off A power plug is plugged into the outl...

Page 18: ...Before using the Machine 12 2X 3D Printer Class A...

Page 19: ...l of Used Battery Control board uses a Lithium battery Please discard used batteries following the environmentally friendly procedure stated on the manufacturer guidelines To replace batteries please...

Page 20: ...ny purposes related to human lives Do not expose this product to water humidity or liquid Do not expose this product to direct light hot temperature or fire Warning If the machine has been modified by...

Page 21: ...dbm MHz IEEE 802 11g 10mW 10dbm MHz IEEE 802 11n 20MHz 10mW 10dbm MHz IEEE 802 11n 40MHz 10mW 10dbm MHz No of Channels IEEE 802 11b 14 IEEE 802 11g 14 IEEE 802 11n 20MHz 14 IEEE 802 11n 40MHz 9 Modula...

Page 22: ...guarantee that interference will not occur in a particular installation If this equipment does cause harmful interference to radio or television reception which can be determined by turning the equip...

Page 23: ...rference received including interference that may cause undesired operation RESPONSIBLE PARTY Name Sindoh America Ltd Address 6047 Tyvola Glen Circle Suite 115 Charlotte NC 28217 Phone No 1 704 414 66...

Page 24: ......

Page 25: ...1 Preparations for Machine Operation 2X Series USER MANUAL...

Page 26: ...ontinuous Bed Usage Maximum Temperature Recommended Temperature Bed PLA 60 ABS 90 Flexible 60 PVA 60 Max 100 Recommended printing speed maximum speed 40mm s Recommended 200mm s max Continuous operatio...

Page 27: ...they are needed for product exchange or repair service Nozzle Cleaner Spring Nozzle Cleaner 3D Printer USB Cable Cartridge Scrapper Reference Guide Power Cable USB Drive Tube for Cleaning Warning The...

Page 28: ...nd hold for 2 seconds to turn off the printer Power Button Indicator Lamp On Power is On 1 second interval flickering Can be turned on instantly power cable is connected Caution If in case of not usin...

Page 29: ...and dismantle Flexible bed 3 Bed heater Heats the printables bottom surface to stabilize it on the bed 4 Flexible bed bed sheet Seating space for Printable 3 Nozzle 2 4 1 5 No Part Name Description 1...

Page 30: ...s displayed on the LCD screen install the cartridge Refer to UI manual LOAD 4 Connection to PC 1 Direct Connection Connect one end of the enclosed USB cable to the back of the 3DWOX and the other end...

Page 31: ...of the file is complete a pop up window shows up as picture below Press Next button to initiate the installation of 3DWOX Desktop program 4 Choose the destination location of the file and press Next...

Page 32: ...Preparations for Machine Operation 1 8 1 6 After all installation is complete you can see that the 3DWOX Desktop created on the desktop of your computer...

Page 33: ...2 UI Menu Function 2X Series USER MANUAL...

Page 34: ...ZZLE 2 NOZZLE CLEANING NOZZLE CLEANING 1 NOZZLE CLEANING 2 NOZZLE Calibration XY Calibration ENTER PATTERN VALUE NETWORK WIRELESS WIRELESS NETWORK SELECT DHCP STATIC SSID DELETE WIRED DHCP STATIC CLEA...

Page 35: ...D IP WIRED MAC IP WIRELESS IP WIRELESS MAC IP WEB SITE GUIDE HISTORY indicates factory set value 1 1 CARTRIDGE CARTRIDGE CARTRIDGE 1 LOAD CARTRIDGE 2 UNLOAD UNLOCK LOAD This function automatically loa...

Page 36: ...rtridge load confirming message cartridge load will automatically proceed The filament reaches to the nozzle and it is heated up to the specified temperature Then the filament is inserted into the hea...

Page 37: ...2 5 UI Menu Function 2 UNLOAD This function automatically unloads filament from the nozzle 1 From the HOME screen press CARTRIDGE 2 Press UNLOAD to activate Cartridge unloading...

Page 38: ...he nozzle is heated up to the specified temperature and the filament unload starts After the filament has been removed the screen will automatically turn to the UNLOCK screen to let the user remove th...

Page 39: ...2 7 UI Menu Function 2 2 Press UNLOAD to activate Cartridge unloading 3 Remove the snap ring and tube from the nozzle as shown in the following UI screen and press the OK button...

Page 40: ...8 2 4 Cut the filament that came out of the tube as shown below and press the OK button 5 Reinsert the tube into the nozzle and assemble the snap ring Push the tube back toward the nozzle again and p...

Page 41: ...2 9 UI Menu Function 2 6 After the filament has been removed the screen will automatically turn to the UNLOCK screen to let the user remove the cartridge...

Page 42: ...n also be manually done by the user When unlock screen automatically appears after cartridge unload 1 For 10 seconds LOCK state is deactivated and the user can detach cartridge from printer If the car...

Page 43: ...2 11 UI Menu Function 2 To manually unlock later 1 From home screen press CARTRIDGE 2 Press UNLOCK to activate UNLOCK function...

Page 44: ...deactivated and the user can detach cartridge from printer If the cartridge can t be pulled out even after unlock gently push it forward and then try to pull out again 4 After 10 seconds printer will...

Page 45: ...ANING 1 NOZZLE CLEANING 2 NOZZLE Calibration XY Calibration ENTER PATTERN VALUE NETWORK WIRELESS WIRELESS NETWORK SELECT DHCP STATIC SSID DELETE WIRED DHCP STATIC CLEANING CASE BED LOWERING TEST PRINT...

Page 46: ...UI Menu Function 2 14 2 X Y Z Use to change the position on the X Y and Z axes of the Nozzle 1 From home screen press SETTING 2 Press the X Y Z button to enter X Y Z...

Page 47: ...the length of trasnfer and press the arrows to move the Bed and the Nozzle in the respective position To move to each axis home location press All X Y or Z EXTRUDER This function is used to fine contr...

Page 48: ...UI Menu Function 2 16 2 2 Press EXTRUDER to enter EXTRUDER settings 3 To Control EXTRUDER Nozzle temperature needs to be raised...

Page 49: ...t you will use to move the filament Press 1 10 50 100 200 to select an amount In the image shown below press the direction to move the filament BED LEVELING This function is used to perform the leveli...

Page 50: ...ING page user is able to perform bed leveling The bed leveling process consists of 3 steps From the center the top side is measured first and then both sides of the bottom level are measured If the he...

Page 51: ...2 19 UI Menu Function 2 4 If you turn the screw and press OK the measuring is performed and the value to fix appears again 5 When all settings are done the program returns to the previous screen...

Page 52: ...zzle and BED Standard is 0 25mm and can be customi zed button widens the GAP button shortens the GAP For higher adhesive strength between the print output and the bed shorten the distance of the z off...

Page 53: ...adjust the gap Default value is 0 25mm Use buttons to move in 0 05 mm unit 4 Use the MOVE and SAVE buttons to adjust the gap and to save the setting The saved value is applied when next time the prin...

Page 54: ...ZLE CLEANING Function used when nozzle needs cleaning of left over filament residue 1 From home screen press SETTING 2 Press the NOZZLE CLEANING button to access nozzle cleaning settings Select the no...

Page 55: ...be heated When the specified temperature is reached it moves on to the next step to remove filament residue Once finished message will appear press OK printer will return to the settings screen NOZZL...

Page 56: ...UI Menu Function 2 24 2 2 Press the Nozzle Calibration button to access the Nozzle Calibration screen 3 To printthe XY calibration pattern press the XY Calibration button...

Page 57: ...2 25 UI Menu Function 2 4 Press the OK button to access the XY Calibration printing screen 5 When the temperature of the nozzle and the bed rises and reaches the target temperature printing will begin...

Page 58: ...1 2 3 4 5 6 7 8 9 10 11 1 2 3 4 5 6 7 8 9 10 11 7 To print the pattern for the calibrating nozzle again press the OK button Press the Cancel button to return to the Home screen Note Generally the use...

Page 59: ...2 27 UI Menu Function 2 Entering the Pattern Value 1 From home screen press SETTING 2 Press the Nozzle Calibration button to access the Nozzle Calibration screen...

Page 60: ...UI Menu Function 2 28 2 3 Press the Enter Pattern Value button to access the Enter Pattern Value 4 Enter the values for the horizontal and vertical lines...

Page 61: ...ozzle press the OK button Press the Cancel button to return to the Home screen NETWORK This is a menu to configure users network setting IP address can be set up manually or automatically via DHCP set...

Page 62: ...o access network configuration screen 3 The default network setting is Wired connection using LAN line Press DHCP for automatic IP address setup To manually input a fixed IP address press Static and e...

Page 63: ...UI Menu Function 2 4 In any case to use Wifi press the Wifi tab Wifi setting can be turned ON or OFF 5 To select a Wifi network click Choose a network and the printer shows all available Wifi connect...

Page 64: ...work For a password protected network a dialog pops up and asks for the password You can refresh the network list by clicking Search 7 After successful connection printer may ask for DHCP Static simil...

Page 65: ...3 UI Menu Function 2 CLEANING CASE Function used to clean out the case for the collected filament residue 1 From home screen press SETTING 2 Press the CLEANING CASE button to enter CLEANING CASE setti...

Page 66: ...visible and accessible Like shown in the image empty the CASE press OK when done and user will be returned to the settings screen BED LOWERING Use this function in times of moving printer to a differ...

Page 67: ...2 35 UI Menu Function 2 2 Press Next to move to next page where the BED LOWERING button is located 3 Upon selection the bed will automatically be lowered...

Page 68: ...ction 2 36 2 TEST PRINT This function allows the user to test print a sample model already saved in the printer 1 From home screen press SETTING 2 Press Next button to move to the next page and press...

Page 69: ...2 37 UI Menu Function 2 3 Select the test file to print ACTIVE LEVELING 1 From home screen press SETTING...

Page 70: ...UI Menu Function 2 38 2 2 Press the Next button to access ACTIVE LEVELING 3 After setting On Off of the Active Leveling and then press the OK button...

Page 71: ...2 39 UI Menu Function 2 SECURITY 1 From home screen press SETTING 2 Press the Next button to access the SECURITY Screen...

Page 72: ...UI Menu Function 2 40 2 3 After setting On Off of the Security and then press the OK button VOICE GUIDE 1 From home screen press SETTING...

Page 73: ...2 41 UI Menu Function 2 2 Press the Next button to access the VOICE GUIDE screen 3 After setting your printer s speech volume and speed press the OK button...

Page 74: ...UI Menu Function 2 42 2 LANGUAGE Menu to set language for machine 1 From home screen press SETTING 2 Press Next 2 times to go to the screen where the LANGUAGE menu is...

Page 75: ...2 43 UI Menu Function 2 3 Using the arrows select a language and press OK...

Page 76: ...printing status and sends the information to the email address specified Printer will send information of completion based on the PC program standard settings Maximum of 10 emails can be sent 1 From...

Page 77: ...ers do not allow the use of port number 465 If port number 465 is not available please use 25 587 or the port number that the service provider recommends ID SMTP server login ID e g sender Enter the I...

Page 78: ...recipient addresses can be added by using semicolon e g recipient1 test com recipient2 test com recipient3 test com The maximum number of notification emails that can be sent is 10 Regardless of the n...

Page 79: ...scure apps criteria Set it to On to enable the option Printer Setting 1 Set smtp google com for the settings of the email address 2 For Google 25 and 587 ports are compatible Caution According to the...

Page 80: ...UI Menu Function 2 48 2 UNIT Settings for the units of measurments displayed on the printer 1 From the home screen press SETTING 2 Press Next 2 times and select UNIT...

Page 81: ...2 49 UI Menu Function 2 3 The units for temperature and length can be changed TIME SETTING You can view or change the time setting 1 From the home screen press SETTING...

Page 82: ...UI Menu Function 2 50 2 1 Press Next 2 times and select TIME SETTING 3 The time setting can be changed in this screen...

Page 83: ...2 51 UI Menu Function 2 TIME ZONE You can view or change the time zone setting 1 From the home screen press SETTING 2 Press Next 2 times and select TIME ZONE...

Page 84: ...ed time zone can be selected from the time zone list Once Time Zone has been set the printer will restart to apply the new settings POWER SAVING MODE Function to set timer for printer energy saver mod...

Page 85: ...POWER SAVING MODE 3 The adjustable values of energy savor mode are 0 100 min The time can be adjusted in 5 min unit select the desired time using the then press OK button to save changes 0 Min Do not...

Page 86: ...enu Function 2 54 2 BEEP SOUND The volume level of beep sound can be adjusted using this menu 1 Press SETTING button from the home screen 2 Tap on the Next button to move to next page and press BEEP S...

Page 87: ...on 2 3 Currently available sound settings are Low Middle High and Off Select the desired setting and press the OK button to save settings LAMP Menu to configure settings for machine lamp 1 From home s...

Page 88: ...UI Menu Function 2 56 2 2 Press Next to enter LAMP setting screen 3 Settings available for LAMP are Always On Always Off and On only in printing Use arrow buttons to select an option and press OK...

Page 89: ...2 57 UI Menu Function 2 WEB 3dprinter homepage for the user to view 1 From the home screen enter the settings menus by pressing the SETTING button 2 Press the Next and enter the WEB menu...

Page 90: ...e opened and user can view the information of user preference The company website address is http 3dprinter sindoh com S W UPDATE With the printer connected to the internet user is able to download th...

Page 91: ...2 59 UI Menu Function 2 2 Press Next 2 times and select S W UPDATE 3 Press the Start Update button and printer will start updating After it has finished restart the printer and updates will be applied...

Page 92: ...O VERSION GUI VER WIRED IP WIRED MAC IP WIRELESS IP WIRELESS MAC IP WEB SITE GUIDE HISTORY In this menu user is able to view the detail information of the printer and set device name password In HISTO...

Page 93: ...enu Function 2 2 To set password and name for printer select Change Name PW 3 By entering the password you can edit name and set a new password Pressing OK saves the changes Reference Initial password...

Page 94: ...UI Menu Function 2 62 2 4 In INFO screen press Guide to access to the Quick Guide for the printer 5 Other useful information is also available in INFO screen...

Page 95: ...3 Printing 2X Series USER MANUAL...

Page 96: ...cting USB flash drive to the printer In order to print using an USB flash drive insert the flash drive into the USB port When the USB flash drive is connected while in the home screen a list of files...

Page 97: ...3 3 Printing 3 2 Printing Files Select a file to print in the USB list 3 Print Preview Once selected a preview of the model appears on the screen...

Page 98: ...sed the nozzle starts to be heated When the specified temperature is reached the printing starts 5 Pausing Print Pressing during a print will pause the progress Press again and nozzle is heated again...

Page 99: ...Extruder and Cartridge Load Unload and Unlock These additional functions are used for any mechanical problem or if the user needs them Bed Height Adjustment This menu is used to adjust the height of t...

Page 100: ...g Cartridge during print Press Change to switch the currently using cartridge into a different cartridge 8 Print Cancelation During print pressing button a message pops up and asks for confirmation on...

Page 101: ...reen Reference Methods of removing printables refer to P 4 2 1 Printed Output Check 1 2 Printing Via PC 1 Prepare PC connected to the same network where the printer is connected to 2 Run 3DWOX Slicer...

Page 102: ...Printing 3 8 3 1 3 Print Job Management You can manage print jobs in queue 1 Press the Queue button on the upper left hand corner while printing 2 The print jobs in queue are listed...

Page 103: ...zles can cross print the same material PLA and PLA ABS and ABS FLEX and FLEX 2 Two nozzles can cross print the same material PLA and PVA PLA ABS FLEX PVA PLA O X X O ABS X O X X FLEX X X O X PVA O X X...

Page 104: ......

Page 105: ...4 Printed Output Check 2X Series USER MANUAL...

Page 106: ...not touch the bed or the bed handle until you are told you can touch the bed 2 Detaching Bed Press Bed Lock on the screen to fix the bed in place The Flexible Bed is detached if you hold the bed hand...

Page 107: ...k or damage please be cautious 4 Flexible Bed Installation After a period of time bed locking will automatically released if bed is unlocked press the lock button again to fix the bed into position be...

Page 108: ...perature Testing various temperatures and finding the optimum temperature are needed Temperature options can be changed in the 3DWOX Desktop slicer Material Appropriate nozzle temperature Appropriate...

Page 109: ...5 Printable Verification 4 2 When Printer Cannot be Turned On 1 Open the Front door shown below and turn the belt counter clockwis 2 After the bed is lowered remove printed output and turn the power o...

Page 110: ...Printable Verification 4 6 4 3 If problems persist 1 Please visit http 3dprinter sindoh com...

Page 111: ...5 Maintenance 2X Series USER MANUAL...

Page 112: ...right after a print job 1 3 Periodical Inspection Oil Grease Inspection During manufacturing grease oil is applied to the gears After a period of time grease and oil can dry and cause printer noises d...

Page 113: ...ed the properties will be changed The changed leftover is harder to pull out and easily stacked in the nozzle Therefore it is recommended to clean the nozzle regularly if you want to use nozzle for a...

Page 114: ...Maintenance 5 4 5 3 Press Setting Extruder to enter Extruder mode 4 After positioning the nozzle in the center insert the enclosed short tube into the nozzle Short Tube...

Page 115: ...The properties of the material are slightly different for each filament color Using non white PLA filaments can cause filaments to break when pulling out the filaments 6 Press the home button in the U...

Page 116: ...re on the left below the nozzle cleaning is complete Cleaned Filament Contaminated Filament USING NOZZLE CLEAN TOOL If the filament does not come out of the nozzle well in step 5 proceed as follows On...

Page 117: ...the nozzle can come out Caution When you pull out the filament if you can not pull it out well please heat the nozzle after removing it B Using Nozzle Spring Pin If the filament does not come out of...

Page 118: ...played insert the nozzle spring pin at the nozzle inlet side and turn it to the left and right to drill it Caution Be careful It may cause burns The tip of the nozzle may be hot Please wear it with he...

Page 119: ...shown below Please move the nozzles to the center 3 Wipe the tip of the nozzle with cotton or leather cloth in the direction shown below Caution To prevent burns wipe the nozzle tip by folding the cl...

Page 120: ...ament is not transferred properly Follow the directions listed in the 3 5 Solu tion for EC 401 section EC 411 412 413 and 414 The filament was not loaded properly Remove the cartridge according to the...

Page 121: ...unloading Follow the UI instructions in removing the re maining filament Refer to P 5 5 EC 487 Remove the remaining filament be cause of a problem during loading Remove any filament located outside of...

Page 122: ...e unlock Remove the cartridge from the printer Use the extruder jog mode to remove the filament Cut the removed filament Use below image as reference re install the cartridge and run LOAD Note Cutting...

Page 123: ...r cannot be seen After attaching the Snap Ring gentely push the tube in Approx 1 5mm Use Extruder mode to transfer the filament towards the nozzle and check that filament is coming out of the end of t...

Page 124: ...times with 800 grit sandpaper or so 3 Check the filament residue or foreign matter on the Nozzle tip and remove with a cleaning tool After lowering the bed enther the extrude mode and wipe it with cot...

Page 125: ...the screen 2 The EC 401 error code selects the cartridge with the number of the detected nozzle and unloads it Remove the cartridge from the printer Open the cartridge and check if the filament is ta...

Page 126: ...tact our customer service hotline and submit a video or image of this issue to a customer service representative 4 A persistent EC 401 error code may be caused by an insufficient space between the noz...

Page 127: ...5 17 Maintenance 5 5 Press the Start button to continue printing...

Page 128: ...output may not adhere on the bed properly and should consider exchanging the bed to a new one Bed sheet is a consumable Please replace the bed sheet if models don t get attached to it due to a signif...

Page 129: ...5 19 Maintenance 5 2 Remove the cover by pulling it up 3 Remove the bolts by using the plus screwdriver to fix the duct 4 Rotate and lower the duct to the indicated direction...

Page 130: ...20 5 5 Release the hook and remove the duct from the device 6 Remove the consumed filter from the duct 7 Install a new filter on the duct as shown in the image 8 Connect the hook of the duct as shown...

Page 131: ...e 5 9 Fasten the duct to the device by tightening the bolts using the plus screwdriver 10 Lower the extruder cover to install it on the device 11 Fasten the extruder cover to the device by using the p...

Page 132: ...lor is the only difference from the previous filament it doesn t affect the printing quality Difference in material however may affect the printing quality To fix problem after changing cartridge plea...

Page 133: ...5 23 Maintenance 5 1 Remove Snap Ring SNAP RING 2 Press the tube holder and pull the tube to remove TUBE TUBE HOLDER 3 Push the top of the front handle and lift it up to open the cover HOOK COVER...

Page 134: ...re disconnected 1 With the cover lifted up attach the nozzle The magnet of the nozzle attaches to the surface but check if it is fully attached by shaking it Also inspectthe spring pin and see if it i...

Page 135: ...osition the harness near the left right and center section of the cover The harness can get caught in between covers when closing Caution Harness 3 Insert Tube Note Push the tube in about 50mm until t...

Page 136: ...p Ring in between the Fitting and Holder SNAP RING SNAP RING INSERTION POINT 5 Finally push tube in all the way through Approximately 1 5mm can be additionally inserted TUBE 6 Use the Cartridge Select...

Page 137: ...6 Appendix 2X Series USER MANUAL...

Page 138: ...Appendix 6 2 6 1 Type of Consumables Material Color Material PLA ABS FLEXIBLE and PVA are compatible Color white black gray green blue yellow red Pink PLA Purple PLA...

Page 139: ...uipment This equipment is a Class A EMC electromagnetic compatible equipment and should not be used in hou sehold locations This equipment is a Class B EMC electro magnetic compatible equipment for ho...

Page 140: ......

Reviews: