Simrad FishNet 144 Instruction Manual Download Page 50

48

G210–54/1

Details

Enter network name

This is the name of the radio network you want to join. The radio network name is
in upper case.

Related topics

Joining a radio network, page 25
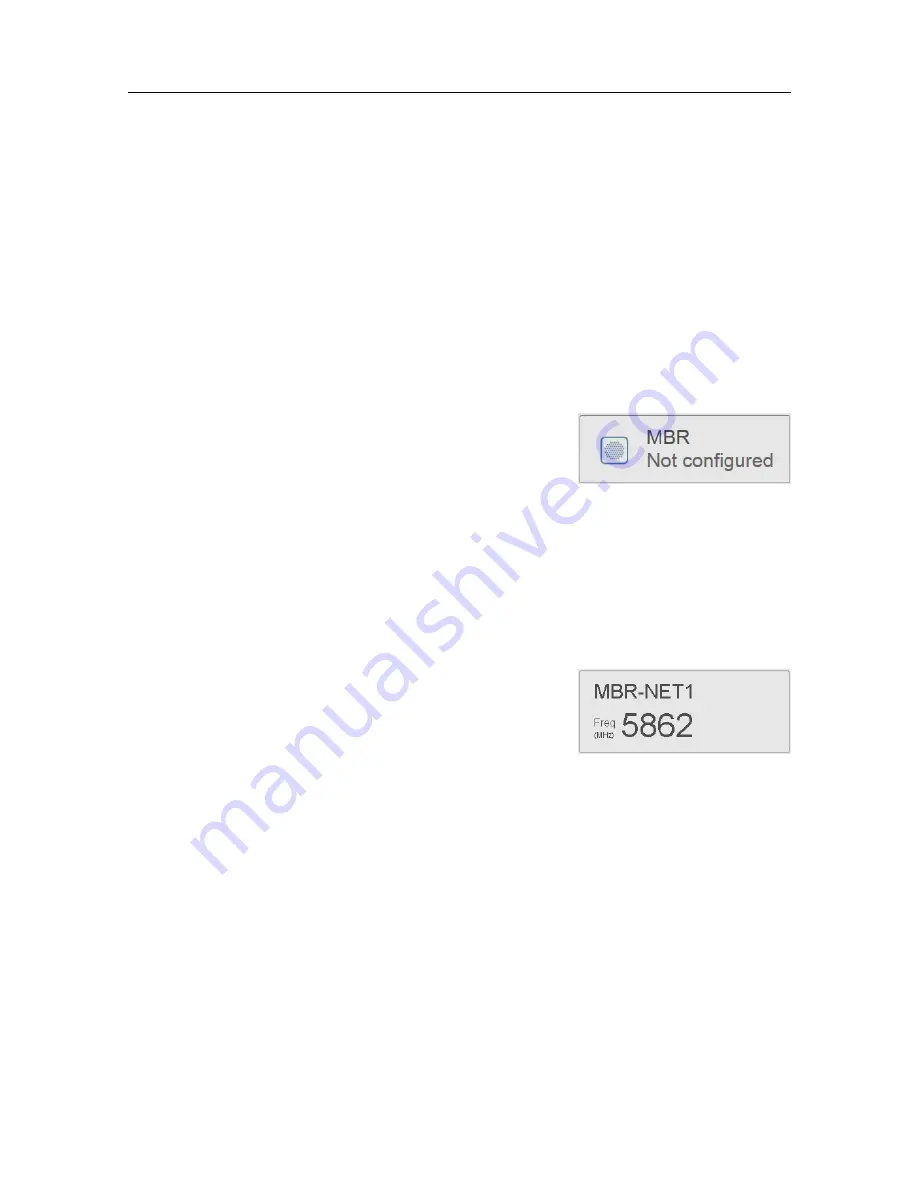
System status

The

System status

shows the status for the local radio

site. The status is

Active

when the radio site is configured.

The status is

Not configured

when the radio site is not

configured.

The

System status

is located to the left in the

Main

view.

Related topics

Checking the status of the MBR network, page 29

Network status

The

Network status

shows the current network name

and the frequency of the network. The Network status is
located to the left in the

Main

view.

Related topics

Checking the status of the MBR network, page 29

Individual radio site status

The

Site list

contains information about each radio site in the network. Both for local and

remote radio sites.

The

Site list

is located to the left in the

Main

view.

FishNet 144 Instruction Manual

Summary of Contents for FishNet 144

Page 1: ...Simrad FishNet 144 Maritime Broadband Radio T E C H N O L O G Y F O R S U S T A I N A B L E F I S H E R I E S www simrad com Instruction Manual...

Page 2: ......

Page 3: ...t 144 Maritime Broadband Radio Instruction Manual This manual provides you with reference information required to operate and fully understand the commands menus operational modes and options provided...

Page 4: ...mproper use or maintenance may cause damage to the equipment and or injury to personnel You must be familiar with the contents of the appropriate manuals before attempting to operate or work on the eq...

Page 5: ...the computer network adapter 15 Operating procedures 17 Setting up the radio site for operation 17 Creating a new radio network 22 Joining a radio network 25 Editing an existing radio network 26 Addi...

Page 6: ...Radio Unit 51 Mounting the Radio Unit 51 Setting to work summary 53 DRAWINGS 54 About drawings 54 Outline dimensions 55 TECHNICAL SPECIFICATIONS 57 Performance specifications 57 Interface specificatio...

Page 7: ...nfigure operate and maintain the FishNet 144 Target audience This manual is intended for all users of the FishNet 144 This includes installation personnel navigators and other operators License inform...

Page 8: ...description page 7 System diagram page 7 Scope of supply page 8 Restrictions in guarantee page 8 Radio frequency license page 9 Health and safety page 9 Network security page 9 Support information pa...

Page 9: ...o site is one or several radio units connected together on one location A radio network is a network of radio sites The FishNet 144 requires no extra infrastructure to operate It serves as an extensio...

Page 10: ...ocally Power supply 24 V DC Kongsberg Maritime AS part no G072 59 For indoor use only Computer For configuration purposes Restrictions in guarantee Changes or modifications to the product not explicit...

Page 11: ...garding environmental conditions WARNING RF exposure According to EN 50383 the safety distance for the FishNet 144 is o 8 metres Network security If a FishNet 144 system is connected to a local area n...

Page 12: ...trusted users The customer end user of the FishNet 144 system will always be in charge of defining and implementing a security policy and providing the relevant network security applications Note Sim...

Page 13: ...G210 54 1 11 Telefax 47 73 51 50 20 E mail address km support seatex km kongsberg com Website http www km kongsberg com seatex Related topics Repairing the Radio Unit page 61 FishNet 144...

Page 14: ...it page 12 Enabling contact with the Radio Unit page 13 Defining the IP address on the computer network adapter page 15 Turning on the Radio Unit The Radio Unit is turned on when the power connector i...

Page 15: ...th the Radio Unit To be able to set up and communicate with the Radio Unit you must enable contact with the unit via a browser Prerequisites In order to set up the Radio Unit you need these items Comp...

Page 16: ...ar Observe that the Welcome page appears For previously configured systems the Main view appears Result You are now connected to the web interface on your local radio Related topics Defining the IP ad...

Page 17: ...elect Settings c Observe that the Settings dialog box opens d Select Network and Internet e At the bottom of the dialog box select Change adapter options f Select the network adapter you are going to...

Page 18: ...127 10 Subnet mask 255 255 0 0 4 Select OK to save the chosen settings then close all the dialog boxes Related topics Enabling contact with the Radio Unit page 13 Setting up the radio site for operat...

Page 19: ...ork configuration All configuration of the FishNet 144 Maritime Broadband Radio MBR is done through the web interface Prerequisites The IP address for the Radio Unit is located at the bottom of the Ra...

Page 20: ...e background select the System menu button to open the System menu In the Palette group you can change the colour palette 2 Select Start on the Configuration guide page to start the step by step confi...

Page 21: ...the radios you want to add to the site Type a description of the location of the Radio Unit Select Continue Note Radio units connected on the local Ethernet will appear automatically They are by defau...

Page 22: ...y Select the data rate for the radio site from the Rate list 6 Select Manage third party equipment to open the Third party equipment dialog box This is where you add third party equipment to your radi...

Page 23: ...the MAC address Select Add to add the equipment Note You can add and or change information later by selecting the equipment making the changes and selecting Update You can also delete equipment by sel...

Page 24: ...ge 53 Creating a new radio network You must create a new radio network in order to communicate with other Maritime Broadband Radio MBR sites Context Important The radio network name is in upper case I...

Page 25: ...the site ID Select Add to add site IDs for other sites that you want to add to the radio network Observe that the new radio site appears in the Guest list The site ID is the ID you were given by the...

Page 26: ...e superframe can be adjusted This will affect the data throughput 6 Select OK to store the bandwidth settings and return to New network 7 Type a radio network name in the Network box The radio network...

Page 27: ...adio network which you want your operation to be a part of If another radio site has created a new radio network you might want to become a part of this network Context If you are out of range of the...

Page 28: ...u might want to administer and make changes to an existing radio network If a new site has been established or you want to change the bandwidth resources Prerequisites A radio network must have been s...

Page 29: ...g network 4 If you want to adjust the bandwidth resource for each site select Resource management to enter the Resource management dialog box 5 Select Update to save the network settings Related topic...

Page 30: ...3 Select the Manage third party equipment button to open the Third party equipment dialog box 4 Type the IP address of the equipment you want to connect Select equipment type from the drop down list...

Page 31: ...the Main view It is easily visible to the operator Procedure 1 Look at the system status information to view the status about your local site The status is Active when the radio site is set up for op...

Page 32: ...t the Unfold button to show Tx and Rx traffic on the radio site BW indicates the bandwidth resource allocated to the remote radio site Related topics System status page 48 Network status page 48 Indiv...

Page 33: ...lect a colour scheme for the display which suits your current light conditions Context Two palettes are available Day black and day white Procedure 1 Select the System menu button in the top right cor...

Page 34: ...em The FishNet 144 is operated and configured from the System menu Related topics Menu system page 34 Display organisation The display is made up of three main parts Information about the status of th...

Page 35: ...k view It displays the MBR sites in the current network E System menu button It provides various system settings and operational functions F Local site It shows the position of local site in the netwo...

Page 36: ...ner of the display to open the System menu When the System menu is open this button changes to a Close button Select the Close button to close the System menu The System menu provides access to four g...

Page 37: ...nt for the local radio site You can also see the radio details for the radios on the local site Related topics Operational principles page 32 Welcome The Welcome page is the start page of your radio u...

Page 38: ...Unit page 13 Configuration guide An installation wizard takes you through the setup of the radio site The Configuration guide page is the first page in the step to step configuration of your radio sit...

Page 39: ...ame of your radio site How to open This page is step 2 in the step to step configuration of your radio site Details Name of site Type a suitable name for your radio site This name will be displayed in...

Page 40: ...e local Ethernet will appear automatically They are by default selected Details Select the Details button to open the Radio status property sheet This dialog box shows the serial number product versio...

Page 41: ...w to open This is the last page in the step to step configuration of your radio site Details Frequency This is the operating frequency of the radio site Rate This is the operating data rate of the rad...

Page 42: ...ation page 17 Third party equipment page 40 Status page 41 Third party equipment In the Third party equipment dialog box you can manage third party equipment connected to your radio site It contains a...

Page 43: ...dress This is the MAC address of the equipment you want to add to your radio site The circle becomes green when a MAC address is found automatically for the entered IP address Select the MAC button to...

Page 44: ...rating frequency of the Radio Unit Rate This is the data rate for the Radio Unit Temperature This is the internal temperature of the Radio Unit Antennas This is the number of active antenna elements C...

Page 45: ...39 Checking the product version page 60 Edit current network The Edit current network dialog box allows you to edit the current radio network How to open This dialog box is opened from the System men...

Page 46: ...urrent network with the same network name and the resource distribution between the radio sites Resource management This button opens the Resource management dialog box This is where you can change th...

Page 47: ...bandwidth which is an open resource Open resource is a contention based multiple access protocol which allows radio sites to communicate without having a fixed allocated time slot Add by site ID You c...

Page 48: ...save the current configuration as a preset Related topics Creating a new radio network page 22 Resource management page 46 Resource management The Resource management dialog box allows you to change...

Page 49: ...the current network with the same network name and the resource distribution between the radio sites Rate This is the operating data rate of the radio site Bandwidth It shows the bandwidth of the radi...

Page 50: ...figured The System status is located to the left in the Main view Related topics Checking the status of the MBR network page 29 Network status The Network status shows the current network name and the...

Page 51: ...site The Usage bar indicates the usage of the bandwidth resource Select the Unfold button to show Tx and Rx traffic on the radio site Remote radio site BW indicates the bandwidth resource allocated to...

Page 52: ...rawings page 50 Necessary tools and equipment page 51 Selecting the best location for the Radio Unit page 51 Mechanical drawings Outline dimension drawings are included in this manual Unless otherwise...

Page 53: ...e system performance Consider these factors when installing the unit Make sure the unit is properly secured and vertically mounted Mount the unit in a suitable location where the radio signals will no...

Page 54: ...ple an echo sounder D Connection to power source on vessel Procedure 1 Mount the Radio Unit according to your mounting arrangement Make sure the unit is properly secured and vertically mounted 2 Conne...

Page 55: ...the Radio Unit 2 Enable contact with the Radio Unit 3 Configure the radio site 4 Join a radio network Related topics Turning on the Radio Unit page 12 Defining the IP address on the computer network a...

Page 56: ...age 54 Outline dimensions page 55 About drawings Unless otherwise specified all measurements are in millimetres The drawings are not to scale The drawing can also be downloaded from our website https...

Page 57: ...G210 54 1 55 Outline dimensions Drawings...

Page 58: ...56 G210 54 1 Related topics Mechanical drawings page 50 Mounting the Radio Unit page 51 FishNet 144 Instruction Manual...

Page 59: ...e specifications These performance specifications summarize the main functional and operational characteristics of the FishNet 144 Operating range 15 km Dependent on antenna placement and height User...

Page 60: ...na elements 4 This product is in compliance with the standard ETSI EN 303 276 Weight and outline dimensions These weights and outline dimension characteristics summarize the physical properties of the...

Page 61: ...rning on the Radio Unit page 12 Environmental specifications These environmental specifications summarize the temperature and humidity requirements for the FishNet 144 system Enclosure material Thermo...

Page 62: ...dio Unit Procedure 1 Select the System menu button to open the System menu 2 Select Site to enter the Configure site page 3 Under Radios select the Details button for the radio for which you want to s...

Page 63: ...Brush off any ice or snow Repairing the Radio Unit The Radio Unit is not designed for repair in the field All repairs and modifications of the unit except for installation of new software versions and...

Page 64: ...ent and that all components and parts are present according to the packing list The equipment contains delicate electronic components handle with care and avoid shocks The equipment can be lifted by h...

Page 65: ...ent and human health This is a precondition for reuse and recycling of used electrical and electronic equipment For more detailed information about disposal of your old appliance please contact your l...

Page 66: ...ialog box 41 Remote radio site status dialog box 49 Resource management dialog box 46 system 7 System menu 34 System status dialog box 48 Third party equipment dialog box 40 Welcome page dialog box 35...

Page 67: ...support 10 installing radio unit 51 IP address network adapter 15 IP Address network adapter 15 J join network how to 25 Join network dialog box description 47 K Kongsberg Maritime support 10 Kongsber...

Page 68: ...58 Radio Unit how to clean 61 how to enable contact 13 how to turn on 12 reader this manual 5 Remote radio site status dialog box description 49 removing third party equipment 28 repairing radio unit...

Page 69: ...remove 28 Third party equipment dialog box description 40 this manual purpose 5 target audience 5 tools installation of system units 51 turning on the Radio Unit 12 U unpacking equipment 62 W waste ha...

Page 70: ...2018 Simrad...

Reviews: