background image

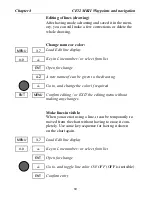
)F REQUIRED GO TO AND SELECT A DIFFERENT TRACKPOINT AS

THE APPROACHING POINT

'O TO AND CHOOSE SAILING DIRECTION IN TRACK

3TART NAVIGATING

Refer to section 4.1.2 Navigation display, 4.1.3 ETA &
AVN, and 6.1.4 Set & drift.

4O STOP NAVIGATING FROM CHART DISPLAY OR

-press 

[MENU], [4], 

and select ’Turn NAV OFF’.

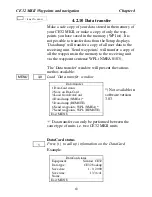
The waypoint/mark program features 999 
points, 17 different symbols, and location names.
The waypoints can be organized into 30 routes 
or sailplans of max. 99 waypoints in one route. 
Waypoints can be entered as cursor plots directly 
on the chart, or as coordinates via the keypad. 

Depending on your situation there are several ways you
can insert/plot and edit marks and waypoints:

1. Plot cursor position on chart by means of the 

[PLOT]

key. Refer to section 3.1.1 "PLOT function" and 4.2.2.

 7!90/).42/54% -%.5

3:

WP/RTE

-ARK 70 LIST

2:WP used in routes
3:Delete group of WPs
4:Route
5:Route calculation
6:Trackplot
7:Line
8:Target
9:Data transfer

+/-

+/-

ENT

3

GOTO

 -ARKS AND WAYPOINTS

#HAPTER 


#% -+)) 7AYPOINTS AND NAVIGATION

48

Summary of Contents for ce32 mkii

Page 1: ...ic navigation equipment is subject to external factors beyond the control of the manufacturer Therefore such equipment must be regarded as an aid to navigation The prudent navigator will for that reason never rely on a single source for position fixing and navigation 3 2 03 HART3OUNDER NGLISH ...

Page 2: ...nce to the MOB position Elapsed time first in sec onds and then in minutes over 9999 minutes O TO GRAPHICAL DISPLAY The 24 display will provide a graphical impres sion of the MOB position a man waving his arms in relation to the ship 0RESS WIN REPEATEDLY TO RETURN TO THE DISPLAY 0RESS MENU 4 AND 3 TO TURN THE FUNCTION OFF 0RESS MENU 2 AND 6 TO RE CALL THE LAST POSI TION PLUS THE EXACT TIME AND DAT...

Page 3: ...n 40 4 1 8 Route calculation 41 4 1 9 Editing of route 42 4 1 10 Track navigation 47 4 2 WP Route menu 48 4 2 1 Marks and waypoints 48 4 2 2 Plot cursor position on chart 49 4 2 3 Plot mark or waypoint as ship s position 52 4 2 4 Plot mark waypoint via WPlist 53 4 2 5 Edit mark waypoint 54 4 2 6 Delete mark waypoint 56 4 2 7 Trackplotting 57 4 2 8 Lines drawing 59 4 2 9 Targets 61 4 2 10 Data tran...

Page 4: ...ct 96 8 4 2 Transducer connections 96 8 4 3 Fuse 96 8 4 4 NMEA 0183 interface connections 96 8 5 Transducer connections 97 8 5 1 Position for transducer 99 8 6 Optional connections 100 8 7 Maintenance 101 8 8 Troubleshooting procedure 102 8 9 Specifications 103 PPENDIX Glossary of terms 104 PPENDIX List of datums 111 PPENDIX TideTracker feature only available in US version 113 PPENDIX C MAP Port T...

Page 5: ...SOUNDER SYSTEM with selectable frequencies will provide an impression of Bottom expansion VRM expansion A scope and white line 4HE LOBAL 0OSITIONING 3YSTEM is rapidly becoming the most common system used for navigation and positioning all over the world Not only for maritime use but also for land based applications and aviation The satellite based system has been developed and is operated by the U...

Page 6: ...lectrical parts inside may cause bodily harm or death If the unit is not working properly please check section 8 8 Troubleshooting If your CE32 MKII requires servicing or repair cal your authorized SIMRAD dealer 0OWER SOURCE FUSE AND POWER CABLE Check that the DC power sup plied to the unit is within the range of 10 to 32 volts Note that the ap ropriate fuse must be employed see the fuse rating in...

Page 7: ... move around in the chart dis play and to place the cursor on the function you wish to change then select the data by using the alphanu meric keys or keys OW TO INTERPRET SPECIAL MARKED KEY SYMBOLS ETC IN THE MANUAL Either the plus or minus key may be applied Alpha numeric keys for insertion of figures Alpha numeric keys for insertion of letters Emphasizes important points F EYPAD 0 9 A Z UNDAMENT...

Page 8: ...s are related to a certain menu s and can only be applied when in the appropriate menu Turns cursor on off in data displays Opens for con firms insertion and editing of data Calls up informa tion on marks waypoints etc on chart Turns the menu bar on off Exits any data display with out taking any action Press for 2 seconds to activate the MOB Man over board function Zooms in for greater chart detai...

Page 9: ...er the cursor ship on the chart Turns the CE32 MKII on Calls up an info window where you can adjust light contrast in screen and back ground light in keypad Adjust contrast in black white version Turns the CE32 MKII off Ejects drawer for insertion of C card 4O TURN THE ON PRESS AND HOLD THE PWR KEY UNTIL THERE IS A PICTURE ON THE SCREEN HOOSE LANGUAGE FOR DISPLAY AND MENU TEXT BY KEYING THE NUMBER...

Page 10: ...EW ALTITUDE E G METRES altitude can be set to positive or negative value ONFIRM ENTRY 2OTATION OF 7 DOWS 0RESS WIN REPEATEDLY TO LEAF THROUGH THE WINDOWS CURRENTLY SELECTED FOR ROTATION The sequence of the 4 displays will be as they are se lected If you only need 3 or 2 displays in the rotation then you call up the same display in more than one WINdow to make the total of 4 Press WIN to select the...

Page 11: ...enu bar e g Main menus Sub menus Having selected e g 4 NAVIGATION from the menu bar its associated menus sub menus will drop down Key in the number next to the function you wish to call forward or use the cursor key to highlight the function and press ENT If you want to switch to a different menu use the cursor key to move to the adjacent menu The menu bar will disappear from the screen at the sel...

Page 12: ...units language 2 Navigation setup 2 Bottom expansion 2 Interface setup NMEA 3 Cursor 3 VRM expansion 3 Interface setup remote 3 Waypoint 4 Turn A scope ON 4 Interace setup alarm log 4 Route 5 Turn VRM ON 5 Wind display 5 Track 6 Presentation setup 6 Set drift 7 Echosounder setup 7 Display color 8 TideTracker US version only The 6 menu is dynamic and will adapt to the function which is currently ac...

Page 13: ...t display with cursor off will give you course speed and ship s position With cursor active the top line will show the cursor position in lat long bearing and distance from actual position to cursor position The ship symbol indicates the present position on the chart and the pointer informs of the actual true course course over ground There is a built in autohome function which automatically move ...

Page 14: ... with CURSOR ON the zoom function will zoom around the cursor With CURSOR OFF the zoom function will zoom around the ship s position OOM IN FOR DETAILS SMALLER SCALE OOM OUT FOR OVER VIEW GREATER SCALE F Use one of the shorcut keys to quickly change the chart scale Press 1 1 6 600 000 Press 6 1 20 000 Press 2 1 2 000 000 Press 7 1 6 000 Press 3 1 600 000 Press 8 1 2 000 Press 4 1 200 000 Press 9 1...

Page 15: ...different NAV modes refer to section 4 1 1 Cursor navigation 4 1 5 Waypoint navigation 4 1 7 Route navigation 4 1 10 Track navigation With NAV mode active press the GOTO key and Press 1 to advance to the next waypoint in the route Route navigation Press 2 if you for some reason have drifted off course and wish to continue to the approaching waypoint Press 3 if you wish to change the current form o...

Page 16: ...gether with depth information AKE ROUTE You can quickly make a route by plot ting cursor s position one after another i e place the cursor on the first position of the route you wish to make and press PLOT Move the cursor to the next po sition and press PLOT Continue in this manner till the route is complete In case you make a wrong plot press CLR to erase the last plotted position Save the route ...

Page 17: ...ss MENU to exit the function IST AND 44 IN ROUTE FROM TO Navigational in formation from one route point to another is easily ob tained by placing the cursor on the first route point A and press ENT then move to the second route point B and press ENT This will activate the Route cal culation display which will inform of Total distance from A to B Time to go from A to B Arrival time etc 3ET VERTICAL...

Page 18: ...test if there is any data present at all F If a cartridge is defect it must be removed before you can exit the display When the Cartridge status display informs that the cartridge is O K exit with MENU In addition to the larger boundaries of the world chart there will be separate boundary lines for the individual charts stored on the same cartridge Other chart areas can quickly be reached by OOM O...

Page 19: ...ore The Chart detail level can also help to control the amount of details shown on the chart The advanced zoom feature will automatically expand or compress charts for the scale you have selected and attempt to compensate for missing charts When ever a chart is compressed however it tends to get clut tered with details Choose between five settings AUTO HIGH default compressed charts will display d...

Page 20: ...ots are for the deepest water OVE CURSOR TO THE DESIRED SETTING 4OGGLE BETWEEN AND Continue in this manner until you have turned those of the settings off which you do not require to have shown on the chart at the moment ONFIRM ENTRY AND RETURN TO CHART DISPLAY In this display you can adjust what type of information you want shown on the screen This gives you the opportunity to have an uncluttered...

Page 21: ...osition will call up a display which will provide information of the last acti vated MOB position ENT H A R T S E T U P WP ON Numbers OFF Names OFF Route numbers OFF Track numbers OFF Line numbers OFF Target numbers ON Chart scale factor 1 Show scale ON LAT LON grid OFF Auto chart select ON Position in chart display LAT LON Auto cursor switch off 05 min ON Orientation NORTH UP 15 Motion RELATIVE 0...

Page 22: ...mber of received satellites S Satellite search a A good b B acceptable c C fair or no update see also Status indicator and accuracy on next page With D GPS receiver built in or connected dGPS differential data received DGPS corrected differential data received 4O RESET LOG OR SET TIME LOCAL 54 PEN FOR CHANGE 3HIFT BETWEEN OG AND Datum 000 Log 1 Log 2 WGS 1984 0 2nm 0 4nm LAT 56 52 500 N LON 9 50 7...

Page 23: ... better in 95 of the time dGPS indicates that differential data is received either via built in differential receiver or from external receiver DGPS indicates that the position is corrected by the dif ferential data The accuracy will typically be 3 5 me tres In order to utilize the high accuracy of the GPS system it is necessary to align the lat long calculations to the paper charts you are using ...

Page 24: ...ed indicator will show how much the present speed varies from the average speed If the difference exceeds 3 knots or km h or miles h an arrow will appear which will be pointing out of the scale OURSE AND SPEED KEYS TO PRESS p KN UAL SPEED 0OSITION DISPLAY KEYS TO PRESS 2 2 MENU 2 3 MENU HAPTER HART AND POSITION MENUS 24 ...

Page 25: ...me Dynamic speed with short filtering time The average speed indicator with long filtering time gives a very stable reading The dynamic speed indicator with short filtering time is more unsteady but with quick reaction to changes OW TO RESET DUAL SPEED PEN FOR CHANGE 0RESS ENT TO RESET DUAL SPEED OR 0RESS MENU TO EXIT FUNCTION WITHOUT MAKING ANY CHANGES p Status UTC time Water speed DGPS 4 Sat a 1...

Page 26: ...B 29 Bangladesh 6C 06 Lofoten Norway 3E 30 Hokkaido 9C 07 German 3F 31 Tohoku 6C 08 N Baltic 4B 32 Kyusyu 7C 09 NW Spanish 4C 33 Namaqua 4A 10 Trondelag N 4E 34 Cape chain 6A 11 English 5B 35 E Province 8A 12 N Bothnian 5F 36 Dampier 8E 13 S Spanish 6A 37 Port Hedld 4A 14 N Scottish 6C 38 Hokuriku 2C 15 Finland 6E 39 Newfoundld 2C 16 Danish 7B 40 Cabot strt 6B 17 Irish 7D 41 Nova Scotia 7C 18 Finn...

Page 27: ... NEGA TIVE TOGGLE WITH OFFSET TO THE TIME DELAY ONFIRM ENTRY ORAN KEYS TO PRESS 2 5 ENT ENT IST OF ORAN CHAINS Central Pacific 4990 Commando Lion 5970 Gulf of Alaska 7960 North West Pacific 9970 Southeast U S 7980 Norwegian Sea 7970 Great Lakes 8970 Mediterranean Sea 7990 Northeast U S 9960 Icelandic 9980 Canadian West Coast 5990 Saudi Arabia South 7170 Canadian East Coast 5930 Saudi Arabia North ...

Page 28: ...y in case a particular satellite is disturbing the navigation PEN FOR CHANGE OVE CURSOR LEFT RIGHT TO LOCATE SATELLITE TO BE EXCLUDED 4HE MINUS KEY WILL EXCLUDE THE SATELLITE AND THE PLUS KEY WILL REINSTATE IT ONFIRM ENTRY 0OSITION SETUP KEYS TO PRESS 3ATELLITE OVERVIEW 2P 5P 7P 8P 11P 12P 18P 22P 10dB 13dB 12dB 9dB 11dB 8dB 13dB 11dB HDOP 1 4 DOP limit 8 0OSITION SETUP Manual antenna altitude 5m ...

Page 29: ...e of more than 20 If the preset DOP limit is exceeded indicated by in the position display it will cause the position updating to stop until it once again is within the limit The DOP limit can be changed manually but should not be set to higher than 8 factory set up as this may result in poor accuracy false position PEN FOR CHANGE O TO 0 LIMIT AND INSERT NEW LIMIT ONFIRM ENTRY 2ECEPTION STATUS Sat...

Page 30: ...t in receiver plus standard receivers incl RS5660 RS5665 or 23 24 03 Data counts up slowly when correct DGPS data is received A break in the data flow will reset the counter Maximum number of received DGPS data will be reset by power off on Test counts up slowly when any data is received Will not be displayed after activating 4 PEN FOR CHANGE 3PEED AND COURSE FILTER LEVEL There is a speed filter o...

Page 31: ...display The time interval of the speed diagram can be set in 8 intervals from 1 min ute to 3 hours freeze O TO THE FUNCTION YOU WISH TO CHANGE EY IN NEW FIGURE OR CHANGE SETTING ONFIRM ENTRY Setup speed diagram Scale for speed max 010kn Scale for speed min 000kn Speed over ground S ON Velocity made good V ON Water speed W ON Time interval 5 MIN 3PEED DIAGRAM KEYS TO PRESS 3 kn 6 kn 7 kn kn 13 49 1...

Page 32: ... be set ma nually if known but when left on AUTO the naviga tor will always search for the nearest one with a good signal strength A good signal strength is 20 and up Signal to noise ratio should be 8dB and up How to change the current settings in the DGPS infor mation display PEN FOR CHANGE O TO THE FUNCTION YOU WISH TO ALTER 4OGGLE THE FUNCTION INSERT FIGURES ONFIRM ENTRY DGPS information Beacon...

Page 33: ...Navigation setup To start the chart cursor navigation will require that the cursor is already activated in the chart display If you currently have a chart display on the screen all you do to activate the cursor is press the cursor key And if your current display is something different than the chart display 0RESS GOTO TO LOAD THE CHART DISPLAY AND PRESS THE CURSOR KEY TO ACTIVATE THE CURSOR THEN M...

Page 34: ...tion and earing to ext WP 1 Ship s position in relation to intended track Does not indicate heading 2 Waypoint circle alarm you will re ceive an alarm when touching the circle 3 Ideal course line between two way points starting from ship s position when NAV is activated 4 Waypoint and waypoint line you will receive an alarm when reaching the point line 5 XTE alarm lines you will receive an alarm i...

Page 35: ...te PEN FOR CHANGE in route navigation the final destina tion point is automatically suggested F REQUIRED SELECT ALTERNATIVE EARLIER ROUTE POINT only in Route navigation O TO 4 MODE AND SELECT 54 OR 5 O TO 6 AND INSERT TIME AND DATE IF REQUIRED ONFIRM ENTRY STIMATED TIME OF ARRIVAL 4 KEYS TO PRESS MENU 4 3 ENT 0 9 ENT ETA Arrival Time 08 41 Date 12 03 2000 ETA mode MANUAL ETA speed 10 0kn AVN Veloc...

Page 36: ... 4 is about to be made The top line will show cursor s position in lat long or decca lanes Lo ran TDs plus bearing and distance from position or last plot to cursor If you plot a wrong position by mistake ELETE THE LAST PLOTTED POSITION 0RESS ENT WHEN READY TO SAVE THE 2OUTE The first vacant route number is suggested You can give the route a name section 4 2 2 REATE ROUTE BY CURSOR KEYS TO PRESS 2...

Page 37: ...NAVIGATING Refer to section 4 1 2 Navigation display 4 1 3 ETA AVN display and 6 1 4 Set drift display 4O STOP NAVIGATING FROM CHART DISPLAY OR press MENU 4 and select Turn NAV OFF The system can hold up to 30 routes numbered from 1 to 30 and one route can hold up to 99 waypoints Each route can be given a name of max 27 characters for easy identification Each leg in a route can have an indi vidual...

Page 38: ...int can not be deleted from the waypoint list as long as it is part of a route or used for navigation OAD 2OUTE DISPLAY 2OUTE Indicates Route no 01 and Route Point no 01 which is the first point in the route The course line and the XTE corridor can be set ON OFF and the color can be changed NTER VACANT ROUTE NUMBER IN DIGITS LEAF THROUGH THE ROUTES IN THE MEMORY PEN FOR DATA ENTRY KEYS TO PRESS Ro...

Page 39: ... setup NSERT WAYPOINT IN ROUTE EY IN LOCATE NEXT WAYPOINT NUMBER FROM THE LIST NSERT NEXT WAYPOINT ETC F DESIRED USE CURSOR TO GO TO AND SELECT NEW COLOR FOR COURSE LINE OR 84 AND TOGGLE THE FUNCTIONS O TO NAME FIELD AND INSERT NAME OF MAX CHARACTERS refer to section 4 2 2 The name field will automatic ally contain the names if any of the first and last way point in the route Set up route 2 01 Nam...

Page 40: ...N AND MAYBE CHANGE START POINT ETC 3TART NAVIGATING You will now have the graphical steering display to navigate by see section 4 1 2 for interpretation 2OUTE NAVIGATION KEYS TO PRESS 3 GOTO 0 9 0 9 ENT ENT Route number 01 01 Name Direction in the route FORWARD Navigation from your position YES Show XTE limit ON 56 52 786N 9 50 318E POS N E 945 x 56 43 100N 6 36 985E 944 ROUTE 1 03x 56 23 602N 6 1...

Page 41: ... navi gate from POS current position If you need to go back to the original course line B you will also select route no 01 and route point no 06 direction is forward but you say NO to navigate from POS toggle with and confirm by pressing the ENT key To stay well informed during navigation the Route cal culation display will provide information of how long it takes to go from one point to another t...

Page 42: ...o modify delete existing ones It is also possible to delete a total route There are two ways of performing the editing either by means of the cursor or through the route menu DIT ROUTE BY MEANS OF THE CURSOR CTIVATE CHART DISPLAY CURSOR DITING OF ROUTE KEYS TO PRESS Route calculation Route 0 1 Route point A 06 WP1992 ROUTE 1 06x Route point B 05 WP1993 ROUTE 1 05x ETA speed 010 0kn MANUAL Total di...

Page 43: ...d then press PLOT ENT to insert it in the route You can delete a total route with its waypoints if they are not used in other routes or you can delete just the route lines and keep all the waypoints in the WPlist and their symbols will stay on the screen In case this INFO window appears on the screen it s because the cursor is not placed on the exact right spot Move the cursor slightly and try pre...

Page 44: ... route points are more than 9 if not then you will only have to press 9 once PEN FOR EDITING the last used WP from the WP list is suggested New WP if acceptable press ENT or KEY IN THE 70 NO DIGITS OR SCROLL THROUGH LIST DD THE WAYPOINT TO THE ROUTE ONFIRM ENTRY Edit route 2 01 Name Course line OFF XTE OFF N E 997 57 46 201N 9 26 643E 998 57 28 732N 9 02 995E 999 57 15 259N 8 10 460E New WP XTE 0 ...

Page 45: ... KEY IN NEW 84 VALUE 2EPLACE OLD 70 WITH EW 70 OR NEW 84 VALUE ONFIRM EDITING OW TO INSERT A WAYPOINT IN EXISTING ROUTE OAD THE 2OUTE DISPLAY EY IN THE 2OUTE NUMBER OR SELECT FROM LIST 7ITH CURSOR UNDER 0OINT NO KEY IN THE 0OINT NO WHERE YOU WANT A NEW 70 TO FOLLOW OR SELECT THE 0OINT NO BY SCROLLING THROUGH LIST PEN FOR EDITING EY IN THE EW 70 NUMBER DIGITS OR SCROLL THROUGH LIST NSERT THE EW 70 ...

Page 46: ...ELETE A TOTAL ROUTE OAD 2OUTE DISPLAY 3ELECT ROUTE NUMBER TO BE DELETED PEN FOR CHANGE ALL UP NEW DISPLAY WITH CHOICE OF WHAT TO DELETE To delete the route lines only press ENT To delete the route lines the waypoints in the route which are not used in other routes press CLR If you changed your mind press MENU to exit the Editing mode without de leting anything DELETE TOTAL ROUTE Delete route WPs n...

Page 47: ... MENU 4 6 and select Track from menu Number indicates that the track s number is and the nearest track point to the cursor ship is number Auto trackpoint shift set to ON will when reaching the approaching track point automatically pro vide navigational data to the next point in the track Auto trackpoint shift can be set to OFF if you wish to re ceive an alarm when reaching the approaching track po...

Page 48: ... can be organized into 30 routes or sailplans of max 99 waypoints in one route Waypoints can be entered as cursor plots directly on the chart or as coordinates via the keypad Depending on your situation there are several ways you can insert plot and edit marks and waypoints 1 Plot cursor position on chart by means of the PLOT key Refer to section 3 1 1 PLOT function and 4 2 2 7 90 4 2 54 5 3 WP RT...

Page 49: ... If Chart display is not in current display press GOTO CTIVATE 3ELECT 0 4 MODE ONE OF THE OPTIONS see below where point 2 is selected as an example The first vacant waypoint starting from WP999 is suggested Waypoints and other points appearing on the screen can be marked by one of 17 symbols The plotted waypoints are given a preset name start ing from PLOT 1 with a consecutive numbering for easy r...

Page 50: ...E POSITION COORDINATES 4 OR ORAN EY IN CORRECTION TO POSITION TOGGLE 3 OR 7 HANGE SYMBOL see Choice of 17 symbols below HANGE NAME OF WAYPOINT MAX CHARACTERS see Alphanumeric naming of points on next page HANGE COLOR OF SYMBOL OMPLETE WAYPOINT ENTRY EACON ISH 0LATFORM 2OCK AWASH ARBOUR ARKER ORTH 3OUTH AST 7EST 3TARBOARD 0ORT ENT ENT 0 9 A Z 0 9 0 9 7AYPOINT 2ED BUOY REEN BUOY 7RECK ANGER HOICE OF...

Page 51: ...you make a mistake Depending on the selected language the zero key will hold special characters eg and the 9 key will hold empty space Press the CLR key to delete a character word OCATE WAYPOINT BY ITS NUMBER OR NAME OAD 7AYPOINT LIST 0LACE CURSOR IN THE NUMBER FIELD the WP list will appear in numerical order NSERT NUMBER OF WAYPOINT YOU WISH TO CALL 0LACE CURSOR IN THE NAME FIELD the WP list will...

Page 52: ...h the name PLOT 1 the next in 998 with PLOT 2 etc ONFIRM ENTRY 0LOT POSITION AS SPECIFIC 70 NUMBER Can be applied from any display 0LOT ACTUAL POSITION ON CHART NSERT LOCATE DESIRED NUMBER WP number must be empty OMPLETE 70PLOT or before you press ENT you may want to change the position coordinates name symbol or color as described in section 4 2 2 F A WPplot can be changed adjusted or used in rou...

Page 53: ... 70 NO BETWEEN THE TWO HORIZONTAL LINES OR GO TO THE FIRST VACANT 70 NO IN THE LIST PEN FOR ENTRY When selecting a vacant WP number the system will suggest to use the pre sent position as waypoint This position can be ack nowledged by ENT or you can make corrections as re quired 0LOT MARK OR WAYPOINT VIA 70LIST KEYS TO PRESS Waypoint number 996 Name 991 N E 992 N E 993 N E 994 N E 995 N E 996 56 4...

Page 54: ...ion 4 2 2 HANGE COLOR OF SYMBOL OMPLETE WAYPOINT ENTRY It will be possible to edit a mark waypoint after it was saved in the WP list There are two ways to approach the editing 1 Edit mark waypoint via chart 2 Edit mark waypoint via WP list DIT MARK WAYPOINT VIA CHART If Chart display is not in current display press GOTO CTIVATE CURSOR AND LOCATE WAYPOINT PEN FOR EDITING see pop up window on next p...

Page 55: ...diting of the waypoint Changing the position of a waypoint will also update the WPlist with the new position Deleting a waypoint from a route will not delete the waypoint from the WP list DIT MARK WAYPOINT VIA 70 LIST OAD 7AYPOINT LIST 0LACE THE CURSOR IN THE NUMBER OR NAME FIELD EY IN THE NUMBER NAME OF THE WAYPOINT YOU WISH TO EDIT PEN FOR EDITING It is now possible to change the position symbol...

Page 56: ...0 NO DIGITS OR SCROLL THROUGH THE LIST BY MEANS OF THE KEYS PEN FOR EDITING AND DELETE WAYPOINT latitude and longitude will be replaced by ONFIRM EDIT OR EXIT FUNCTION WITHOUT DELETING THE WAY POINT ELETE A GROUP OF WAYPOINTS OAD ELETE GROUP OF 70S DISPLAY PEN FOR EDITING AND KEY IN THE NUMBER OF THE FIRST AND LAST 70 IN THE GROUP ONFIRM EDIT OR EXIT FUNCTION WITHOUT DELETING THE WAY POINTS MENU 3...

Page 57: ...p to 9 tracks numbered 1 to 9 with up to 256 points in each 3TART AND STOP TRACK FUNCTION OAD 4RACK SETUP Plot intervals can be set from 0 01 to 9 99nm Select color to specify the tracks The tracks will re main in the memory also when Display track is OFF 4RACKPLOTTING KEYS TO PRESS Track setup 1 Name Tracking OFF Display track OFF Interval 0 100 nm Trackpoints 0 Color Wake line OFF 3 6 MENU Waypo...

Page 58: ... of 256 plots have been used up then the first trackpoints at the tip of the tail will start to fall off to extend the capacity needed to keep trailing the ship DITING OF TRACK After a track is made you can give it a name change its name select a different color for the track or you can cancel the track by resetting it OAD 4RACK SETUP EY IN THE DESIRED TRACK NUMBER AND OPEN FOR CHANGE AME OR RENAM...

Page 59: ... THE DRAWING 0LOT THE FIRST POINT OF THE DRAWING OVE CURSOR TO NEXT POINT TO DRAW A LINE SECTION FROM POINT TO POINT 0LOT THE SECOND POINT OF THE DRAWING ETC Continue to draw line sections in this manner until the line drawing is complete If you plot a wrong point by mistake ELETE THE LAST PLOTTED POINT 0RESS ENT WHEN READY TO SAVE THE LINE DRAWING 4HE DRAWING CAN BE GIVEN A NAME OF CHARACTERS O T...

Page 60: ...HE COLOR IF REQUIRED ONFIRM EDITING OR 8 4 THE EDITING MENU WITHOUT MAKING ANY CHANGES AKE LINES INVISIBLE When you are not using a line it can be temporarily re moved from the chart without having to erase it com pletely Use same key sequence for having it shown on the chart again OAD DIT LINE DISPLAY EY IN INE NUMBER OR SELECT FROM LIST PEN FOR CHANGE O TO AND TOGGLE LINE COLOR OFF is invisible ...

Page 61: ...in via the keypad 3ET UP TARGETS The plotted target position is automatically preset to ac tual position of ship or to cursor position when the chart display is active and the cursor is on ALL UP 3ELECT 0 4 MODE 3ELECT 0LOT TARGET OR KEY IN THE POINT NUMBER 3ELECT TARGET 4 4 OR 4 4HE SUGGESTED SHIP OR CURSOR POSITION CAN BE ALTERED BY KEYING IN A NEW LAT LONG POSITION O TO AND INSERT NAME OF CHARA...

Page 62: ...and the tar get number e g T1 Refer to section 3 1 4 Chart setup 2 DIT TARGETS OAD 4ARGET DISPLAY PEN FOR EDIT NSERT OR CHANGE NAME IF REQUIRED O TO AND CHANGE COLOR IF REQUIRED ONFIRM ENTRY 3WITCH TARGETS OAD 4ARGET DISPLAY O TO AND SET TARGET ONFIRM ENTRY F You can exit a menu without making any changes by pressing MENU instead of ENT MENU 3 8 GOTO MENU 3 8 ENT A Z ENT 3 8 MENU ENT HAPTER 7AYPOI...

Page 63: ...dow will present the various methos available OAD ATA TRANSFER WINDOW Not available in software version 3 03 F Data transfer can only be performed between the same type of units i e two CE32 MKII units ATA ARD STATUS 0RESS 1 TO CALL UP INFORMATION ON THE ATA ARD Example ATA TRANSFER KEYS TO PRESS 3 9 MENU Data transfer 1 DataCard status 2 Save on DataCard 3 Load from DataCard 4 Data dump NMEA 5 Da...

Page 64: ...he unit s memory 0RESS ENT TO TRANSFER A COPY OF ALL THE DATA STORED ON THE ATA ARD INTO THE UNIT S MEMORY Note When transferring data from the DataCard to the CE32 MKII it will overwrite all existing user data in the unit s memory The load time is normally less than 1 minute F During all data transfers there will be an INFO win dow on the screen which informs of the process These INFO windows wil...

Page 65: ...der Pin 1 white TX A to PC RS232 serial port RX D pin 2 Sender Pin 2 brown TX B to PC RS232 serial port GND pin 5 Receiver Pin 3 yellow RX A from RS232 serial port TX D pin 3 Receiver Pin 4 green RX B from RS232 serial port GND pin 5 PC standard Windows Hyper Terminal or another ter minal suited for dumping data to a file The setup of the serial channel must be 4800 baud 8 data bit no parity 1 sto...

Page 66: ...After SELECTING ONE OF THE OPTIONS an info window will pop up indicating how the transfer copying is progress ing e g DATADUMP ACTIVE PLEASE WAIT PROGRESS HAPTER 7AYPOINTS AND NAVIGATION 66 ...

Page 67: ...er Any reflected signals from intervening objects such as a fish school are received by the transducer and converted back into an elec trical signal It is then amplified in the amplifier section and finally displayed on the screen The picture displayed is made up of a series of vertical scan lines pings one for each transmission Each line represents a snapshot of what has occured beneath the boat ...

Page 68: ...T to open Pre sentation setup if any changes are required Press ENT again to con firm changes and to return to the standard echosoun der display CHOSOUNDER MENU 5 ECHO CHOSOUNDER DISPLAY 2 Bottom expansion 3 VRM expansion 4 Turn A scope ON OFF 5 Turn VRM ON OFF 6 Presentation setup 7 Echosounder setup CHO DISPLAY KEYS TO PRESS 5 1 MENU 62 TRANSMITTER STATUS WINDOW REFER TO PPENDIX WILL APPEAR IN T...

Page 69: ...ll allow you to take a closer look at a particular section of the water near the bottom underneath your boat and could be thought of as a zoom function The expanded area will start approximately 0 5m under the detected bottom structure and in steps from 3 to 50 metres feet or fathoms PEN 0RESENTATION SETUP see display on page 66 if any changes are required in the setup e g the Expan sion window nu...

Page 70: ...ng from 3 to 50 metres feet or fathoms see Setup for units page 75 PEN 0RESENTATION SETUP SEE DISPLAY ON PAGE IF ANY CHANGES ARE REQUIRED AND CONFIRM ENTRY 5SE THE OR KEYS AS A SHORTCUT TO ADJUST RANGE 5SE THE CURSOR KEY LEFT RIGHT AS A SHORTCUT TO ADJUST GAIN 2ETURN TO STANDARD DISPLAY 62 EXPANSION KEYS TO PRESS MENU 5 3 4HE 62 CAN BE MOVED UP DOWN BY MEANS OF THE CURSOR p KN M MENU ENT ENT 5 1 H...

Page 71: ... hardness of the bottom PEN 0RESENTATION SETUP SEE DISPLAY ON PAGE IF ANY CHANGES ARE REQUIRED AND CONFIRM ENTRY 4URN SCOPE AGAIN This function is not available if VRM expansion is ON 4URN 62 The Variable Range Marker can be moved up down by the cursor key and the range can be adjusted by means of the keys 4URN 62 AGAIN 6ERTICAL 6 4 MARKER PRESS PLOT AND SELECT 3ET VERTICAL MARK SCOPE KEYS TO PRES...

Page 72: ... or FRESH White line Ping to ping filter Signal threshold and Depth grid can all be turned OFF or ON Color threshold set to ON to select a color from which you want the below colors not to be shown in the echo display see scale in echo display F See Appendix A for more details on spec functions ONFIRM NEW SETUP WITH ENT OR EXIT WITH MENU Echosounder fre quency select 50kHz or 200kHz Further detail...

Page 73: ... HIGH AUTO and OFF to de termine noise Transmit pulse length can be set SHORT MEDIUM LONG or AUTO Max depth limit AUTO 50 75 100 150 200 250 300 400 500 750 1000 m F See Appendix A for more details on the functions in the Echosounder setup display ONFIRM ENTRY WITH ENT OR EXIT WITH MENU WITHOUT MAKING ANY CHANGES CHOSOUNDER SETUP KEYS TO PRESS Echosounder setup Transducer depth below surface 00 0 ...

Page 74: ...unter a change in density such as a fish or the bottom This causes the sound waves to echo back up through the water When the reflected sound waves echoes hit the transducer the ceramic disk vibrates at the same fre quency This generates a varying voltage between the disk surfaces This voltage goes back up through the cable to the re ceiver The CE32 MKII processes the sig nals and presents them on...

Page 75: ...und from your transducer is focused downwards with a smaller amount going out to the sides The amount of focusing of the sound beam is expressed as a beamwidth 4RANSDUCER BEAMWIDTH Figur 3 A representation of a transducer beamwidth Transducer Approximation of the sound pattern below the transducer This angle is the transducers beamwidth 1 2 maximum intensity Maximum intensity CHOSOUNDER OPERATION ...

Page 76: ...of sound pings strike each fish A low vessel speed will provide the most accurate information of where fish are located The center of the sound beam is the most intense then as you move out towards the sides of the sound beam there is a point where the intensity of the sound is 1 2 what it was in the center The distance moved is the beamwidth See Figure 3 The beamwidth is related to the actual fre...

Page 77: ...E Course bearing as MAGNETIC Navigation mode RHUMBLINE Auto waypoint shift WP line WP circle alarm OFF 0 50 nm XTE alarm distance OFF 0 50 nm Anchor alarm OFF 0 50 nm 3 450 5 4 2 AVIGATION SETUP KEYS TO PRESS 4 NAV 1 Navigation display AVIGATION SETUP 3 Waypoint 4 Route etc 6 SETUP 1 Speed alarm units and language 2 Interface setup NMEA 3 Interface setup remote 4 Interface setup alarm log 5 Wind d...

Page 78: ...ixed i e WGS84 ELTA POSITION some paper charts do not indicate a da tum but instead they have a notation to an offset or delta position to WGS84 OURSE AND BEARING readings of course and bearing can be made in either magnetic or true AVIGATION MODE rhumbline navigation is used for shorter distances and great circle for long trips espe cially when crossing high latitudes UTO WAYPOINT SHIFT in Auto w...

Page 79: ...ce can be set to anywhere between 0 01 to 9 99nm This value may be overwritten if the legs in a route have been specified with different values NCHOR ALARM When setting the anchor it is possible to set up an alarm at the same time so you will be warned in case you drift too far from the anchored posi tion The alarm distance can be set to anywhere from 0 01 to 9 99nm OAD DISPLAY FOR AVIGATION SETUP...

Page 80: ...y settings of colors for text back ground highlighted menu etc ISPLAY is preset to DAYLIGHT and ISPLAY is preset to NIGHTLIGHT If you wish to make your own special setup in e g Dis play 3 then 3ELECT ISPLAY AME DISPLAY MAX CHARACTERS see section 4 2 2 Alphanumeric naming of points Palette setup 1 NAME Text Background Data cursor Menu text Menu background Menu text highlight Menu highlight Menu fra...

Page 81: ...see also Appendix A O TO THE FUNCTION YOU WISH TO CHANGE 3ELECT NEW VALUES ONFIRM ENTRY The SPEED ALARM can be set to maximum and or a mini mum cruising speed This may be handy for trawl fishing entering into harbours with speed limits etc 3ETUP FOR SPEED ALARM UNITS AND LANGUAGE KEYS TO PRESS Setup for speed LOG speed sensor ON LOG speed calibration 019000 PULSES nm Speed alarm maximum SOG 00 0kn...

Page 82: ...lo metres km or statute miles mi The speed can be shown in knots kn kilometres hour kh or miles hour mh The temperature can be shown in Celcius or Fahrenheit F 3OFTWARE VERSION indicates which version is in stalled in the unit 7 CHANGE INTERVAL can be set to anywhere be tween 02 to 99 seconds Refer to Rotation of WIN dows in section 2 2 for more details on how the function works ISPLAY TEXT IN as ...

Page 83: ... moving and what direction in relation to the vessel relative 3ET DRIFT TRIM DISPLAY 4HE SET DRIFT TRIM DISPLAY CAN BE CALLED FORWARD navigation must be active BY PRESSING MENU 4 4 It will provide information on actual and mean speed velocity and wind To reset mean speed indication in Set drift trim dis play press ENT ENT 3ET DRIFT DISPLAY KEYS TO PRESS KN 4 3ET DRIFT 6 6 MENU 4 4 MENU ENT ENT 3ET...

Page 84: ... HAPTER 3ETUP 84 ...

Page 85: ...e setup alarm log 5 Wind display 6 Set drift 7 Display color 8 TideTracker US version NTERFACE SETUP KEYS TO PRESS Interface setup NMEA NMEA0183 Input pin 3 4 NMEA0183 Heading HDT OFF Water speed VHW ON Water temperature MTW OFF True wind VWT ON Relative wind MWV ON External position course and speed OFF Datum 000 World Geodetic System 1984 Position GLL ON Course VTG ON Speed VTG ON Output pin 1 2...

Page 86: ...on to dual station F NMEA output is available at all settings except when built in DGPS is in use External DGPS can be selected via the NMEA port NMEA 0183 version 2 00 output GLL Geographic position latitude longitude GL2 Geographic position with 2 decimals GGA Global Positioning System fix data APB Autopilot sentence B BWR Bearing and distance to waypoint Rhumbline BWC Bearing and distance to wa...

Page 87: ... instrument input WPL Waypoint data MTW Water temperature VHW Water speed and heading VWT True wind speed and angle VWR Relative wind speed and angle MWV Wind speed and angle DBS Depth below surface DBK Depth below keel DBT Depth below transducer DPT Depth including offset NMEA0183 external position heading and speed input GLL Geographic position latitude longitude RMA Recommended minimum specific...

Page 88: ... installed transducer and con nected instrument 7IND DATA The wind instrument can provide both wind direction and wind speed and the readings can be shown in rela tive or true ALL THE WIND INSTRUMENT DISPLAY 7IND INSTRUMENT DISPLAY KEYS TO PRESS 6 SETUP 1 Speed alarm units and language 2 Interface setup NMEA 3 Interface setup remote 4 Interface setup alarm log 7IND DISPLAY 6 Set drift 7 Display co...

Page 89: ...wind angle offset can be from 0 to 360 The wind speed can be set to TRUE or RELATIVE and the wind speed unit can be either METERS SECOND KNOTS KILOMETRES HOUR or MILES HOUR O TO THE FUNCTION YOU WISH TO CHANGE 4OGGLE BETWEEN SETTINGS OR KEY IN NEW FIGURE ONFIRM ENTRY Setup for Wind Damping level LOW Relative wind scale NORMAL Wind angle offset 000 Show wind speed as RELATIVE Wind speed unit METERS...

Page 90: ...reset will erase all data waypoints and settings and restore the basic settings from the factory ALL MASTER RESET DISPLAY To activate a MASTER RE SET follow the instruc tions in the display or exit the function without making any changes by pressing 5 FTER A MASTER RESET the CE32 MKII will start up with the language display where you have to choose display and menu language see sec 2 2 and then pe...

Page 91: ... CE32 MKII can be flat or bracket mounted overhead bulkhead or console VERHEAD ONSOLE LAT MOUNTED 3EE TEMPLATE FOR INSTRUCTIONS 2EMOVABLE CORNERS EX ULKHEAD NSTALLATION OF NSTALLATION AND SERVICE HAPTER 91 ...

Page 92: ... cable of 15 meters with two female plugs is supplied with the DC30 Push the female plug into the receptacle marked REMOTE on the back of the CE32 MKII DGPS Chart Sounder and DC30 Dual Station ROUND ROUND METRES OF CABLE NOT EXTENDABLE 0OWER 0OWER PERATION OF All key commands are relayed to the main unit CE32 MKII and the dis play picture is instantly transferred back via a high speed link NSTALLA...

Page 93: ...am area OUNTING OF 03 ANTENNA Mount the antenna on a standard US 1 14 thread pipe or optional standard antenna mount Tighten firmly but only by hand no use of tools Attach the antenna cable to the TNC socket OUNTING OF 03 ANTENNA 23 Loosen the screw 1 of the antenna adaptor Guide the antenna cable 2 through the adaptor and con nect it to the antenna Screw the US 1 14 mount adaptor 3 firmly onto th...

Page 94: ...e special mount ings When utilizing the adaptor from the mounting kit be careful to GENTLY turn the cable along with the antenna when screwing it onto the adaptor Mounting examples The universal antenna mount is for vertical and horizontal pipes of 20 40 mm The antenna adaptor from the mounting kit will also fit directly onto a standard US 1 14 thread pipe HAPTER NSTALLATION AND SERVICE 94 ...

Page 95: ...ite Pin 2 TX B RETURN Brown Pin 3 RX A DATA IN Yellow Pin 4 RX B RETURN Green Pin 5 ALARM LOG Grey Pin 6 MOB Pink Pin 1 SPEED LOG Pin 2 5V SUPPLY SPEED LOG Pin 3 DEPTH Pin 4 NC Pin 5 DEPTH Pin 6 GND SHIELD Pin 7 THERM 4 Antenna connection LECTRICAL CONNECTIONS XTERNAL LOG ALARM RELAY NMEA Relay 5V 50mA 0IN 5 2 XTERNAL SWITCHES NMEA 0IN 6 2 Connectors seen from solder side 2 4 072 NSTALLATION AND S...

Page 96: ...ted with out affecting the performance of the transducer The cable must be of the same type as the standard cable F 4HE MUST BE TURNED OFF WHILE CONNECTING DISCONNECTING THE TRANSDUCER CABLE The use of longer cable runs while possible always increases the likeli hood of increased interference and decreased performance Care must be taken when increasing the cable lengths to ensure that proper adequ...

Page 97: ...ion Reference No 179 0401 001 Housing chemical resistant high impact plastic alloy 4RANSDUCER CONNECTIONS 0 4HRU HULL MOUNT not for use in wood hulls Frequency 50 200 kHz Beamwidth 45 15 Cable length 10m 32 Depth information Reference No 179 0401 002 Housing Reinforced plastic Reference No 179 0401 003 Housing Bronze 0 NSTALLATION AND SERVICE HAPTER 97 ...

Page 98: ...3 1 4 Frequency 50 200 kHz Beamwidth 45 15 Cable length 10m 32 Depth information Ref No 179 0401 007 Housing Bronze fiberglass or wood hulls only Ref No 179 0401 008 Housing Stainless steel compatible with any hull material Ref No 179 0401 011 Optional fairing HAPTER NSTALLATION AND SERVICE 98 ...

Page 99: ...r will seriously degrade the transducer s performance Therefore the transducer should be located well clear of any water intake or discharge line and also clear of any projection along the hull line which might dis turb the smooth flow of water It is of profound importance for good per formance that the water flowing over the transducer be free of bubbles and aeration If the transducer face is cle...

Page 100: ...lts will be Particularly the lower frequency operation interference from pro peller noise can be a significant problem This can be seen as an increase in the noise on the echosounder display when the propeller speed is in creased To help reduce this the transducer s mounting face may be an gled slightly forward on the order of 5 for the 50 kHz transducers and 3 for the 200 kHz transducers The goal...

Page 101: ... DC30 Repeater Waypoint IS11 Dataline instrument serie Color Trackplotter RS2500 RS2800 Diff Beacon Receiver RS5660 RS5665 Differential Receiver RS5460 Water speed and temperature sensor Autopilot Radar Yeoman digitizer Other equipment via NMEA 0180 0182 0183 NMEA Buffer RS5345 The CE32 MKII does not require any maintenance other than an occational external cleaning We recommend the use of a cloth...

Page 102: ...ction 7 3 Echo picture appears nor mal but no targets are shown or only random noise is seen Check that the transducer connector is securely mated with the unit Correctly mate the connector to the unit Check that the receiver gain is set high enough Increase the receiver gain refer to section 5 2 6 Check that the range is correct for the water depth Adjust the range refer to section 5 2 6 Check th...

Page 103: ...m D 38mm 150 gr 03 NTENNA Type GPS patch diff H field Dimensions H 75mm D 127mm 600gr Environm 35 C to 75 C 95 rel Mounting 1 14 thread standard US Cable Max 10m RG58 standard Max 30m RG213 option CHOSOUNDER SECTION Frequency 50 200 kHz selectable Output power Low 15 W High 500 W RMS 4 000 w PP Depth range display 5 1000 units and auto Depth range Up to 350m at 200kHz and 800m at 50kHz Max ping ra...

Page 104: ...HIFT Will automatically shift to the next trackpoint in the track and provide new steering details Track nav UTO WAYPOINT SHIFT Will automatically shift to the next waypoint in the route and provide new steering details 6 Approximate Velocity Necessary to arrive at a specific waypoint at a specific time earing The direction of where to go eg towards a specific waypoint HART SCALE FACTOR An additio...

Page 105: ...pulses nm actual speed GPS eg 5 kn EASUREMENT UNITS nm nautical mile 1 nm is 1 852 metres kn knots nautical mile per hour km kilometer 1 km is 1 000 metres kh kilometer per hour mi statute mile 1 mile is 1 609 metres mh mile per hour OTION can be set to TRUE or RELATIVE TRUE the ship will move across the chart RELATIVE the ship is locked to the center of the screen and the chart will move National...

Page 106: ...ent position to approaching point 2HUMBLINE The straight line to a waypoint on a chart 2OUTE NAME Each route can be given a name for easy identification 2OUTE NUMBER Each route is assigned a route number 2OUTE POINT NO When waypoints are inserted as part of a route they will also be given a route point number eg WP8 could be the third point in a route ie route point number 3 3HOW SCALE Setting Sho...

Page 107: ...r the blues and greens etc Doing this will leave only the stronger targets on the display screen F The monochrome version will have 3 different tones of grey EPTH Setting the various depth features correctly can have great influence on the performance of the echosounder In the Echosounder setup display Max depth limit is preset to AUTO but can be changed to a specific value if the depth is known T...

Page 108: ...he screen Whereas with the filter on the system will compare every two echoes received and only reflect on the screen what is received from both echoes which will give a more uncluttered and pre cise recording 0ULSE LENGTH The transmitted pulse length can be set to 50kHz 200kHz SHORT less than 5 m deep water less than 5 m deep water MEDIUM between 5 and 50m between 5 and 50m deep water deep water ...

Page 109: ...evel is automatic and the feature should be used with cau tion as it may eliminate small fish and small unidentified objects on the screen 4RANSMITTER STATUS INFO WINDOW In the echo display a small info window will indicate the current status of selected transmitter frequency power and pulse length Example Selected frequency 50 kHz or 200 kHz Transmit power HIGH LOW Pulse length SHORT MEDIUM LONG ...

Page 110: ...VRMs The depth to the VRM can be seen in the left side of the screen 7HITE LINE Places a white black line to indicate the sea floor and blanks out four pixels just below the line The purpose of this is to help the user detect tar gets such as fish which are very close the the sea floor and whose echoes tend to merge with those of the sea floor itself PPENDIX LOSSARY OF TERMS 110 ...

Page 111: ...023 Bermuda 1957 024 Bogota Observatory 025 Campo Inchauspe 026 Canton Astro 1966 027 Cape 028 Cape Canaveral 029 Carthage 030 Chatham 1971 031 Chua Astro 032 Corrego Allegre 033 Djakarta 034 DOS 1968 035 Easter Island 1967 036 Gandajika Base 037 Guam 1963 038 GUX 1 Astro 039 Hjorsey 1955 040 Hong Kong 1963 041 Indian 042 Ireland 1965 043 ISTS 073 Astro 1969 044 Johnston Island 1961 045 Kandawala ...

Page 112: ...stem 1984 094 World Geodetic System 1984 095 World Geodetic System 1972 096 World Geodetic System 1984 097 World Geodetic System 1984 098 World Geodetic System 1984 099 Lisboa Datum 100 Pulkovo 1942 101 North Am 1927 Alaska Can 102 South American Yacare 103 Old Hawaiian Maui 104 Old Hawaiian Oahu 105 Old Hawaiian Kauai 106 Bukit Rimpah 107 Camp Area Astro 108 Guam 1963 109 G Segara 110 Herat North...

Page 113: ...ill calculate this impor tant data through the year 2010 ALL UP THE 4IDE4RACKER DISPLAY Keys to press in monochrome version MENU 6 7 In most places there are two high and two low tides per day The heights of the high tides or the low tides may not be the same The height of the tide varies with the time of year The 0 zero in the scale to the left in the display indicates the level MLLW mean lower l...

Page 114: ...actual time and is placed be tween the last and the next high low tide indication The cursor can be moved manually by means of the cursor key to provide information of the tide later on during the day F The 24 hour time schedule will always run from the last high low tide indication and 24 hours ahead it does not follow morning till night EIGHT NOW or EIGHT CURSOR FT indi cates that the tide is fl...

Page 115: ...RING TIDE PLEASE WAIT will appear on the screen for a moment and then go back to the Tide Tracker display with the new information If none are available you will receive the legend None found Choosing FROM CHART will call forward the chart display Move cursor to the vicinity of the station you wish to select information from and press ENT A list of max 9 tide stations will appear To select a speci...

Page 116: ...s always presented in 24 hour format and is local time NOT GMT 4IDE GRID can toggle between ON and OFF by means of the key confirm with ENT BOUT ACCURACY ____________________________________________ The science of tide prediction is an exacting one But like the prediction of the weather is subject to vari ables beyond the control of man The following section describes the conditions under which th...

Page 117: ...tional tidal height due to storm surge conditions EOGRAPHY Whenever the topology of the coast line is changed the height of the tides may also change These changes may be man made such as the construction of a break water or the dredging of a channel or they may be caused by a natural phenomenon such as the breaching of a barrier beach by a storm or they may simply be the consequence of the natura...

Page 118: ... PPENDIX 4IDE4RACKER 118 ...

Page 119: ...E 4 SYMBOLS ARE VISIBLE they are typically seen in the scales associated with the direct access keys 3 4 or 5 0LACE THE CURSOR ON THE 4 SYMBOL FOR THE 4IDE STATION YOU WISH TO RECEIVE INFORMATION FROM AND PRESS ENT An info window will first appear with information on the object and after a few seconds the 4IDE INFORMATION will be presented Example Scale 1 60000 0 93nm Tide height Object name MINA ...

Page 120: ...chedule will always run from the last high low tide indication and 24 hours ahead it does not follow morning till night AUTION The tide information system is quite accurate However the predictions are subject to variables which like the weather are beyond the control of man The tide predictions are based on normal weather con ditions Hurricanes and strong winds will often have a strong influence o...

Page 121: ...location of the ports However the sym bol is not visible in all chart scales Please see below for how to access the 0ORT INFORMATION From chart display 3ELECT A CHART SCALE WHERE THE PORT SYMBOLS ARE VISIBLE they are typically seen in the scales associated with the direct access keys 3 4 or 5 0LACE THE CURSOR ON THE PORT SYMBOL FOR THE PORT LOCA TION YOU WISH TO CHECK OUT AND PRESS ENT Repeat pres...

Page 122: ...ion names 19 marine settings 19 naval aid settings 19 navigation marks 19 orientation 21 105 Chart continued paper chart settings 19 position on 21 restricted areas 19 rubberband feature 43 scale factor 21 setup 19 21 ship symbol 13 shortcut keys to scales 14 show scale 21 110 zoom and over zoom 14 C MAP cartridges 17 Port information 119 Tide information 117 Contrast and light 9 Course speed disp...

Page 123: ... transducer beamwidth 75 transducer depth 73 transmit pulse length 73 107 transmitter 73 transmitter status window 68 108 TVG 72 109 VRM expansion 70 71 109 water salt or fresh 72 Echo sounder operation continued white line 72 109 Electrical connections 95 external log alarm relay 95 fuse 96 NMEA interface 96 optional 100 power supply 96 transducer 96 97 ETA display 35 Global Positioning System 5 ...

Page 124: ... position 9 28 status and setup 28 Power off 9 Power on 9 Route auto WP shift 77 calculation 41 collect from WPlist 37 create by cursor 16 36 delete total route 46 editing by means of cursor 42 editing thru route menu 44 add waypoint 44 delete waypoint 46 insert waypoint 45 replace waypoint 45 insert waypoint 43 navigation 40 navigation mode 15 number 38 point number 38 save 36 set up 39 Satellite...

Page 125: ...oint 31 Warranty 127 Waypoints marks add to WP list 53 approaching 34 delete from WP list 56 delete group of WPs 56 delete via cursor 56 display position as 50 edit via cursor 54 edit via WPlist 55 insert from keypad 53 54 list 53 names 51 navigation 37 plot by cursor 49 plot mark 16 plot pos as specific WP no 52 plot position in WP list 52 plot ship s position 52 Waypoints marks continued symbols...

Page 126: ...Declaration of Conformity The EMC Directive Article 10 1 Undersigned are herewith declaring that Product SIMRAD CE32 MKII DGPS ChartSounder is in accordance with the protection requirements in the EMC Directive 89 336 EØF of May 3rd 1989 Employed harmonized standards EN 60945 1993 Amd 1 1993 Støvring March 31 2000 ...

Page 127: ...be defective 2 3 26 can be arranged by authorised local service dealers or national distributors upon request Labour costs for the repair replacement of the defective mod ules parts will be free of charge provided a valid warranty is confirmed Overtime travel lodging per diem insurance duties or any other costs are the responsibility of the customer Additional expenses connected with replacement o...

Page 128: ..._____ EQUIPMENT ________________________________________________________________________ ____________________________________ ____________________________________ ______________________ __________________________ YES ________ NO ________ DATE OF PURCHASE DATE OF INSTALLATION INSTRUCTION FOR USE GIVEN ___________________________________________ AUTHORIZED INSTALLER DEALER STAMP Simrad Shipmate AS Ø...

Page 129: ...______________________ ___________________________________________ TYPE __________________________________________________________ EQUIPMENT ________________________________________________________________________ ____________________________________ ____________________________________ ________________________________________ ________________________________________ DATE OF PURCHASE DATE OF INSTA...

Page 130: ...___________________________________ _________________________________________________________________________ _________________________________________________________________________ _________________________________________________________________________ STAMP HERE ...

Reviews: