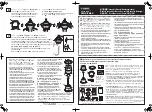
background image

Step 6

6

Step 7 

B

Once you have checked that the door opens and closes 

correctly fix the glass panel frame to the wall channel.

From inside, drill 3 holes through the wall channel/glass panel 

frame using a 3.2mm drill bit and Drill Jig (Y). Fix using 

washers (D), screws (C) and push on the screw covers (E).

D,C,E

Y

Place the breakwater bar (V) and the two end parts - RH (R, T)  

or two end parts - LH (S, U)

 on the shower tray.

Using a pencil mark the outline after adjusting the 3 parts fit for the shower tray and door glass.

Spread silicone sealant under the 3 parts, put them on the shower tray following the marked line.

R

T

V

c

d

b

a

Lmm

L+20 mm

V

V

R

T

Summary of Contents for DWQSC1400

Page 1: ...DESIGN WALK IN QUADRANT DWQSC1400 DWQSC1700 INSTALLATION INSTRUCTIONS B...

Page 2: ...channel pushed onto the glass panel frame The door is designed to open inwards only These hints have been prepared for your guidance you must exercise due care at all times For Health and Safety 2 pe...

Page 3: ...m Screw x 3 C Washer x 3 D Cover x 3 E M6 10mm Screw x 2 F M5 14mm Screw x 1 G Wall Bracket x 1 H Cover x 2 L Mat x 1 M Glass Clamp x 1 N Hinge x 2 O Bottom Waterproof strip x 1 P Waterproof Profile x...

Page 4: ...and mark all 3 fixing holes onto the wall Drill holes in the positions marked using a 6mm masonry drill bit Insert wall plugs B into all of the holes beyond the thickness of the tile Fix the wall cha...

Page 5: ...he level Mark the hole positions on to the wall Drill holes in the positions marked using a 6mm masonry drill bit Insert wall plugs B into the two holes beyond the thickness of the tile 3 4 5 6 7 A A...

Page 6: ...S B Fix Hinges to the fixed glass panel Support door and fix hinges to moving glass Do not fully tighten Check that the door closes and that the top is aligned with the fixed glass panels Fully tighte...

Page 7: ...bit and Drill Jig Y Fix using washers D screws C and push on the screw covers E D C E Y Place the breakwater bar V and the two end parts RH R T or two end parts LH S U on the shower tray Using a penci...

Page 8: ...4H B Inside Sealing inside Run a line of silicone sealant from top to bottom down the joint between the wall channel and tile Do not seal the enclosure to the tray on the inside Outside Sealing Outsid...

Reviews: