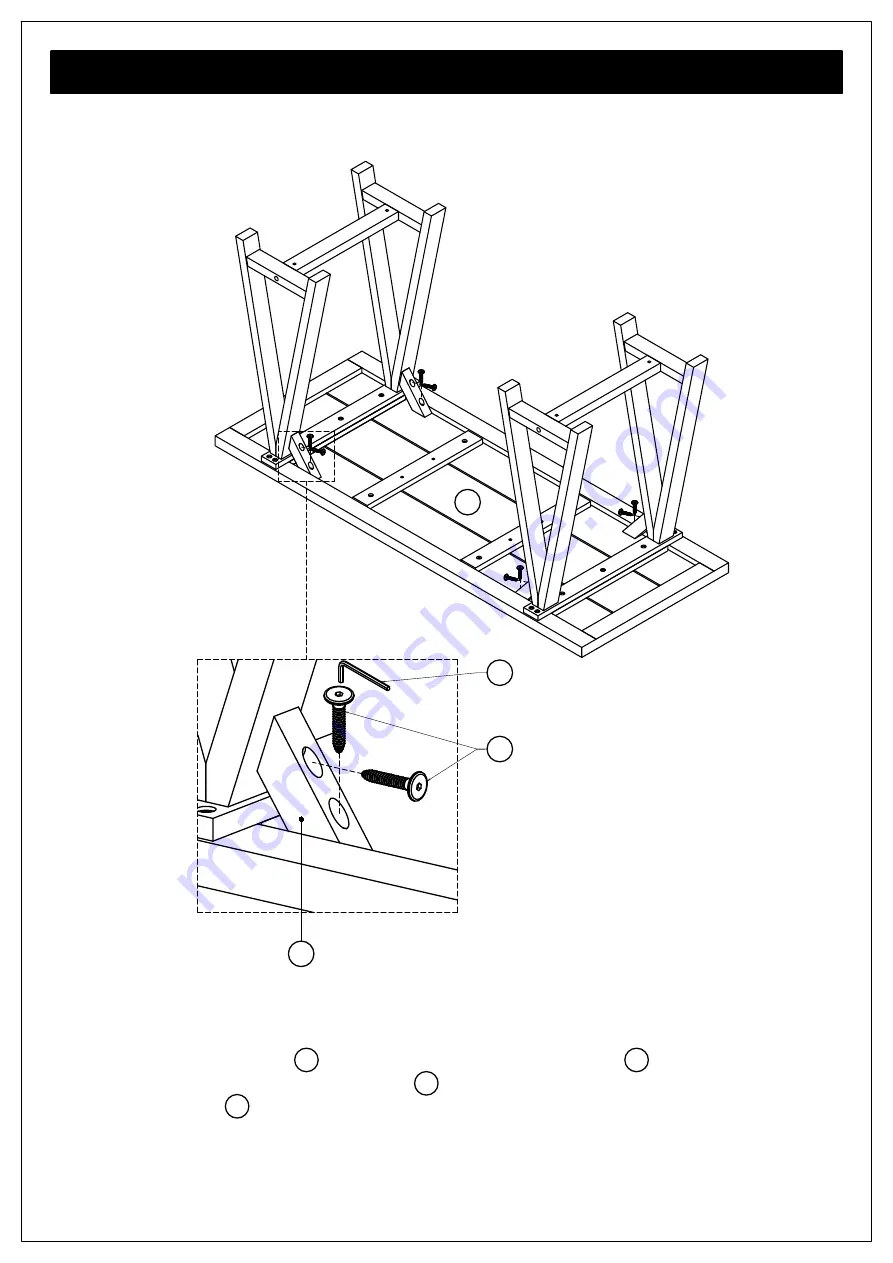
SIMPLIHOME 3AXCSAW-09 Manual Download Page 13

Step 4

A

F

5

2

1. Attach Leg  Supporter  F  to corner in between Legs and Top  A  at specified

    location using two Allen Key Screws  2  .

2. Use Allen Key  5  to tighten screws. Do not over-tighten.
3. Repeat on the opposite legs.

Model # 3AXCSAW-09

Assembly

13

Summary of Contents for 3AXCSAW-09

Page 1: ...Sawhorse Hawkins Spokane Writing Desk Model 3AXCSAW 09 TM TM 1 ...

Page 2: ...l be happy you did simpli home com product registration Great quality is a right Thank you for shopping with Simpli Home America s top brand for high value furniture Activate your 1 year warranty Automatic entry to win a 500 gift certificate Earn instant rewards and save ü ü ü ...

Page 3: ...e d love your feedback Please share a review and get instant rewards simpli home com product review Share photos and get your cash back Send us images or share them on social and qualify for instant rewards You may even receive store credit on your entire purchase simpli home com share images ...

Page 4: ... form with your order information and issue 6 Submit form 7 A customer service associate will contact you Other ways to contact us Visit Us Visit our site directly at www simpli home com Email Us customerservice simpli home com Call Us 1 866 518 0120 Monday to Friday 9am to 5pm EST If you ve purchased from a retailer and you wish to return the product please contact the retailer directly ...

Page 5: ...ets Keep children and pets away during assembly To avoid danger of suffocation always keep plastic bags away from children and pets We recommend that you assemble this unit on a carpeted floor to avoid scratches If using power tools set the tool to low torque to avoid damage May require 2 people for ease of assembly Safety Information IMPORTANT Please read this manual carefully before beginning as...

Page 6: ...t importantly have a good working humidifier for your home A humidistat automatically works to balance the humidity in your home so it is constant Dry indoor air can suck enough moisture from its surroundings to do permanent damage to wood causing it to crack or split Remember that not all woods are created equal Two factors that help determine how rapidly a wood will lose moisture are pore size a...

Page 7: ...TOP QTY 1 A B C D E F LEG B L R Same QTY 2 LEG C L R Same QTY 2 LEG LOWER CONNECTOR QTY 2 LEG UPPER CONNECTOR QTY 2 LEG SUPPORTER QTY 4 Part Description Model 3AXCSAW 09 Pre Assembly Information 7 ...

Page 8: ...N KEY QTY 1 WOOD BOLT CAP QTY 4 ALLEN KEY SCREW M6 X 35mm QTY 8 ALLEN KEY BOLT M6 X 40mm QTY 14 ALLEN KEY BOLT CROSS NUT M6 X 70mm QTY 4 SETS Required Phillips screwdriver Not Included Hardware Description Model 3AXCSAW 09 Pre Assembly Information 8 ...

Page 9: ...A E E F F F F D D B C C B Model 3AXCSAW 09 Components Key Diagram 9 ...

Page 10: ...tor D 2 Insert Cross Nuts 4 into pre drilled holes in Leg Lower Connector D with the slot facing out Use a flathead Screwdriver to turn it to align with the Bolts 4 Repeat on the opposite side 3 Use Allen Key 5 to tighten Bolts Repeat Step 1 3 for second set of legs B C D 4 4 5 Model 3AXCSAW 09 Assembly 10 ...

Page 11: ...ch Leg Upper Connector E to Leg B and Leg C using four Allen Key Screws 1 2 Use Allen Key 5 to tighten screws Do not over tighten 3 Repeat for the second Leg Upper Connector E E 5 1 B C Model 3AXCSAW 09 Assembly 11 ...

Page 12: ...ep 3 A E E 5 3 3 3 1 Attach Top A to Leg Upper Connector E using seven Allen Key Bolts 3 2 Use Allen Key 5 to tighten screws Do not over tighten 3 Repeat on the opposite side Model 3AXCSAW 09 Assembly 12 ...

Page 13: ...ach Leg Supporter F to corner in between Legs and Top A at specified location using two Allen Key Screws 2 2 Use Allen Key 5 to tighten screws Do not over tighten 3 Repeat on the opposite legs Model 3AXCSAW 09 Assembly 13 ...

Page 14: ...Step 5 6 1 Insert four Wood Bolt Caps 6 into exposed bolt holes on Leg B and Leg C Model 3AXCSAW 09 Assembly 14 ...

Reviews: