background image


Setting Up The Main Quarter Tune.  

While the 4 keys are flashing, 

C#

D#

F#

, and 

G#

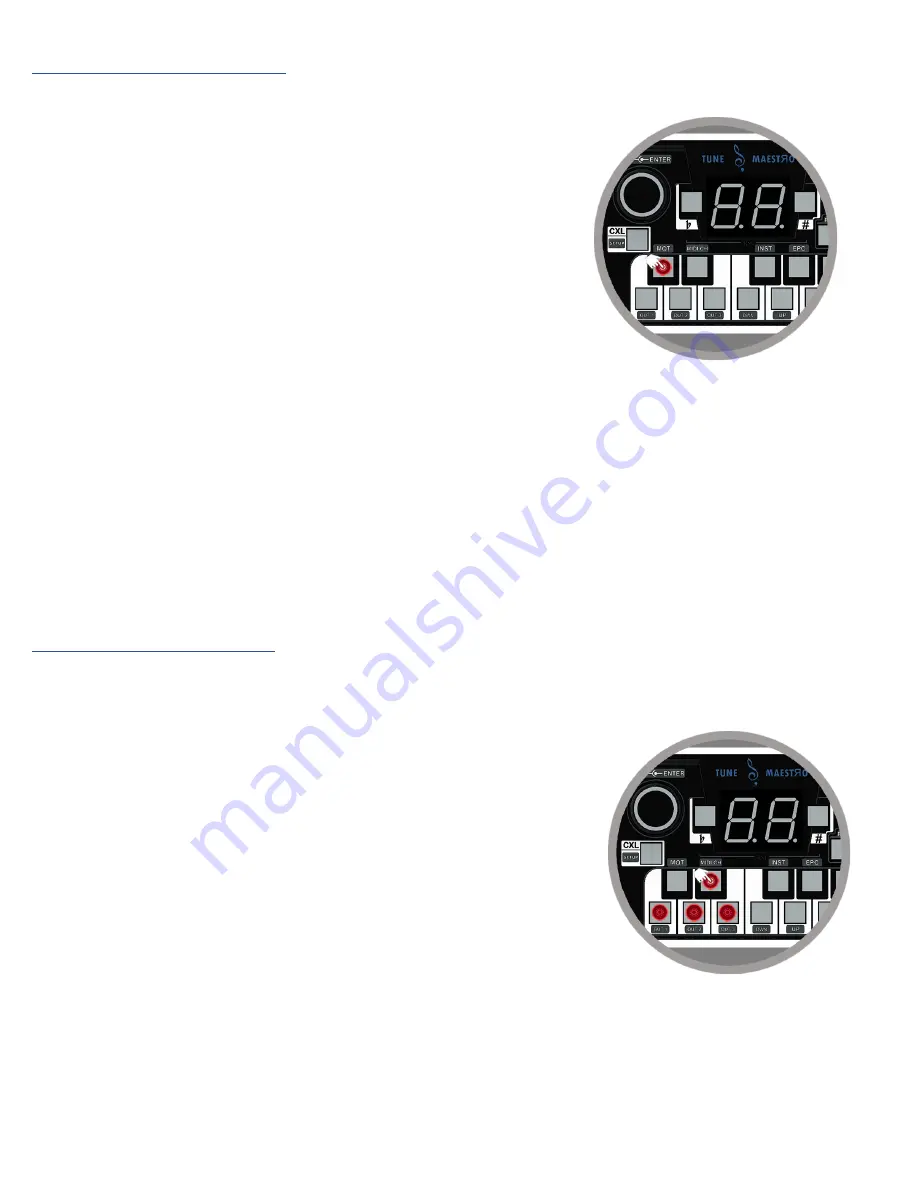
, press the 

C#

 as shown below: 


The display will show the default value, which should be 

-50

.  

Using the dial, set the desired tune, keep in mind that 

clockwise

 will set the tune in the positive direction, and 

counterclockwise

 will set the tune in the negative direction.  


Note:

 the dial color will change to the direction of tuning, i.e. if the tune chosen is positive, the dial LED color will be 

“Green”, and if the tune chosen is negative, the dial LED color will be “Red”. 

 
Once the necessary tune is chosen, either click the “Dial” or click the “

C#

” key to confirm the selection.  Once the 

main quarter tune is asserted, the 4 LEDs, 

C#

D#

F#

, and 

G#

 will start flashing again indicating the user is at the main 

menu. 


Setting Up MIDI Channel. 

To setup the MIDI channel for each instrument press the “

D#

 button as shown below.  Once the 

D#

 is pressed, 

then 

C

D

, and 

E

 buttons will start 

flashing, 

indicating the user is at the “Submenu”.  Each button corresponds to one 

of the MIDI ports. 


C

 MIDI Port 1 


D

 MIDI Port 2 


E

 MIDI Port 3 


Summary of Contents for TUNE MAESTRO I

Page 1: ...1 User Manual English TUNE MAESTROI SIMON LABORATORIES ...

Page 2: ...ture 100 C 490 C Device operating voltage 5v USB powered Contents User Manual 3 x MIDI Cables 1 x USB Power Cable 1 x Tune Maestro I 4 x Rubber Feet Improper use of this device can cause physical and bodily harm Utilizing this device outside of the listed specification can render the device damaged Follow this icon in setting the device by following the images displaying the pressed buttons www si...

Page 3: ... 10 Min Calibration 10 Saving the Entire Setup 11 Initializing the Tune Maestro I to Factory Settings 11 Features of the Tune Maestro I 12 Local Quarter Tune Application 12 Using the Pre Defined Maqams Buttons 12 Tuning and Preset Saving 14 Tune Maestro I Connection to Special Instrument 15 Setting up Instruments to Operate with Tune Maestro I 15 Korg Trinity V3 16 Korg Triton Studio Korg Triton E...

Page 4: ...ta Encoder Enter 4 Transpose 5 Transpose 6 1 8 Inch Display 7 Maqams Presets 8 USB Power Input 9 Expression Pedal Port 10 MIDI OUT 3 11 MIDI IN 3 12 MIDI OUT 2 13 MIDI IN 2 14 MIDI OUT 1 15 MIDI IN 1 16 Main Quarter Tune Setup 17 Global MIDI Channel Setup 18 Selecting Instrument s 19 Expression Pedal calibration 20 Reset Transpose to 0 Press T and T simultaneously ...

Page 5: ...the device This is the default quarter tune applied each time one of the 12 scale keys are pressed C B D This sub menu will set the main MIDI Channel used to communicate with each instrument that s connected to the 3 MIDI ports This corresponds to the Global channel of the instrument connected to the Tune Maestro Refer to the instrument s Global MIDI channel to match it with the ports of the Tune ...

Page 6: ...ive the dial LED color will be Green and if the tune chosen is negative the dial LED color will be Red Once the necessary tune is chosen either click the Dial or click the C key to confirm the selection Once the main quarter tune is asserted the 4 LEDs C D F and G will start flashing again indicating the user is at the main menu Setting Up MIDI Channel To setup the MIDI channel for each instrument...

Page 7: ...he Dial clockwise to the desired MIDI Channel and press the Dial or the key of D for confirmation At this point the 3 keys C D and E will start flashing again indicating to the user that the device is back at the Submenu To setup MIDI channel on Out Port 3 press the E key as shown below This will flash the key of E indicating your setting the MIDI Channel for Out Port 3 Turn the Dial clockwise to ...

Page 8: ...mbers To setup the Tune Maestro to control the instrument connected to MIDI Out Port 2 press the D key as shown below The key of D will start flashing indicting its ready Use the Dial to select the OEM number corresponding to the instrument connected to MIDI Out Port 2 For a list of OEMs pre programmed into the Tune Maestro refer to Table 1 below for the different OEM numbers To setup the Tune Mae...

Page 9: ... 5080 11 PSR Series 2 Pa60 23 XP30 XP50 XP60 XP80 12 Genos 2 Pa55Tr 13 Montage 6 7 8 2 Pa1X 15 PSR A2000 A3000 2 Pa2X 16 MODX 6 7 8 2 Pa800 2 Pa3X 2 Pa4X 2 Pa1000 2 Pa700 2 Pa500 2 Pa500ORT 4 Studio 4 Extreme 6 Kronos 1 Trinity 7 Prophecy 3 M1 TABLE 1 Different OEMs That Are Pre Programmed in the Tune Maestro ...

Page 10: ...click the G key as shown below this will start flashing the F and G keys Keep in mind the expression pedal requires two values to be calibrated Max and Min Max Calibration Press the G key as shown below the display will indicate UP at this point press on the calibration pedal forward to reach Maximum position as the picture below shows then press the G key again Min Calibration Press the F key as ...

Page 11: ...n Congratulations the Tune Maestro has been completely setup and ready for use Initializing the Tune Maestro I to Factory Settings The Tune Maestro I is equipped with initializing procedure in case the user needs to set it back to factory settings Follow the steps below to reset the Tune Maestro I back to factory settings 1 Make sure the Tune Maestro I power is turned Off 2 Press and hold C E and ...

Page 12: ... implemented is the Local quarter tune capability Local quarter tune capability is simply the ability to tune any key in any desired micro tuning 1 To implement Local quarter tune choose one of the 12 scale keys C B 2 Press the key for 3 seconds 3 The key will start flashing indicating its ready for the semitone desired 4 Use the Dial to tune up or down the desired tune Keep in mind that clockwise...

Page 13: ...tep 1 4 Tune Maestro will calculate all the different steps increments required for the chosen maqam and will implement quarter tuning to the necessary keys Example If the musician needs to implement Rast on C C here is used only for example 1 Press the Rast key as shown below 2 The LEDs will start flashing sequentially starting from C all the way to B 3 Press C then the Tune Maestro will calculat...

Page 14: ...r apply as long as that button is used for memory save recall For example if the button Bayati PST1 has a user micro tuning saved then pressing that button will not apply Bayati maqam instead it will recall whatever is saved by the user If the user happens to have certain tuning saved i e 50 tuning on D 32 tuning on F and 40 tuning on B Then pressing PST1 will recall the above tuning to their corr...

Page 15: ... to use MIDI OUT 3 and MIDI IN 3 on the Tune Maestro for faster data processing Follow the diagram below to connect the Tune Maestro to the Korg Trinity Figure 1 Tune Maestro I Connection to the Korg Trinity V3 Note Although the Tune Maestro is capable to communicate with the Korg Trinity on all MIDI Ports however it s advisable to use MIDI OUT 3 and MIDI IN 3 as this particular port has faster da...

Page 16: ...ocuments Korg Trinity Image Courtesy of Korg com Documents Korg Trinity Korg Products Make sure Enable Control Change is checked Make sure Local Control On is NOT checked As the picture is showing Set MIDI channel as in Pg 7 Setting Up MIDI Channel ...

Page 17: ...treme Image Courtesy of Korg com Documents Korg Triton Studio Image Courtesy of Korg com Documents Korg Triton Studio Set MIDI channel as in Pg 7 Setting Up MIDI Channel Under Scale make sure its set to User Octave Scale 00 Enable SysExec ...

Page 18: ...PA Series Image Courtesy of Korg com Documents Korg PA Series Image Courtesy of Korg com Documents Korg PA Series Set Position to Post KB Pre Scale Unlock Master Transpose so Tune Maestro can control Transpose ...

Page 19: ... Korg com Documents Korg PA Series Image Courtesy of Korg com Documents Korg PA Series Make sure all MIDI In Filters are set to OFF Select the MIDI Channel as in Pg 7 Setting Up MIDI Channel and make sure its set to Global ...

Page 20: ...uments Korg KRONOS Series Image Courtesy of Korg com Documents Korg KRONOS Series Select the MIDI Channel as in Pg 7 Setting Up MIDI Channel and make sure its set to the same channel Set Convert Position to Pre MIDI Make sure Enable Exclusive is checked ...

Page 21: ...ourtesy of Korg com Documents Korg Prophecy Image Courtesy of Korg com Documents Korg Prophecy Select the MIDI Channel as in Pg 7 Setting Up MIDI Channel and make sure its set to the same channel Make sure Scale Type is set to USER SCALE1 Make sure Rcv ENABLE is set to ENABLE ...

Page 22: ...urtesy of Yamaha com Documents Yamaha Tyros Series Image Courtesy of Yamaha com Documents Yamaha Tyros Series Yamaha Products Set the PORT to the corresponding PART Set SYS EX both Tx and Rx to ON as shown Set Receive Transpose to ON ...

Page 23: ...Image Courtesy of Yamaha com Documents Yamaha Genos Set the PORT to the corresponding PART Set the CC as shown Make sure you select CC 28 and CC 29 for Transpose and Transpose respectively Make sure to save the new MIDI settings If settings are not saved the Tune Maestro may not work the next time the instrument is used ...

Page 24: ...24 Yamaha Montage 6 7 8 Yamaha MODX 6 7 8 Image Courtesy of Yamaha com Documents Yamaha Montage MODX Make sure Global Settings are set to ON Make sure the Micro Tuning Name is set to User 1 ...

Page 25: ...ies Image Courtesy of SimonLab net Documents Roland Fantom X Series Roland Products Select the MIDI Channel as in Pg 7 Setting Up MIDI Channel and make sure its set to the same channel Make sure Scale Tune Switch is set to ON This will allow Tune Maestro I to communicate with the device ...

Page 26: ...e Maestro I not implementing the quarter tone Check cable connection Make sure the correct port is used Out vs In and the correct port is routed to the correct keyboard device Check both Tune Maestro I and device are both on the same MIDI Channel refer to page 7 Check keyboard device settings such as SysEx Global settings etc Refer to the device manuals for these settings Check to make sure the co...

Reviews: