Simaudio MOON Evolution LP3 Owner'S Manual Download Page 7

MOON W-8 Dual-Mono Power Amplifier


Rear Panel Layout 


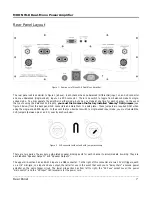
Figure 1:  Rear panel of Moon W-8 Dual-Mono Amplifier 


The rear panel will look similar to Figure 1 (above).  Each channel has one balanced (differential) input  on an XLR connector 
and one unbalanced (single-ended)  input on a RCA connector.  There is no switch to toggle from balanced mode to single-
ended mode.  You may operate the amplifier in either mode, but only one mode at one time for each channel.  In the event 
that you’re using the balanced XLR inputs, you must first remove the factory installed “dummy” XLR jumpers (see 
figure 2 below) from the back panel XLR connectors and store them in a safe place.  These jumpers are required ONLY when 
using the single-ended RCA inputs.  In the event that you decide to switch to single-ended input mode, you must reinstall the 
XLR jumpers (between pins 1 and 3)  exactly as show below: 


Figure 2:  XLR connector without and with jumper accessory 


There are two pairs of heavy duty gold-plated speaker binding posts for each channel to accommodate bi-wiring. They are 
each labelled “Speaker Output 1” and “Speaker Output 2”.  


The upper mid-section has an RS-232 input on a DB9 connector.  To the right of this connector are two 12 Volt triggers, each 
on a 1/8” mini-jack; one input and one output, the latter for use in the event that wish you to “daisy chain” a second power 
amplifier on the same trigger circuit. The lower mid-section has from left to right; the “AC Fuse” socket cover; the power 
“main switch”; and the “AC Input” IEC receptacle for the power cord. 


____________________________________________________________________________________ 


Rear Panel      


       7 

Summary of Contents for MOON Evolution LP3

Page 1: ...Owner s Manual MOON Evolution Series W 8 Reference Dual Mono Power Amplifier...

Page 2: ...articularly at plugs convenience receptacles and the point where they exit from the apparatus 11 Only use attachments and accessories specified by the manufacturer 12 Use only with the cart stand trip...

Page 3: ...ox and rear panel serial number label will indicate the correct voltage Use of any other voltage will likely damage the unit and void the warranty 3 AC extension cords are NOT recommended for use with...

Page 4: ...cking 5 Introduction 6 Installation Placement 6 Rear Panel Layout 7 Connecting the W 8 8 Balanced Operation 8 Bridged Mono Operation 9 Operating the W 8 10 Specifications 11 www simaudio com _________...

Page 5: ...nderstand the power and emotion of music and build our products with the goal of faithfully capturing these elusive qualities The information contained in this manual is subject to change without noti...

Page 6: ...s Designed to be powered up at all times for optimal performance Installation Placement The MOON W 8 Dual Mono power amplifier is both powerful and heavy It requires reasonable ventilation to maintain...

Page 7: ...RCA inputs In the event that you decide to switch to single ended input mode you must reinstall the XLR jumpers between pins 1 and 3 exactly as show below Figure 2 XLR connector without and with jump...

Page 8: ...esigned for high current applications Ensure that the AC wall outlet you use has a functioning ground For the best sonic performance it is preferable that you plug your W 8 directly into a dedicated A...

Page 9: ...r s inputs as pictured above in Figure 3 One lead from the Y adapter must plug into right channel input and the other lead must plug into left channel input As well you must use the positive terminal...

Page 10: ...lue LED located on the front panel also indicates the operational status of your MOON W 8 Dual Mono power amplifier In the event that it starts blinking on and off during use the circuitry is either o...

Page 11: ...rosstalk 1kHz 105dB Intermodulation Distortion Unmeasureable THD 20Hz 20kHz 1 watt 0 015 THD 20Hz 20kHz 250 watts 0 04 Power Consumption idle 48 Watts AC Power Requirements 120V 60Hz or 240V 50Hz Ship...

Reviews: