background image


Page 6 


Unpacking the Screen 


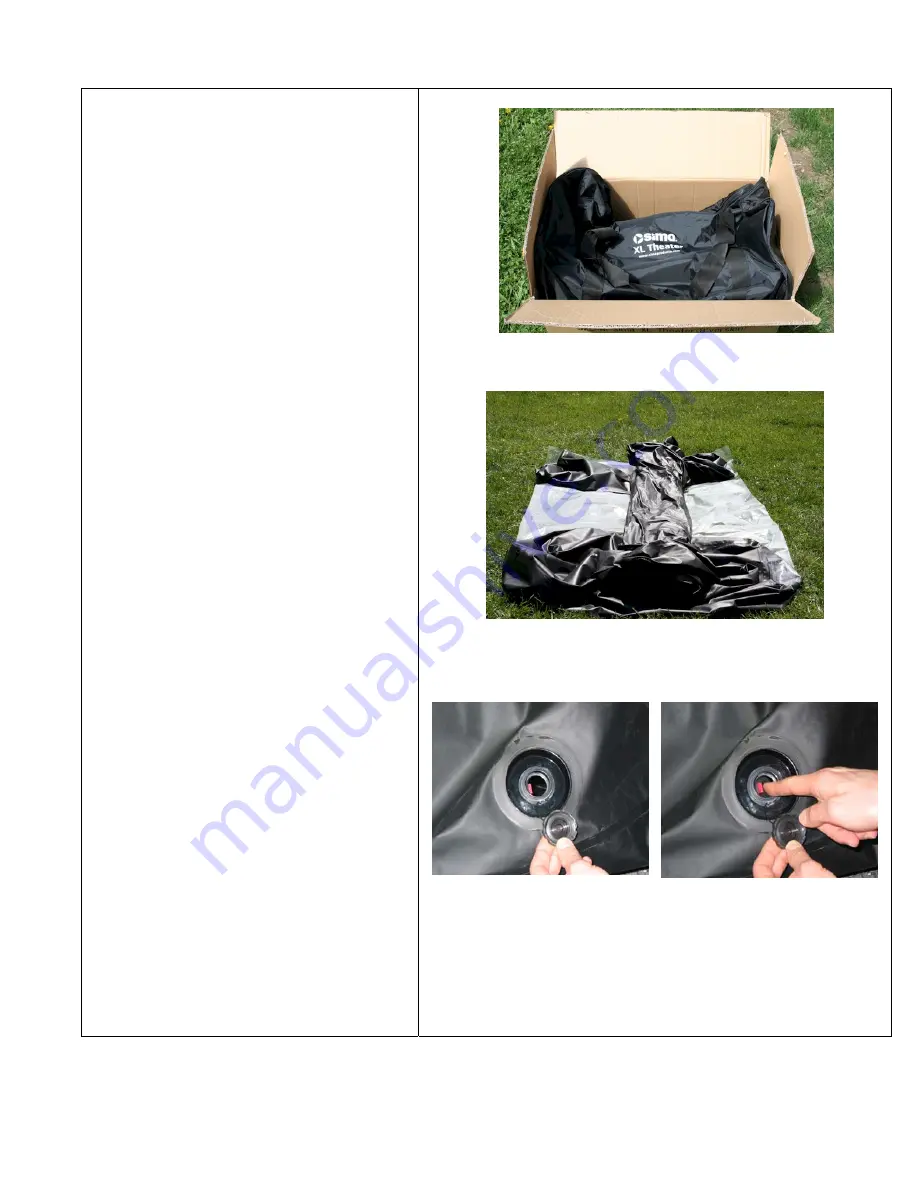
1.  Remove all the items from box as 

shown at right. Don’t cut the boxes too 
deep, as this may damage the screen. 
(Fig. 2)


Note: Keep this box in good condition, 
as it may be used to store the screen 
when not in use.


Inflating the Screen 
 

1.  Remove the frame from the package. 

Unroll the screen as shown at right. Be 
sure both bases are facing the correct 
way. (Both air valves should be facing 
the same direction.)  (Fig. 3) 


2.  Plug the AC air pump into an AC power 

outlet. Note: Power supply must be 
120V AC, 60 Hz. Use a properly 
grounded GFI outlet if using the product 
outdoors. 


3.  Locate the air inlet/outlet valves. You 

will notice that each valve on each base 
has two layers of seals that cutoff the 
airflow. The outer seal is a threaded cap 
that screws into place.  (Fig. 4) 


4.  The inner seal is a rubber check valve 

designed to hold in air when a certain 
amount of pressure presses against it.  
(Fig. 5) 


Fig. 2


Fig. 3 

Fig. 4 

Fig. 5 

Summary of Contents for XL-12

Page 1: ...Page 1 Sima XL Theater Inflatable Indoor Outdoor Projection Screen Amplified Speakers User Manual for Models XL 8 and XL 12 www simaproducts com...

Page 2: ...Page 2 2006 Sima Products Corporation 140 Pennsylvania Ave Bldg 5 Oakmont PA 15139 800 345 7462 www simaproducts com PN 21744...

Page 3: ...SCREEN 11 LIGHT GUARD INSTALLATION WITH VELCRO STRIPS 13 SETTING UP THE INFLATABLE HOME THEATER FOR FRONT AND REAR PROJECTION 14 SECURING THE SCREEN TO THE GROUND 15 HOOKING UP THE SPEAKERS TO THE VOL...

Page 4: ...not use screen during high winds in excess of 15 mph or threat of lightning Do not smoke near the screen Keep away from fire Do not use sharp objects in any manner around the XL Theater System Do not...

Page 5: ...ite Nylon Ropes 4 Ground Stakes 70 Velcro Quick Ties 1 Black Laced Screen Tie 1 Volume Control Box Selecting A Setup Site Select a site that has the necessary height clearance for the screen and enoug...

Page 6: ...correct way Both air valves should be facing the same direction Fig 3 2 Plug the AC air pump into an AC power outlet Note Power supply must be 120V AC 60 Hz Use a properly grounded GFI outlet if using...

Page 7: ...8 8 Turn the pump to the on position On Switch is located on the face of the pump NOTE THE FRAME SHOULD NOT TAKE MORE THAN 5 MINUTES TO INFLATE MAKE SURE THE PUMP ISN T IN USE FOR MORE THEN 15 MINUTES...

Page 8: ...to the frame is difficult release some air to allow for more slack in the frame 7 After the screen has been attached to the frame continue to inflate the frame so that the screen is pulled taut Fig 14...

Page 9: ...ips 1 Attach the Velcro strips to all the grommets on the frame as shown in figure15 2 Unroll the white vinyl screen from the supplied tube in the package 3 Begin to lace each Velcro strip to secure t...

Page 10: ...still 80 inflated 8 Inflate the frame up completely to 100 9 Check to see where the screen needs to be tightened The screen will need adjusted to areas where less taut 10 Deflate back to 80 to adjust...

Page 11: ...ie the cord using a secure knot Fig 20 3 Feed the cord from the back of the frame through the upper left grommet on the screen S1 Fig 21 4 Insert the end of the cord from S1 into the front of the grom...

Page 12: ...into the front of the A2 grommet Fig 26 9 Continue working around the screen until you have laced all of the grommets Fig 27 Upon completely attaching the screen Re connect the pump and fill the scre...

Page 13: ...he light guard to the frame by looping the Velcro through the back of the grommet in the screen and passing the Velcro strip through t hole in the top of the strip he h 4 Leave a couple of inches of s...

Page 14: ...sed to correct for the angle being slightly off Rear Projection Setup To use the inflatable screen with the projector placed behind the screen first lift the black light guard up so that it does not b...

Page 15: ...t could tear or puncture the screen WARNING KEEP AWAY FROM WATER DO NOT PLACE OR STORE THIS WHERE THIS UNIT CAN FALL OR BE PULLED INTO WATER ALWAYS USE GFI OUTLETS FOR THE AIR PUMP AND SPEAKERS IF USE...

Page 16: ...ontrol Box to the R Line input of the other XL SP speaker you have located to the left of the screen and frame 5 Plug the AC line cords into the AC Power Inlet on the back of each speaker and insert t...

Page 17: ...ed to control the level of the line input 4 LINE INPUT CONNECTOR RCA Input for connecting line level signals 5 TREBLE CONTROL Controls the high band of the Channel Equalizer 10 dB at 3 5kHz 6 LINE OUT...

Page 18: ...t the other side of the hose to the air valve on either base Fig 33 shows both the 8 12 model pump and where the hose connects to the deflation inlet 5 Turn the pump to the on position for the next fe...

Page 19: ...lue Make sure the screen is deflated prior to procedure 1 Using patch kit cut a piece of material about 1 inch larger than the size of the tear 2 Apply glue to both the patch and the screen itself 3 L...

Page 20: ...o a working outlet 2 Check the AC power cable connection on the back of the speakers Be sure it is inserted completely 3 The off on switch should illuminate when on if power is connected correctly If...

Page 21: ...nds Included NO Moisture resistant speaker cones Bass and treble control on speaker Universal speaker stand mount stand not included Line out allows for expansion of sound system 2 Channel passive vol...

Page 22: ...Products Corp Attn Customer Service 140 Pennsylvania Ave Bld 5 Oakmont PA 15139 Phone 412 828 3700 Fax 412 828 3775 It is recommended that you call Sima at the number listed above to obtain a return a...

Page 23: ...d that you call Sima at the number listed above to obtain a return authorization number Limitation of Liability and Remedies Sima shall have no liability for any damages due to lost profits loss of us...

Page 24: ...er to qualify for special Rental Product Warranty coverage When the rental dealer receives Sima XL Theater product it is the dealer s responsibility to completely check inflate all product to insure t...

Reviews: