background image

16

��

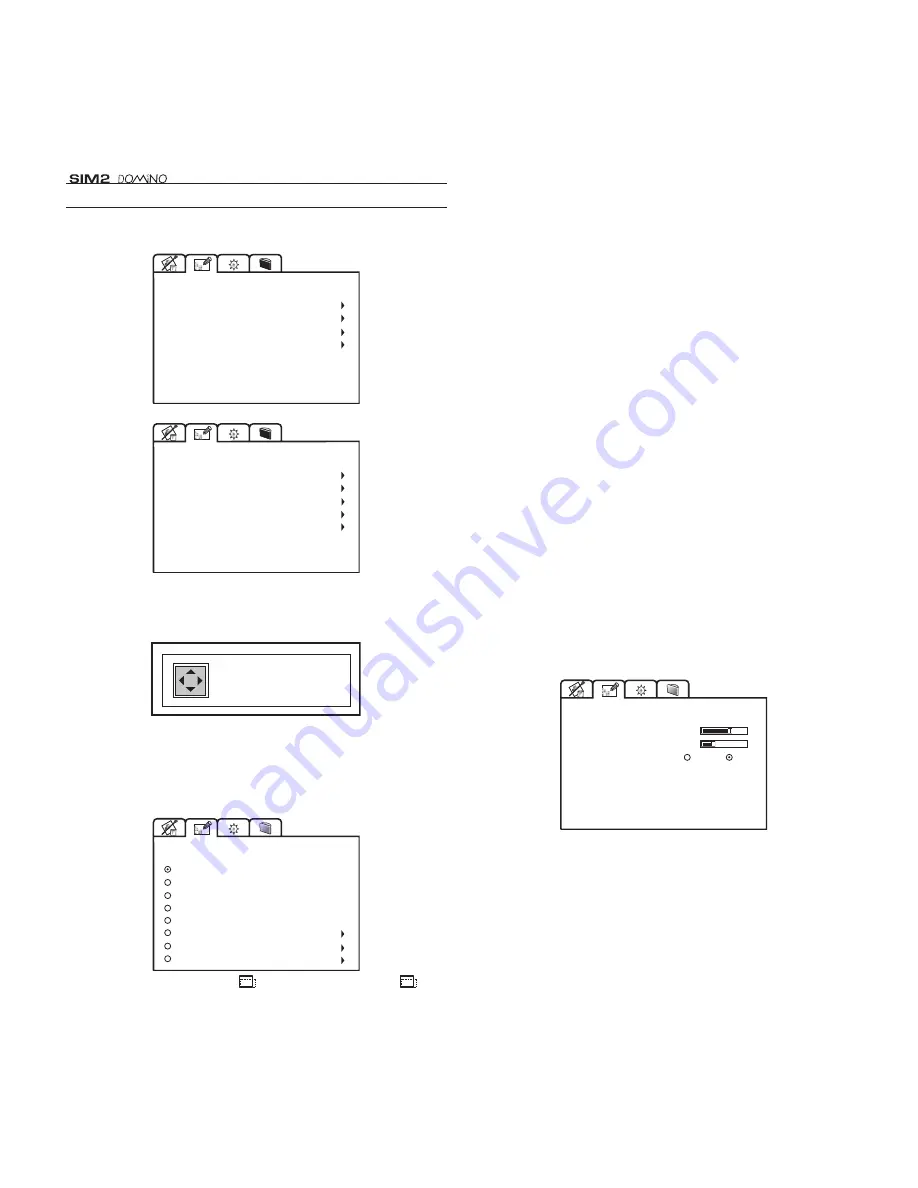
IMAGE ADJUSTMENTS

This menu features adjustments relating to position, aspect ratio 
and magnification etc.

POSITION

ASPECT

ADVANCED SETTINGS

MAGNIFICATION

IMAGE ADJUSTMENTS

VIDEO

POSITION

ASPECT

FREQUENCY/PHASE

ADVANCED SETTINGS

MAGNIFICATION

IMAGE ADJUSTMENTS

RGB

POSITION

Use this adjustment to position the image vertically and hori-
zontally.

HORIZONTAL:  9
VERTICAL:    6

ASPECT

Determines the aspect ratio of the projected image.
From this menu it is possible to select the aspect ratio by using 
the numeric keys 

1...8

 of the remote control. 

5 PIXEL TO PIXEL

7 USER 2

8 USER 3

6 USER 1

1 NORMAL

2 ANAMORPHIC

3 LETTERBOX

4 PANORAMIC

ASPECT

By repeatedly pressing the  

 key or by pressing the 

 and 

one of the numeric keys 

1...8

 of the remote control, it is possible 

to select the aspect ratio.

Normal

This aspect projects the image occuping the full vertical di-
mension  of  the  screen  and  maintaining  the  correct  aspect 
(4:3 or 16:9).

Anamorphic

This aspect allows to properly visualize a 16:9 image.

Letterbox

This aspect allows to project a 4:3 letterbox image, filling the 
16:9 screen and maintaining the correct aspect ratio.

Panoramic

This aspect stretches the 4:3 image slightly cutting the upper 
and lower parts. It’s ideal to project a 4:3 image in a screen 
of 16:9 aspect ratio. 

Pixel to Pixel

This aspect projects the signal as it is input without scaling up 
or down. 
Image is projected in the center of screen.

User 1, 2, 3

Should you wish to use a format different to those preset, go 
to 

User

 menus.

ASPECT / USER 1

HORIZONTAL

VERTICAL

SCREEN CONTROL

0

-10

On

Off

By using the 

Horizontal 

and

 Vertical

 adjustments it is possible 

to select the screen shape of your choice. It is important to 
keep the relation between height and width so that the correct 
aspect ratio can be maintained. 

FREQUENCY / PHASE

Summary of Contents for Domino 35

Page 1: ...rusted dependable name in projector lamp sales http www myprojectorlamps com http www myprojectorlamps ca http www myprojectorlamps eu The following projector manual has not been modified or altered i...

Page 2: ...Installation manual cod 46 0338 200...

Page 3: ...projector status VCR Improves the video recorder signals quality ASPECT Selects image Aspect ratio SOURCE Displays the Source Selection menu Up Down Left Right Arrow keys Navigate through and make ad...

Page 4: ...1 C SY NC 1 INTRODUCTION Congratulations and thank you for choosing a projector a SIM2 Multimedia SpA product Fig 1...

Page 5: ...ready be at between 30 and 60 In addition to the regular tests the Quality Control depart ment performs additional statistical tests at the time of shipment In this case the packing may show signs of...

Page 6: ...ng air outlet vents 6 Adjustable carry handle 7 Adjustable levelling feet 8 Ceiling wall bracket fixing holes 9 Fused power socket 10 Main power switch 11 Remote control rear IR sensor 12 Green LED 13...

Page 7: ...Waste Bin label affixed to this product is in your reminder to dispose of your End of Life product properly Substances such as glass plastic and certain chemical compounds are highly recoverable recy...

Page 8: ...r if it is standing on soft sur faces such as cushions pillows blankets mattresses and carpets the air cooling outlets underneath could become obstructed Do not switch on the projector if it is standi...

Page 9: ...ter to this socket as the projector and the computer may be damaged Fig 5 3 PACKAGING AND CONTENTS To unpack the projector safely and easily please follow steps 1 to 4 as per drawing Fig 5 It is recom...

Page 10: ...projector the desired distance from the screen the size of the projected image is determined by the distance from the lens of the projector to the screen and the zoom setting See Appendix C Projection...

Page 11: ...stand by mode For rear projection the screen must be translucent For front projection we recommend the use of screens with low gain specifications i e 1 3 to 2 The use of high gain screens should be a...

Page 12: ...13 Fig 13 SWITCH ON FROM STAND BY By remote control press one of 1 9 By keyboard press Up or Down Arrow Fig 14 When switching on from stand by the projector will turn on the lamp after a brief warm u...

Page 13: ...edance Poor quality cables will cause inferior picture performance For optimum connectivity we recommend you follow these simple steps With exception of coaxial RCA Phono type connectors always double...

Page 14: ...with composite synchronisation on the green signal RGsB or on the luminance Y signal YsCrCb through a cable with RCA Phono type connector Fig 19 COMPOSITE VIDEO INPUT CVBS COMPOSITE VIDEO Fig 16 This...

Page 15: ...tor is equipped with one output Voltage 12 Vdc for motorised projection screen and screen This 12V output should be connected to the appropriate screen interface provided by the screen manufacturer Fi...

Page 16: ...will pick up the reflected infrared commands Fig 23 Avoid placing ob structions between the remote control and the infrared sensor at the front of the projector this will impair the remote control per...

Page 17: ...d by pressing the key 0 AV of the remote control or the Up Down Arrow key of the keyboard pad The selected source will be highlighted in yellow Use Up and Down Arrow keys to browse sources Right Arrow...

Page 18: ...definition and sharpness CINEMA MODE In Auto the de interlacer recognizes if the video signal is ori ginated from a cinematographic film resulting from Telecin with 3 2 or 2 2 Pull Down and applies an...

Page 19: ...is aspect projects the image occuping the full vertical di mension of the screen and maintaining the correct aspect 4 3 or 16 9 Anamorphic This aspect allows to properly visualize a 16 9 image Letterb...

Page 20: ...fect final image quality 2 COLOR TEMPERATURE GAMMA CORRECTION Y C DELAY ADVANCED SETTINGS VIDEO COLOR TEMPERATURE GAMMA CORRECTION ADVANCED SETTINGS RGB Colour temperature Select the colour temperatur...

Page 21: ...mage to enlarge using all four arrow keys Via remote control it is possible to alternate between modes by pressing the key SETUP The installation menu gives access to features that will allow for corr...

Page 22: ...ize of the projected image use the lens settings FOCUS ZOOM PROJECTION LENS C SYN C Alternatively press keys Focus and Zoom on your remote control or the key Focus Esc on keyboard pad TEST PATTERNS Di...

Page 23: ...after which the On Screen Display will disappear Left and Right Arrow keys set the timing within a 5 60 second timeframe INFO This function displays the current status of the projector input type inpu...

Page 24: ...ector Check the integrity of cables used to connect various sources Out of range Either the resolution or the horizontal vertical frequency of the input signal is too high Input a signal that is withi...

Page 25: ...had sufficient time to cool down seek technical assistance from your nearest Dealer No image Check that the selected input is actually connected to a active video or graphic signal Check that the abov...

Page 26: ...g colour misalignment on vertical details Verify compatibility of video graphic signals with technical specifications of your projector Adjust Y C Delay settings in the Image Adjustments Advan ced Set...

Page 27: ...via computer through RS232 serial inter face Low Voltage Power Output one 12 Vdc output 100 mA max on jack connectors OPTICAL Projection system optical engine based on 1 DMD chip sealed housing dusty...

Page 28: ...HxD double reinforced carton expan dable anti shock packaging gross weight including accessories 8 kg 17 7 lbs recyclable packa ging material ENVIROMENTAL Operation temperature 0 to 35 C 32 to 95 F Tr...

Page 29: ...26 B DIMENSIONS 74 2 15 16 352 13 7 8 174 6 7 8 102 4 318...

Page 30: ...5 5 17 11 6 6 21 7 8 2 26 11 9 9 32 4 11 0 35 11 12 0 39 6 13 7 44 11 1 1 44 1 3 52 1 6 61 1 8 70 2 0 78 2 2 87 2 7 105 3 3 131 4 0 157 4 4 174 4 9 192 5 5 218 m in m ft in m ft in 0 3 0 11 0 3 1 1 0...

Page 31: ...0 80 2 4 96 3 1 120 3 7 144 4 1 160 4 5 166 5 1 200 m in m ft in m ft in 0 3 1 1 0 4 1 4 0 5 1 7 0 5 1 10 0 6 2 0 0 7 2 3 0 8 2 8 1 0 3 4 1 2 4 1 1 4 4 6 1 5 4 11 1 7 5 8 m ft in m ft in 0 5 1 7 0 6 1...

Page 32: ...IDEO Input 11 VGA input 11 RGB YCrCb Input 11 Motorised projection screen output 12 232 Interface connector 12 7 KEYBOARD PAD 13 8 REMOTE CONTROL 13 INDEX 9 ON SCREEN MENUS 14 Source selection 14 Main...

Page 33: ...IM2 USA Inc 10108 USA Today Way 33025 Miramar FL USA Phone 1 954 4422999 Fax 1 954 4422998 www sim2usa com e mail sales sim2usa com SIM2 Deutschland GmbH Gewerbepark 17 D 35606 Solms Phone 0800 800 74...

Reviews: