background image

Mouse Keyboard Set MK10 

English 

11 

This icon indicates that the function "Num Lock" is enabled. 
Clicking again on the "Num Lock" button will disable this function 
again. 

This icon indicates that the function "Caps Lock" is enabled. 
Clicking again on the "Caps Lock" button will disable this 
function again. 

This icon indicates that the function "Scroll Lock" is enabled. 
Clicking again on the "Scroll Lock" button will disable this 
function again. 

Configuring 

Configuring the Optical Mouse 

Double-click on this icon 

 in the task bar or open the menu by right-

clicking (see figure below). 

"About" gives you information on 
the mouse driver. 

"Properties of the mouse" opens 
the configuration menu for the 
mouse. 

"Exit" closes the mouse driver. 


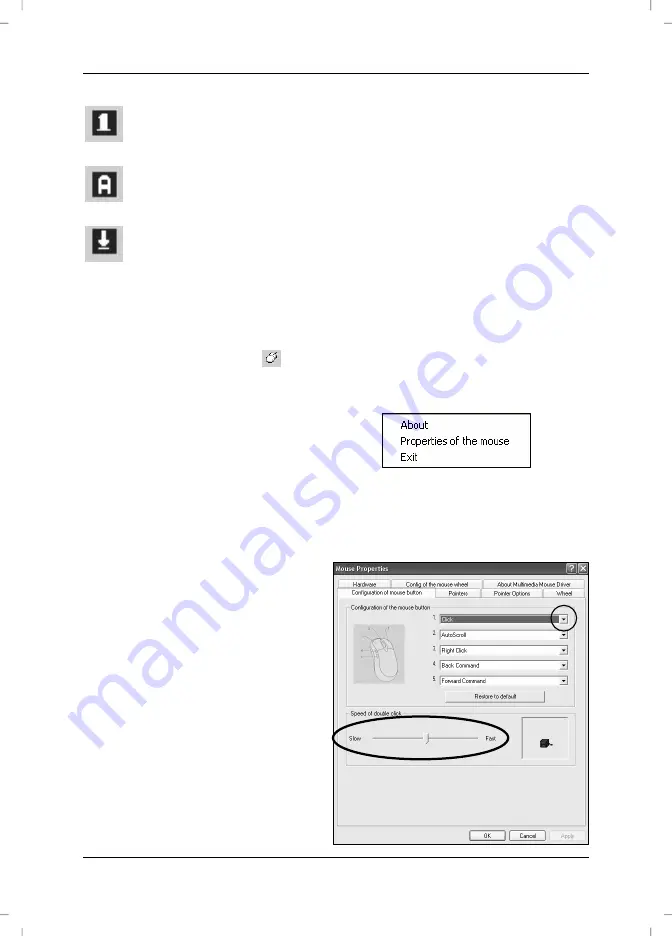
The Mouse Configuration Menu 

Here you can assign a function for 
each of the mouse's five buttons. 
Click on the radio button 
corresponding to the mouse button 
(see highlight in the figure) and 
select the desired function from the 
menu. 

By using the "Restore to default" 
you can return all settings to 
factory default. 


Summary of Contents for MK10

Page 1: ...nformity 4 Disposal of Old Devices 4 PACKAGE CONTENTS 5 INSTALLING HARDWARE 6 Inserting the Batteries 6 Connecting the Wireless Receiver to the Computer 7 Synchronising the Device 7 INSTALLING THE SOFTWARE 9 Icons in the Task Bar 10 CONFIGURING 11 Configuring the Optical Mouse 11 Configuring the Keyboard 12 TECHNICAL SPECIFICATIONS 14 SYSTEM REQUIREMENTS 14 TRADEMARKS 14 DETAILS OF GUARANTEE 15 ...

Page 2: ...and the device should never be operated near water and it must especially never be immersed do no place any objects filled with liquids such as vases or drinks near the device never place the device in the immediate vicinity of magnetic fields e g loudspeakers do not place any fire sources e g burning candles on or near the device do not introduce any foreign bodies into the device the device shou...

Page 3: ...ildren If a battery is swallowed seek medical help immediately Keep the packaging away from children to avoid the danger of suffocation Intended Use This Mouse Keyboard Set consisting of wireless keyboard wireless mouse and wireless receiver is an IT device It may only be used for private use not industrial or other commercial purposes Furthermore the device may not be used outdoors or in tropical...

Page 4: ...urned on near flammable gas or in an explosion sensitive area e g a paint shop as the transmitted RF signals can cause explosions or fire The range of the radio wave signals depends on the environmental conditions Conformity This Mouse Keyboard Set MK10 and the supplied accessories have been tested and approved for compliance with the basic and other relevant requirements of the EMC Directive 89 3...

Page 5: ...rd Wireless Mouse Wireless Receiver AAA type batteries 1 5V 4 pieces not shown CD ROM with driver and software not shown User s manual not shown 1 Volume Control 2 Hotkeys 3 Right mouse button 4 Centre mouse button and scroll wheel 5 Left mouse button 6 Fourth mouse button 7 Fifth mouse button 8 Synchronisation button 9 Status indicator ...

Page 6: ...low Take care to insert the batteries into the device observing the correct polarity and Underside of mouse with open battery compartment Detailed view of keyboard underside with open battery compartment 10 Synchronisation button on mouse 11 Optical sensor 12 Mouse battery compartment 13 Keyboard battery compartment 14 Synchronisation button on keyboard ...

Page 7: ...d and ready to use The uppermost status indicator on the wireless receiver will now light green Synchronising the Device The Mouse Keyboard Set is connected to the receiver via a wireless radio link The radio channel must be tuned in synchronised on first use Position the mouse and the keyboard near to the wireless receiver 1 Press the synchronisation button 14 on the underside of the keyboard 2 P...

Page 8: ...rk after this first synchronization please repeat steps 1 to 3 If you replace the batteries in the keyboard or mouse you must repeat the synchronisation process Detailed Figure of the Status Indicator on Wireless Receiver A Wireless control and synchronization indicator B Indicator light for Scroll Lock C Indicator light for Caps Lock D Indicator light for Num Lock ...

Page 9: ... automatically see figure right If this window does not automatically appear double click on the setup exe file on the CD ROM to start manually After a short time the Install Shield Wizard appears Confirm this window with Next Here you can select the destination folder for the installation with the Browse button or use the suggested folder To proceed click Next ...

Page 10: ... your computer has restarted you can configure the optical mouse and keyboard using the software To do so click on one of the icons in the task bar below right on your screen near the system clock Icons in the Task Bar Double clicking on this icon opens the configuration menu for the optical mouse See page 11 for details Double clicking on this icon opens the configuration menu for the keyboard Se...

Page 11: ... this function again Configuring Configuring the Optical Mouse Double click on this icon in the task bar or open the menu by right clicking see figure below About gives you information on the mouse driver Properties of the mouse opens the configuration menu for the mouse Exit closes the mouse driver The Mouse Configuration Menu Here you can assign a function for each of the mouse s five buttons Cl...

Page 12: ...tion menu to configure the scroll wheel of the mouse as follows Wheel Scroll Speed Determines the speed with which the scroll wheel moves upwards and downwards on the screen Adjust the Volume If this function is enabled you can configure the system volume with the scroll wheel of the mouse With the slide control you can determine the degree of volume adjustment per movement The other tabs of the m...

Page 13: ...ut any changes By left clicking on one of the icons this menu will open With the top function Choose a function you can select one of the default programmes In this example it is the Notepad By enabling this function with the OK button the menu closes and you can comfortably start the Editor Notepad by pressing the corresponding Hotkey This menu will open when you use the second function Select a ...

Page 14: ... 1 radio channel 27MHz with 256 IDs 13 hotkeys of which 9 programmable Volume Control 1 connection button Weight 960g 10g incl batteries Wireless range approx 1 6m Receiver 1 connection button USB connector USB1 1 and USB2 0 compatible 4 status indicators wireless Num Lock Caps Lock Scroll Lock System Requirements Intel Pentium III or higher Minimum 128 MB RAM One free USB port Windows XP 2000 Vis...

Page 15: ...Mouse Keyboard Set MK10 English 15 Details of Guarantee ...

Reviews: