

- 4 -
Speed levels
0 Appliance is switched off
1 Good starting speed for mixing "soft" ingredients
such as flour, butter, etc.
2 Best speed for blending liquid ingredients
3 Optimum speed for mixing cake and bread
dough
4 For whipping butter to form a fine foam, sugar,
for desserts etc.
5 For whipping egg whites, cake, decorative jelly,
pureeing of boiled potatoes, whipping cream,
etc.
For operating the blender:
Only usable in combination with the turbo button.
Turbo:
• this button allows you to have the full power of
your appliance immediately at your disposal.
• for operating the blender
Operation
Kneading and Whisking
Warning:
Do not operate the mixer for longer than 10 minutes
in one session. After 10 minutes, allow the appliance
to rest until it has cooled itself down.
1. Before the first usage, clean the attachments
(
w
,
e
,
r
), the mixing bowl
7
and the lid
9
.
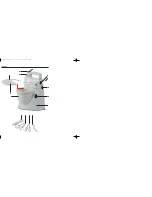
2. Insert the whisk
e
or the kneading hooks
r
into the appliance until they securely and audibly
engage.
Always insert the kneading hook
r
or the whisk
e
with the cogged wheel into the predetermined
opening (marked with a cog wheel) on the
handmixer.
3. Release the mixer holder by pressing the release
button for tilting
5
and lift the mixer holder up-
wards.
4. Remove the mixing bowl
7
and fill it with the
quantities of ingredients to be prepared.
Warning:
NEVER fill the mixing bowl
7
beyond the Max
marking (approx 2.5 l) with ingredients. If you do,
there is a risk they could spill over the edge during
operation.
5. Replace the mixing bowl
7
onto the mixing
stand
6
.
6. Press the release button for tilting
5
and lower
the holder downwards.
7. Place the hand mixer on the holder so that it
firmly engages.
8. Slide the lid
9
into the guiderails on the mixing
bowl
6
so that it is firmly seated.
Note:
Should you wish to add ingredients whilst mixing,
open the filler opening
8
and insert them through
it. To avoid a splattering of the ingredients, be sure
to reclose the filler opening
8
!
You can also use the hand mixer without the mixing
stand
6
. Especially with minor amounts of liquids
you are advised to use the hand mixer without the
mixing stand
6
. Otherwise, the liquid may not be
completely captured and thus not mixed thoroughly.
IB_KH202_33213_LB6 22.05.2009 9:54 Uhr Seite 4


