background image

SilverCrest SCW 5 A2 

34  -  English 

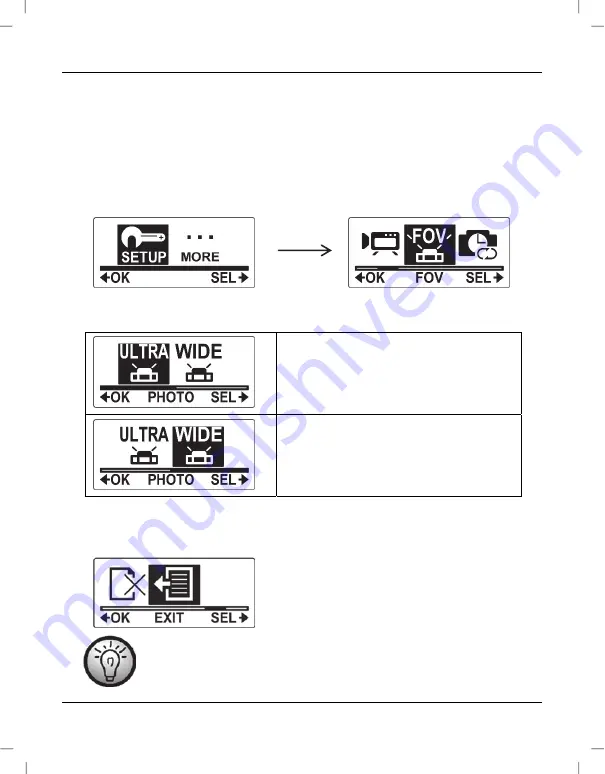
Selecting the camera’s field of view 

To select the camera’s field of view, proceed as follows: 


Press the On/Off/Mode button [2] multiple times to select the SETUP menu and then 
press the record button [9] to confirm. 


Press the On/Off/Mode button [2] multiple times until the FOV menu is highlighted. 
Press the record button [9] to open the FOV menu. 


Press the On/Off/Mode button [2] to select an option. The following settings are 
available: 


Ultra wide-angle lens 


Wide-angle lens 


Press the record button [9] to confirm your selection. 


To exit the SETUP menu, press the On/Off/Mode button [2] multiple times until the EXIT 
item is highlighted and then press the record button [9] to confirm. 


The "Ultra" and "Wide" settings only apply to picture recordings. For 
video recordings, the setting will always be "Ultra" (independently of the 
selection made in the menu). 

Summary of Contents for 113944

Page 1: ......

Page 2: ......

Page 3: ...V 2 15 English 2 Čeština 78 Deutsch 152 ...

Page 4: ...ety instructions 12 Copyright 17 Overview 18 Before you start 19 Inserting removing a memory card 19 Inserting the battery pack 20 Buttons 22 LEDs 22 Charging the Battery 23 Setting the date and time 24 Getting started 26 Powering the camcorder on off 26 The display 26 Selecting the operating mode 28 Recording 28 Recording videos 28 ...

Page 5: ...otating the recording by 180 36 Toggling the loop recording mode on off 37 Toggling the diving mode on off 38 Deleting recordings formatting the memory card 39 Rotating the display image by 180 41 Toggling the status LEDs on off 42 Customising the display brightness 43 Customising the beeper volume 44 Customising the auto power off delay 45 Setting the date and time 46 Connecting a remote control ...

Page 6: ...4 Software 55 System Requirements 55 Installing the software 55 Uninstalling the software 55 The main screen 56 Setting the storage location Selecting the language 56 Editing recordings 57 Viewing recordings 57 Selecting navigation view 58 Preview window 58 Toolbar 59 Importing recordings 59 Merge videos 60 Creating an AVCHD Disk 60 Cutting video clips 61 Upload to YouTube 61 Upload to Facebook 61...

Page 7: ...5 Replacing the back cover 66 Removing fixing the adapter 67 Velcro 68 Swivel holder 69 Replacing the adhesive pad 70 Bike holder 71 Adapter for other mounting systems 72 Troubleshooting 72 When not using the product 73 Environmental regulations and disposal information 74 Conformity notes 74 Warranty and Service Information 75 ...

Page 8: ...er The action camcorder is the ideal companion for your sports activities Its extensive accessories allow you to use the action camcorder for the most different scenarios It allows you to capture wonderful memories at any time Intended use Your camcorder is a Consumer Electronics device and is designed exclusively for recording movies and pictures Any use other than that mentioned above does not c...

Page 9: ... and verify that you have received all items listed Remove all package material If you find anything missing or damaged please contact the Customer Service SilverCrest SCW 5 A1 action camcorder FJ SLB 10A battery 4 GB microSD card incl SD card adapter USB cable HDMI cable Water resistant case incl adapter ...

Page 10: ...est SCW 5 A2 8 English Lens cover Water resistant back cover incl adapter mounted on the water resistant case orange seal Open back cover yellow seal Bike holder Swivel holder Adapter for other mounting systems ...

Page 11: ...atch Velcro without latch 3 x adhesive pads for replacement 6 x anti mist pads CD ROM with software lineart illustration User manual lineart illustration There is a separate GNU General Public License flyer included with the product You can also download this flyer at www lidl service com ...

Page 12: ... MP4 Resolution 1080p 1920 x 1080 30 fps 960p 1280 x 960 30 fps 720p 1280 x 720 60 fps Photo Format JPEG Resolution 5 megapixel Power supply 5V 0 5A for power supply via PC USB port 5V 1 0A for power supply via external power adapter Battery charging time approx 3 0 hours for power supply via PC USB port approx 2 5 hours for power supply via external power adapter Runtime with fully charged batter...

Page 13: ... from the camcorder operation also heats up the battery When not using the camcorder you should store the battery in your pocket for example The technical specifications and design can be changed without prior notice Microphone built in Built in wireless receiver Modulation GFSK Frequency 2403MHz to 2477MHz Data transfer speed 250kbps 1Mbps 2Mbps Number of channels 75 WiFi standards 802 11 b 802 1...

Page 14: ...te important information required for the safe operation of the product and for the safety of its users This symbol denotes further information on the topic To power the camcorder use the supplied battery pack only manufacturer FUJI ELECTRONICS SHENZHEN CO LTD model FJ SLB 10A DANGER Always make sure that the device is not exposed to direct heat sources e g radiators no direct sunlight or bright a...

Page 15: ...ind any component damaged it must not be used Never open the camcorder housing and have all repairs performed by qualified technical staff only Failure to heed the warnings above may result in damage to the device or injury WARNING Recordings photo video of persons and the right on the own image Please note that when recording any persons whether portraits or groups of persons every person has the...

Page 16: ... and persons with disabilities DANGER There is a risk of suffocation DANGER Battery Always insert the battery pack with the correct polarity The correct polarity is labelled on the battery and inside the battery compartment Never throw a battery into fire Remove the battery pack if you do not plan to use the camcorder for a while Improper use could cause explosions or leaks Batteries must never be...

Page 17: ...low deck on a boat fuel line or tank areas environments where the air contains inflammable substances e g cereals dust or metal powder and any areas where you should normally switch off your car engine Respect the environment Old batteries must not be disposed of with domestic waste They must be handed in at a collection point for waste batteries WARNING Cables Always hold cables by the plug and n...

Page 18: ...mperatures between 0 C and 35 C Avoid excessive vibration or shaking under water Otherwise there is a risk that the water resistant case opens This can damage the camcorder and any recordings WARNING Maintenance cleaning Maintenance Repairs are required when the device or its housing has been damaged in any way for example when liquids or objects have entered the product when the product does not ...

Page 19: ...is user manual are protected by copyright and provided to the reader for information only Copying data and information without the prior explicit written consent of the author is strictly forbidden This also applies to any commercial use of the contents and information All texts and diagrams are up to date as of the date of printing ...

Page 20: ...ual You can keep this page folded out whilst reading the different chapters of this user manual This allows you to refer to the relevant controls at any time 1 Display 2 On Off Mode button 3 Status LED 4 Speaker 5 Lens 6 Status LED 7 microSD card slot 8 HDMI output 9 Record button 10 Battery compartment 11 Status LED 12 Microphone 13 USB charging connector 14 Microphone connector 15 Status LED ...

Page 21: ...roceed as follows Power the camcorder off before you insert or remove a memory card Insert the memory card with the contacts facing towards the front of the device towards the lens 5 into the microSD card slot 7 until it clicks in place To remove the memory card gently press on the inserted card The memory card will protrude a little so that you can get a hold of it and remove it Only use Speed Cl...

Page 22: ...arrow until the closed arrow on the cover and the opened arrow on the camera housing are aligned Next lift the battery compartment cover to remove it Align the contacts of the battery pack with the contacts in the battery compartment 10 Make sure that the and contact markings on the battery and in the compartment 10 match Next fully insert the battery pack into the battery compartment 10 Make sure...

Page 23: ...the direction of the arrow until the closed arrow on the cover and the closed arrow on the camera housing are aligned To remove the battery pack open the battery compartment 10 as described above Pull the strip to remove the battery On delivery the battery pack is not charged Please fully charge the battery before using the product for the first time ...

Page 24: ...ture Press this button while the menu is shown to select a menu item LEDs The status LEDs can be found on the top bottom front and back panels of the camcorder They allow you to monitor the camcorder status under the most different mounting scenarios LED Colour Description Status LED 3 Green Operation Powering on or photo capture USB Mode Charging battery Slowly flashing green Operation WiFi is en...

Page 25: ...nsert the small plug of the supplied USB cable into the USB charge port of your camcorder 13 and the large plug into a USB port on your computer You can keep the camcorder powered off while charging Press and hold the On Off Mode button 2 for three seconds to switch the camcorder off The status LED 6 flashes orange during charging When the charging process is complete the status LED 6 goes out Som...

Page 26: ...apter it must be connected to an easily accessible wall outlet in order to be able to disconnect it quickly in case of an emergency Setting the date and time To set the date and time Press and hold the On Off Mode button 2 for at least 3 seconds to switch the camcorder on The camcorder initialises in Video mode automatically To open the menu press the On Off Mode button 2 six times If the display ...

Page 27: ... set the year month day hours and minutes in sequence Select the variable that you want to set by pressing the On Off Mode button 2 Press the record button 9 to increase the value stepwise After all settings have been entered press the On Off Mode button 2 to select OK Press the record button 9 to confirm To exit the MORE menu press the On Off Mode button 2 multiple times until the EXIT item is hi...

Page 28: ...mation 23 25 21 22 24 No Icon Description 21 Number of recordings saved pictures and videos 22 Battery capacity 23 Alternates between the following Displays the field of view of the camera WIDE or ULTRA Shows the remaining storage space in percentage 24 Displays the option that is executed when pressing the record button 9 When this icon is shown pressing the record button 9 starts a video recordi...

Page 29: ...ing mode you can enable or disable the WiFi function While WiFi is enabled you can control the camcorder from the SilverCrest Action Camcorder App Burst mode Use this mode to take a series of 10 pictures Time lapse mode Use this mode for time lapse picture or video recording This icon also resumes the current settings Self timer Use this mode for self timer shots Setup Use this mode to customise t...

Page 30: ...t corner of the display 1 The modes are cycled as follows Video mode Photo mode WiFi Mode Burst mode Setup Self timer Time lapse mode If the display is in dimmed power saving mode press the On Off Mode button 2 once to toggle to active mode Recording Recording videos Press and hold the On Off Mode button 2 for at least 3 seconds to switch the camcorder on The camcorder initialises in Video mode au...

Page 31: ... mode Press and hold the On Off Mode button 2 for at least 3 seconds to switch the camcorder on The camcorder initialises in Video mode automatically To switch to Burst mode BURST press the On Off Mode button 2 three times Press the record button 9 to take a series of 10 pictures While saving the status LED 3 goes green Time lapse mode Press and hold the On Off Mode button 2 for at least 3 seconds...

Page 32: ...martphone or tablet PC You can download the app from the Apple App Store and from the Google Play Store For iOS devices and Android devices up to version 4 x select the SilverCrest Action Camcorder app for Android devices version 5 x and above select the SilverCrest Action Camcorder 2 app In order for the app to be displayed on an Apple iPad in Apple App Store select the iPhone only filter Enable ...

Page 33: ...C and use it to control the action camcorder You can download the operating instructions for your SilverCrest Action Camcorder App from the www lidl service com website The menu The menu lets you customise the camcorder settings and record parameters Press and hold the On Off Mode button 2 for at least 3 seconds to switch the camcorder on The camcorder initialises in Video mode automatically To op...

Page 34: ...mode on off To delete recordings format the memory card To exit the menu Customise camcorder settings To rotate the display image by 180 To toggle the status LEDs on off To customise the display brightness To customise the beeper volume To customise the auto power off delay To set the date and time To connect a remote control not included in the package To reset to factory defaults To exit the men...

Page 35: ... the SETUP menu and then press the record button 9 to confirm The VIDEO menu will be highlighted Press the record button 9 to open the VIDEO menu Press the On Off Mode button 2 to select an option The following settings are available 1080p 1920 x 1080 30 fps 960p 1280 x 960 30 fps 720p 1280 x 720 60 fps Press the record button 9 to confirm your selection To exit the SETUP menu press the On Off Mod...

Page 36: ...he record button 9 to open the FOV menu Press the On Off Mode button 2 to select an option The following settings are available Ultra wide angle lens Wide angle lens Press the record button 9 to confirm your selection To exit the SETUP menu press the On Off Mode button 2 multiple times until the EXIT item is highlighted and then press the record button 9 to confirm The Ultra and Wide settings only...

Page 37: ...2 to select the desired option and then press the record button 9 to confirm The following options are available Use this menu to select to save the time lapse recording as a video or select to save it as a pictures series Use this menu to select the recording interval The following settings are available 1 SEC not for picture series 3 SEC 5 SEC 10 SEC 30 SEC and 60 SEC Select this option to exit ...

Page 38: ...ton 2 multiple times until the UP DOWN menu is highlighted Press the record button 9 to open the UP DOWN menu Press the On Off Mode button 2 to select an option The following settings are available ON and OFF Select ON to have your recording rotated by 180 Select OFF if you don t want to rotate the recordings Press the record button 9 to confirm your selection To exit the SETUP menu press the On O...

Page 39: ...P menu is highlighted Press the record button 9 to open the LOOP menu Press the On Off Mode button 2 to select an option The following settings are available ON and OFF Select ON to enable the loop recording mode or select OFF to disable it Press the record button 9 to confirm your selection As soon as loop recording has been enabled you can press the recording button 9 to start or stop recording ...

Page 40: ... Press the record button 9 to open the DIVING menu Press the On Off Mode button 2 to select an option The following settings are available ON and OFF Select ON to enable the diving mode or select OFF to disable it Press the record button 9 to confirm your selection Once you have enabled the diving mode only video and photo recording is available To be able to select a different recording mode you ...

Page 41: ... the memory card if one is inserted This menu lets you delete any recordings or format the memory card or internal memory Proceed as follows Press the On Off Mode button 2 multiple times to select the SETUP menu and then press the record button 9 to confirm Press the On Off Mode button 2 multiple times until the DELETE menu is highlighted Press the record button 9 to open the DELETE menu Press the...

Page 42: ...button 2 to select an option The following options are available Confirm DELETE or FORMAT Cancel EXIT Press the record button 9 to confirm your selection To exit the DELETE menu press the On Off Mode button 2 multiple times until the EXIT item is highlighted and then press the record button 9 to confirm To exit the SETUP menu press the On Off Mode button 2 multiple times until the EXIT item is hig...

Page 43: ...UP DOWN menu will be highlighted Press the record button 9 to open the UP DOWN menu Press the On Off Mode button 2 to select an option The following settings are available and Select to restore the default value Use the setting to rotate the display image by 180 Press the record button 9 to confirm your selection To exit the MORE menu press the On Off Mode button 2 multiple times until the EXIT it...

Page 44: ...hted Press the record button 9 to open the LED menu Press the On Off Mode button 2 to select an option The following settings are available ON and OFF Selecting ON will enable the camcorder s status LEDs and selecting OFF will disable them Press the record button 9 to confirm your selection To exit the MORE menu press the On Off Mode button 2 multiple times until the EXIT item is highlighted and t...

Page 45: ...ton 2 multiple times until the BRIGHT menu is highlighted Press the record button 9 to open the BRIGHT menu Press the On Off Mode button 2 to select an option The following settings are available 100 60 and 30 You can adjust the display brightness in three levels 100 bright to 30 dark Press the record button 9 to confirm your selection To exit the MORE menu press the On Off Mode button 2 multiple ...

Page 46: ...ple times until the BEEP menu is highlighted Press the record button 9 to open the BEEP menu Press the On Off Mode button 2 to select an option The following settings are available Sets the beeper volume to the highest value Sets the beeper volume to a middle value Disables the beeper Press the record button 9 to confirm your selection To exit the MORE menu press the On Off Mode button 2 multiple ...

Page 47: ...ord button 9 to confirm Press the On Off Mode button 2 multiple times until the AUTO OFF menu is highlighted Press the record button 9 to open the AUTO OFF menu Press the On Off Mode button 2 to select an option The following settings are available 1 MIN 3 MIN 5 MIN 10 MIN 30 MIN 60 MIN and OFF Select a delay time after which the camcorder powers off automatically if no operation has been made in ...

Page 48: ...ighlighted Press the record button 9 to open the TIME menu Next you can set the year month day hours and minutes in sequence Press the record button 9 to increase the value stepwise Press the On Off Mode button 2 to confirm each entry After all settings have been entered press the On Off Mode button 2 to select OK Press the record button 9 to confirm To exit the MORE menu press the On Off Mode but...

Page 49: ... control and consumables like adhesive pads from our hotline or by e mail see page 77 To connect the remote control to the camcorder proceed as follows Press the On Off Mode button 2 multiple times to select the MORE menu and then press the record button 9 to confirm Press the On Off Mode button 2 multiple times until the BINDING menu is highlighted Press the record button 9 to open the BINDING me...

Page 50: ...ography via the remote control you first have to set the camcorder to the desired mode Photo Burst Time lapse or Self timer To use the remote control to record videos set the camcorder to Video mode In Video mode you can even take picture by pressing the camera icon button on the remote control The remote control is water resistant up to a depth of 60 m To guarantee its water resistance do not use...

Page 51: ...times until the DEFAULT menu is highlighted Press the record button 9 to open the DEFAULT menu You ll have to confirm the factory reset If you want you can also cancel this process Press the On Off Mode button 2 to select an option The following options are available Confirm reset to factory defaults Cancel EXIT Press the record button 9 to confirm your selection To exit the MORE menu press the On...

Page 52: ...w your recordings on a television The television needs to have an HDMI connector Use the HDMI cable to connect the camcorder to an available HDMI port on a TV Insert the small plug of the supplied HDMI cable into the HDMI port 8 of your camcorder and the large plug into a HDMI port on your TV Power on your TV and select the HDMI input where your camcorder is connected to Press and hold the On Off ...

Page 53: ...pacity Memory card Type of recording Recordings thumbnail view Mode Shows the current operating mode Shows the recordings in thumbnail view Plays back the recording photo or video Battery capacity Shows the remaining battery level of your camcorder ...

Page 54: ... 9 to select a recording type Recordings thumbnail view This displays the recordings in thumbnail view Press the On Off Mode button 2 to highlight a recording The highlighted recording appears with a frame in thumbnail view If you have highlighted a video its resolution will also be indicated on the left Press the record button 9 to show the highlighted video or picture in full screen mode Press t...

Page 55: ...o the computer you can rename or edit them on the computer Connecting the camcorder to a computer Use the USB cable to connect the camcorder to an available USB port on a computer Insert the small plug of the supplied USB cable into the USB charge port of your camcorder 13 and the large plug into a USB port on your computer Switch the camcorder on if it is powered off The computer will now setup r...

Page 56: ...der in My Computer Open My Computer on your PC and double click on the drive representing the card reader All recorded files can be found in a subfolder of the folder DCIM on this drive Now you can copy the recorded files from the camcorder into a folder of your choice on the computer s hard disk Write protecting the SD card adapter The SD card adapter comes with a write protection tab When write ...

Page 57: ...ree hard disk space Installing the software The software provided is on the CD ROM supplied To install the software you first need to connect the camcorder to the computer using the USB cable Use the USB cable to connect the camcorder to your computer Then switch the camcorder on Insert the CD ROM supplied into the CD or DVD drive of your computer The CD will launch automatically Then follow the o...

Page 58: ...ting the language You can set the storage location for pictures and videos and change the software language at any time From the main dialog click Options Preferences The first field allows you to set the storage location for pictures and videos Click OK to confirm or Select the language you want from the list and click OK to confirm A message appears that a program restart is required Click OK to...

Page 59: ... the current recording Click on the info icon to show further information on the current recording Here you can insert a comment that can further be used for keyword searches Video recordings show a play and a cut icon in the preview window To display a recording in a new window double click on it In the display window click the arrow icons or use the up and down arrow keys on your keyboard to dis...

Page 60: ...month Click the Up arrow to return to the previous level Use the left and right arrows to navigate through the months and years To open My Computer click the button Here you can find all the drives installed on your computer For example this allows you to access any recordings stored on a CD ROM Preview window The preview window gives you various options for filtering and editing your recordings S...

Page 61: ...links to an Asian video portal and is not suitable for use in European countries Importing recordings You can use the Import function to archive your recordings The recordings are copied to your computer Once you have imported your recordings you do not need to connect the camcorder to view them Select all recordings that you want to import from the drive selected and click Import on the bottom to...

Page 62: ...eos that have already placed on the timeline Creating an AVCHD Disk AVCHD Advanced Video Codec High Definition is an innovative digital standard with high resolution and brilliant picture and sound quality This format allows you to record onto writeable DVD disks and play back on suitable DVD players It is a good addition to an HDTV television set Not all players support playback from self recorde...

Page 63: ...o cut Then click It is possible to define mutiple cutting areas in the same clip Start cutting by clicking the confirmation icon The section is cut and a new clip is created without the selection The new clip will be saved to the My Creations folder Upload to YouTube Click on the YouTube upload icon Drag the video recording you want onto the timeline at the bottom of the window Click Next Enter yo...

Page 64: ... Click Next The programme ArcSoft Print Creations launches automatically Choose a category and then a template from the application To do this double click on the template you want Album page This option allows you to create an album page consisting of one or more photos There are also several templates that you can use Click the Album page icon Drag the pictures you want onto the bar at the botto...

Page 65: ... the camcorder under water or when practicing sports activities related to water You can operate the camcorder buttons as usual when it is installed in the water resistant case Remove the lens cover from the water resistant case before recording Insert the camcorder as follows into the water resistant case Open the lock and then open the holding mechanism Open the water resistant case and insert t...

Page 66: ...sm and the lock Please note the following when using the camcorder under water or when practicing sports related to water Make sure that the water resistant case shows no signs of damage Make sure that the holding mechanism of the water resistant case is firmly closed and that no dust or sand is found between the rubber seal and the case The lock mechanism needs to click in place otherwise the cas...

Page 67: ...immediately Avoid excessive vibration or shaking under water Otherwise there is a risk that the water resistant case opens Cleaning after using under water Clean the water resistant case after every time it is used under water Make sure that the water resistant case shows no signs of damage After using the water resistant case under water clean it with tap water To do this submerge in tap water fo...

Page 68: ... under water or when practicing water related sports The open back over may be used only if you want to record videos with audio Please note that the case is not water resistant when the open cover is mounted Water resistant back cover incl adapter orange seal Open back cover yellow seal To replace the back cover proceed as follows Open the lock and then open the holding mechanism ...

Page 69: ...By default an adapter is fixed to the water resistant case and another adapter to the water resistant back cover These adapters allow mounting the water resistant case and the other accessories If you need to mount the adapter on the open back cover you can remove it and fix it at the desired position Proceed as follows Remove the desired adapter by untightening the four screws ...

Page 70: ... on uneven surfaces for example The camcorder is supplied with one Velcro with and one Velcro without latch For instance you can mount the Velcro with latch as follows Pass the Velcro through the guiding slots of the adapter Make sure to place the smooth side of the Velcro inside Then pass the Velcro through the latch and fix its end as shown in the following figure If the Velcro with latch is not...

Page 71: ...nto the adapter until the swivel holder clicks into place Secure the unlock catch with the fixing screw The unlock catch avoids an accidental separation from the water resistant case Then you can fix the swivel holder with an adhesive socket To do this insert the swivel holder into the adhesive socket until the swivel holder clicks into place To fix the adhesive socket on a surface remove the red ...

Page 72: ...fixing screw and remove the unlock catch Press the clip on the swivel holder to remove the swivel holder from the water resistant case To guarantee a good adhesive fixation the cleaned mounting surface must be free of dust oil and grease Replacing the adhesive pad The camcorder is supplied with three spare adhesive pads If the adhesive strength of one adhesive socket weakens you can replace the ad...

Page 73: ...as necessary to be able to remove the screw located on the side of the clip on the bottom piece Rotate the bottom piece aside Place the upper piece on a tube and replace the bottom piece Reinsert the screw into the bottom piece To fix the holder on the tube tighten the screws Next you can fix the camcorder together with its water resistant case and the swivel holder on the bike holder Please see t...

Page 74: ...solve most common problems yourself using the table below If the problem persists after checking the suggested solutions please contact our Service Hotline see page 77 Do not attempt to repair the product yourself Do not open the housing of the camcorder as it contains no serviceable parts Error Solution Unable to power the camcorder on The battery pack is empty Recharge the battery The camcorder ...

Page 75: ... a memory card that is too slow Only use Speed Class 4 or faster memory cards Not all modes are available Probably the camcorder is in WiFi mode or loop recording mode Select a different operating mode Please make sure to use the latest firmware version If a new firmware is available you will find it on the following website www lidl service com When not using the product When not using the camcor...

Page 76: ...ing Any film or plastic contained in the packaging should be taken to your public collection points for disposal Respect the environment Old batteries must not be disposed of with domestic waste They must be handed in at a collection point for waste batteries Please note that batteries must be disposed of fully discharged at appropriate collection points for old batteries If disposing of batteries...

Page 77: ...and repaired parts Any damage or defects discovered upon purchase must be reported immediately when the product has been unpacked Any repairs required after the warranty period will be subject to charge Scope of warranty The device was carefully manufactured in compliance with stringent quality guidelines and subjected to thorough testing before it left the works The warranty applies to material a...

Page 78: ...ct is repaired or replaced Submitting warranty claims To ensure speedy handling of your complaint please note the following Before using your product for the first time please read the enclosed documentation carefully Should any problems arise which cannot be solved in this way please call our hotline Always have your receipt the product article number as well as the serial number if available to ...

Page 79: ...E Mail service IE targa online com Phone 800 62 175 E Mail service MT targa online com Phone 800 92 496 E Mail service CY targa online com IAN 113944 Manufacturer Please note that the following address is not a service address First contact the service point stated above TARGA GmbH Coesterweg 45 59494 SOEST GERMANY ...

Page 80: ...čnostní pokyny 88 Ochrana autorských práv 92 Přehled 93 Než začnete 94 Vkládání vyjímání paměťové karty 94 Vkládání baterie 95 Tlačítka 97 LED indikátory 97 Nabíjení baterie 98 Nastavení data a času 99 Začínáme 101 Zapnutí a vypnutí videokamery 101 Displej 101 Volba provozního režimu 103 Záznam 103 Natáčení videozáznamů 103 ...

Page 81: ... režimu 110 Natočení záznamu o 180 111 Zapnutí vypnutí záznamu ve smyčce 112 Zapnutí vypnutí režimu natáčení pod vodou 113 Odstranění záznamů formátování paměťové karty 114 Natočení zobrazení o 180 116 Zapnutí vypnutí stavových LED indikátorů 117 Úprava jasu displeje 118 Úprava hlasitosti zvukového signálu 119 Úprava intervalu automatického vypnutí 120 Nastavení data a času 121 Připojení dálkového...

Page 82: ...ti zápisu 129 Software 130 Požadavky na systém 130 Instalace softwaru 130 Odinstalování softwaru 130 Hlavní okno 131 Nastavení úložiště Volba jazyka 131 Úpravy záznamů 132 Prohlížení záznamů 132 Výběr zobrazení navigace 133 Náhledové okno 133 Panel nástrojů 134 Import záznamů 134 Sloučení videozáznamů 135 Vytvoření disku AVCHD 135 Střih videoklipů 136 Přenos na YouTube 136 Přenos na Facebook 136 P...

Page 83: ...a zadního krytu 141 Sejmutí upevnění redukce 142 Suchý zip 143 Otočný držák 144 Výměna přilnavé podložky 145 Držák na jízdní kolo 146 Redukce na jiné typy upevnění 147 Odstraňování problémů 147 Pokud se výrobek nepoužívá 148 Předpisy na ochranu životního prostředí a informace o likvidaci 149 Prohlášení o shodě 149 Informace o záruce a servisu 150 ...

Page 84: ... ochrannými známkami příslušných vlastníků Úvod Děkujeme za nákup této akční videokamery SilverCrest SCW 5 A2 Akční videokamera je ideálním společníkem pro vaše sportovní aktivity Díky rozsáhlé nabídce příslušenství ji lze používat pro nejrůznějších scénáře Umožní vám kdykoli zachytit báječné vzpomínky Určené použití Vaše videokamera je spotřební elektronické zařízení které určeno výhradně k natáč...

Page 85: ...te obdrželi všechny uvedené položky Odstraňte veškerý obalový materiál Pokud zjistíte jakoukoli chybějící nebo poškozenou položku kontaktujte zákaznický servis Akční videokamera SilverCrest SCW 5 A2 Baterie FJ SLB 10A 4GB karta microSD včetně SD adaptéru Kabel USB Kabel HDMI Vodotěsné pouzdro včetně redukce ...

Page 86: ...W 5 A2 84 Čeština Kryt objektivu Vodotěsný zadní kryt včetně redukce namontován na vodotěsném pouzdře oranžové těsnění Otevřený zadní kryt žluté těsnění Držák na jízdní kolo Otočný držák Redukce na jiné typy upevnění ...

Page 87: ...uchý zip bez přezky 3 x přilnavá podložka na výměnu 6 x vložka proti zamlžení Disk CD ROM se softwarem vyobrazení Uživatelská příručka vyobrazení K produktu je přiložen samostatný leták GNU General Public License Všeobecná veřejná licence GNU Tento leták lze také stáhnout na adrese www lidl service com ...

Page 88: ...nímků Video Formát H 264 MP4 Rozlišení 1080p 1920 x 1080 30 sn s 960p 1280 x 960 30 sn s 720p 1280 x 720 60 sn s Fotografie Formát JPEG Rozlišení 5 megapixelů Zdroj napájení 5 V 0 5 A pro napájení z USB portu počítače 5 V 1 0 A pro napájení z externího adaptéru Doba nabíjení baterie cca 3 hodiny při napájení z USB portu počítače cca 2 5 hodiny při napájení z externího adaptéru Provozní doba s plně...

Page 89: ...nosti videokamery tak bude zahřívat i baterii V době kdy videokameru nepoužíváte byste měli baterii ukládat třeba do kapsy Technická specifikace a vzhled může být předmětem změny bez předchozího upozornění Mikrofon vestavěný Vestavěný bezdrátový přijímač Modulace GFSK Frekvence 2403 MHz až 2477 MHz Rychlost přenosu dat 250 kb s 1 Mb s 2 Mb s Počet kanálů 75 Wi Fi norma 802 11 b 802 11 g 802 11 n P...

Page 90: ...úmrtí VAROVÁNÍ Tento symbol a nápis Varování označuje důležité informace pro bezpečné používání výrobku a bezpečnost uživatele Tento symbol označuje další informaci na dané téma K napájení videokamery použijte pouze dodávanou baterii výrobce FUJI ELECTRONICS SHENZHEN CO LTD model FJ SLB 10A POZOR Pokaždé se ujistěte že přístroj není vystaven přímým zdrojům tepla např radiátory na přístroj nepůsobí...

Page 91: ...oškození nesmíte ji používat Kryt videokamery nikdy neotvírejte a veškeré opravy svěřte pouze kvalifikovaným technikům Pokud výše uvedené pokyny nedodržíte může dojít k poškození přístroje nebo ke zranění VAROVÁNÍ Záznam fotografie videozáznam osob a právo na vlastní snímek Mějte na paměti že při záznamu jakékoli osoby má každá osoba právo na svůj vlastní snímek záznam bez ohledu na to zda se jedn...

Page 92: ...ZOR Hrozí nebezpečí udušení POZOR Baterie Při vkládání baterie vždy dbejte na správnou polaritu Správná polarita je vyznačena na baterii a uvnitř přihrádky na baterii Baterii nikdy nevhazujte do ohně Pokud nebudete videokameru nějakou dobu používat baterii vyjměte Nesprávné použití může vést k výbuchu a ohrožení života Baterie se nikdy nesmí otevírat ani deformovat Všechny baterie s unikajícím ele...

Page 93: ...ach apod a všechna místa v nichž je obvykle nařízeno vypnutí motoru vozidla Chraňte životní prostředí Staré baterie se nesmí likvidovat jako běžný domácí odpad Odevzdejte je na sběrném místě pro použité baterie VAROVÁNÍ Kabely Při odpojování od zásuvky držte kabel za vidlici nikdy netahejte za samotný kabel Na kabely nikdy nepokládejte kusy nábytku ani jiné těžké předměty a dejte pozor aby nedošlo...

Page 94: ...stroj nepracuje správně nebo spadl na zem Pokud zaznamenáte dým neobvyklé zvuky nebo zápach zařízení okamžitě vypněte a baterii vyjměte V tomto případě přístroj dále nepoužívejte a nechte ho zkontrolovat odborníkem Všechny opravy musí provádět kvalifikovaný servisní technik Čištění Používejte měkkou bezprašnou tkaninu Nepoužívejte žádné čisticí prostředky ani rozpouštědla neboť by mohly vniknout p...

Page 95: ...í různých kapitol příručky ponechat rozevřenou Tak si můžete příslušné prvky kdykoli prohlédnout 1 Displej 2 Vypínač přepínač režimu 3 Stavový LED indikátor 4 Reproduktor 5 Objektiv 6 Stavový LED indikátor 7 Slot na paměťové karty microSD 8 Výstup HDMI 9 Tlačítko záznamu 10 Přihrádka na baterii 11 Stavový LED indikátor 12 Mikrofon 13 Konektor USB nabíjení 14 Konektor mikrofonu 15 Stavový LED indik...

Page 96: ...kartu microSD Postupujte následujícím způsobem Před vložením nebo vyjmutím paměťové karty videokameru vypněte Do štěrbiny pro paměťovou kartu 7 zasuňte kartu microSD tak aby její kontakty směřovaly k přední straně přístroje směrem k objektivu 5 dokud nezapadne na místo Chcete li vloženou paměťovou kartu vyjmout jemně na ni zatlačte Paměťová karta se mírně vysune takže ji můžete uchopit a vytáhnout...

Page 97: ...e směru šipky dokud se nesrovná uzavřená šipka na víčku přihrádky s otevřenou šipkou na krytu videokamery Poté zvedněte víčko přihrádky pro baterii a sundejte ho Kontakty na baterii srovnejte s kontakty uvnitř přihrádky na baterie 10 Ujistěte se že se označení kontaktů a na baterii shoduje s označením v přihrádce 10 Poté baterii zcela zasuňte do přihrádky 10 Nezapomeňte přes baterii položit konec ...

Page 98: ... a posunout ho ve směru šipky dokud se nesrovná uzavřená šipka na víčku přihrádky s uzavřenou šipkou na krytu videokamery Chcete li baterii vyjmout otevřete přihrádku na baterii 10 podle výše uvedeného popisu Baterii vyjměte zatažením za pásek Při dodání není baterie nabitá Před prvním použitím přístroje baterii dobijte ...

Page 99: ...hem zobrazení nabídky lze stiskem tohoto tlačítka vybírat položky nabídky LED indikátory Stavové LED indikátory jsou umístěny na horním spodním předním a zadním panelu videokamery Umožňují sledovat stav videokamery během nejrůznějších typů instalace LED indikátor Barva Popis Stavový LED indikátor 3 Zelená Funkce Indikace zapnutí nebo fotografování Režim USB Nabíjení baterie Pomalu blikající zelená...

Page 100: ...r na dodaném kabelu USB zapojíte do portu USB nabíjení na videokameře 13 a velký konektor do portu USB na počítači Během nabíjení lze nechat videokameru vypnutou Chcete li videokameru vypnout stiskněte Vypínač přepínač režimu 2 a přidržte ho na tři sekundy Během nabíjení bude stavový LED indikátor oranžově blikat 6 Až bude nabíjení dokončeno stavový LED indikátor 6 zhasne Některé počítače nedodáva...

Page 101: ...napájecí adaptér USB musí být připojen do snadno přístupné zásuvky aby se dal v případě nouze snadno odpojit Nastavení data a času Jak nastavit datum a čas Videokameru zapnete tak že stisknete Vypínač přepínač režimu 2 a přidržíte ho alespoň na 3 sekundy Videokamera se automaticky zapne v režimu Video Chcete li vyvolat nabídku šestkrát stiskněte Vypínač přepínač režimu 2 Pokud je displej ztlumen v...

Page 102: ... Potom můžete postupně nastavit rok měsíc den hodiny a minuty Vypínačem přepínačem režimu 2 vyberte proměnné které chcete nastavit Ke zvýšení hodnoty o krok použijte tlačítko záznamu 9 Po zadání všech parametrů vyberte vypínačem přepínačem režimu 2 OK Potvrďte stiskem tlačítka záznamu 9 Chcete li nabídku MORE DALŠÍ opustit několikrát stiskněte Vypínač přepínač režimu 2 dokud se nezvýrazní položka ...

Page 103: ...azují tyto informace 23 25 21 22 24 Číslo Ikona Popis 21 Počet uložených záznamů snímky a videozáznamy 22 Kapacita baterie 23 Střídají se tyto hodnoty Zorný úhel videokamery WIDE nebo ULTRA Velikost zbývajícího úložného prostoru v procentech 24 Zobrazí se možnost která se provede při stisku tlačítka záznamu 9 Při zobrazení této ikony se stiskem tlačítka záznamu 9 zahájí natáčení videozáznamu Při z...

Page 104: ...imu lze zapnout či vypnout funkce Wi Fi Pokud je Wi Fi zapnuto videokameru lze ovládat z aplikace SilverCrest Action Camcorder App Sekvenční režim Tento režim použijte k pořízení série 10 snímků Časosběrný režim Tento režim použijte k pořízení časosběrných snímků nebo videozáznamu Tato ikona také obnoví momentální nastavení Samospoušť Tento režim použijte k pořizování snímků se samospouští Nastave...

Page 105: ... displeje 1 Režimy se mění v tomto pořadí Režim video Režim Fotografie Režim Wi Fi Sekvenční režim Nastavení Samospoušť Časosběrný režim Pokud je displej ztlumen v úsporném režimu dalším stiskem Vypínače přepínače režimu 2 ho aktivujte Záznam Natáčení videozáznamů Videokameru zapnete tak že stisknete Vypínač přepínač režimu 2 a přidržíte ho alespoň na 3 sekundy Videokamera se automaticky zapne v r...

Page 106: ...ekvenční režim Videokameru zapnete tak že stisknete Vypínač přepínač režimu 2 a přidržíte ho alespoň na 3 sekundy Videokamera se automaticky zapne v režimu Video Třemi stisky vypínače přepínače režimu 2 ji přepnete do sekvenčního režimu Stiskem tlačítka záznamu 9 pořídíte sérii 10 snímků Při ukládání se stavový LED indikátor 3 rozsvítí zeleně Časosběrný režim Videokameru zapnete tak že stisknete V...

Page 107: ...amcorder Aplikaci si můžete stáhnout ze serverů Apple App Store a Google Play Store Pro modely se systémem iOS a Android až do verze 4 x vyberte aplikaci SilverCrest Action Camcorder Pro modely Android ve verzi 5 x a vyšší vyberte aplikaci SilverCrest Action Camcorder 2 Kvůli zobrazení aplikace na přístroji Apple iPad v prostředí Apple App Store vyberte filtr iPhone only pouze iPhone Aktivace akčn...

Page 108: ... a použijte ho k ovládání akční videokamery Příručku k aplikaci SilverCrest Action Camcorder App si můžete stáhnout z webových stránek www lidl service com Nabídka Nabídka umožňuje upravit nastavení videokamery a parametrů záznamu Videokameru zapnete tak že stisknete Vypínač přepínač režimu 2 a přidržíte ho alespoň na 3 sekundy Videokamera se automaticky zapne v režimu Video Chcete li vyvolat nabí...

Page 109: ...vodou Odstranění záznamů formátování paměťové karty Ukončení nabídky Úprava nastavení videokamery Natočení zobrazení o 180 Zapnutí vypnutí stavových LED indikátorů Úprava jasu displeje Úprava hlasitosti zvukového signálu Úprava intervalu automatického vypnutí Nastavení data a času Připojení dálkového ovladače není součástí balení Obnovení původní nastavení z výroby Ukončení nabídky Potvrzení stisk...

Page 110: ...e nabídku nastavení SETUP a poté akci potvrďte tlačítkem záznamu 9 Bude zvýrazněna nabídka VIDEO Nabídku VIDEO otevřete tlačítkem záznamu 9 Požadovanou možnost vyberete stiskem vypínače přepínače režimu 2 K dispozici jsou tato nastavení 1080p 1920 x 1080 30 sn s 960p 1280 x 960 30 sn s 720p 1280 x 720 60 sn s Výběr potvrďte tlačítkem záznamu 9 Chcete li nabídku nastavení SETUP opustit několikrát s...

Page 111: ...ku FOV otevřete tlačítkem záznamu 9 Požadovanou možnost vyberete stiskem vypínače přepínače režimu 2 K dispozici jsou tato nastavení Ultra širokoúhlý objektiv Širokoúhlý objektiv Výběr potvrďte tlačítkem záznamu 9 Chcete li nabídku nastavení SETUP opustit několikrát stiskněte Vypínač přepínač režimu 2 dokud se nezvýrazní položka EXIT KONEC a poté akci potvrďte tlačítkem záznamu 9 Nastavení Ultra a...

Page 112: ...dovanou možnost a poté akci potvrďte tlačítkem záznamu 9 K dispozici jsou následující možnosti Pokud v této nabídce vyberete položku časosběrný záznam můžete uložit jako videosekvenci Pokud vyberete položku uložíte jej jako sérii snímků Tuto nabídku použijte k nastavení časového intervalu záznamu K dispozici jsou tato nastavení 1 SEC ne pro sérii snímků 3 SEC 5 SEC 10 SEC 30 SEC a 60 SEC Tuto možn...

Page 113: ...kud nebude zvýrazněna nabídka otáčení UP DOWN Nabídku UP DOWN otevřete tlačítkem záznamu 9 Požadovanou možnost vyberete stiskem vypínače přepínače režimu 2 K dispozici jsou tato nastavení ON a OFF ZAPNOUT a VYPNOUT Pokud chcete svůj záznam otočit o 180 vyberte ON Pokud záznam nechcete otáčet použijte nastavení OFF Výběr potvrďte tlačítkem záznamu 9 Chcete li nabídku nastavení SETUP opustit několik...

Page 114: ...znamu ve smyčce LOOP Nabídku LOOP otevřete tlačítkem záznamu 9 Požadovanou možnost vyberete stiskem vypínače přepínače režimu 2 K dispozici jsou tato nastavení ON a OFF ZAPNOUT a VYPNOUT Chcete li zapnout záznam ve smyčce vyberte ON chcete li ho vypnout vyberte OFF Výběr potvrďte tlačítkem záznamu 9 Jakmile jste aktivovali režim záznamu ve smyčce můžete tlačítkem záznamu 9 záznam zahájit nebo ukon...

Page 115: ...tevřete tlačítkem záznamu 9 Požadovanou možnost vyberete stiskem vypínače přepínače režimu 2 K dispozici jsou tato nastavení ON a OFF ZAPNOUT a VYPNOUT Chcete li zapnout režim natáčení pod vodou vyberte ON chcete li ho vypnout vyberte OFF Výběr potvrďte tlačítkem záznamu 9 Pokud jste zapnuli režim natáčení pod vodou je dostupné pouze natáčení videa a fotografování Chcete li zvolit jiný režim zázna...

Page 116: ...ložena Tato nabídka vám umožní odstranit veškeré záznamy nebo naformátovat paměťovou kartu nebo interní paměť Postupujte následujícím způsobem Několikerým stiskem vypínače přepínače režimu 2 vyberte nabídku nastavení SETUP a poté akci potvrďte tlačítkem záznamu 9 Několikrát stiskněte Vypínač přepínač režimu 2 dokud nebude zvýrazněna nabídka DELETE Nabídku DELETE otevřete tlačítkem záznamu 9 Požado...

Page 117: ...režimu 2 K dispozici jsou následující možnosti Potvrdit DELETE ODSTRANIT nebo FORMAT FORMÁTOVAT Storno EXIT Výběr potvrďte tlačítkem záznamu 9 Chcete li nabídku DELETE opustit několikrát stiskněte Vypínač přepínač režimu 2 dokud se nezvýrazní položka EXIT KONEC a poté akci potvrďte tlačítkem záznamu 9 Chcete li nabídku nastavení SETUP opustit několikrát stiskněte Vypínač přepínač režimu 2 dokud se...

Page 118: ...něna nabídka otáčení UP DOWN Nabídku UP DOWN otevřete tlačítkem záznamu 9 Požadovanou možnost vyberete stiskem vypínače přepínače režimu 2 K dispozici jsou tato nastavení a Chcete li obnovit výchozí hodnotu vyberte Chcete li natočit zobrazení o 180 použijte nastavení Výběr potvrďte tlačítkem záznamu 9 Chcete li nabídku MORE DALŠÍ opustit několikrát stiskněte Vypínač přepínač režimu 2 dokud se nezv...

Page 119: ...de zvýrazněna nabídka LED Nabídku LED otevřete tlačítkem záznamu 9 Požadovanou možnost vyberete stiskem vypínače přepínače režimu 2 K dispozici jsou tato nastavení ON a OFF ZAPNOUT a VYPNOUT Při volbě ON se stavové LED indikátory zapnou při volbě OFF se indikátory vypnou Výběr potvrďte tlačítkem záznamu 9 Chcete li nabídku MORE DALŠÍ opustit několikrát stiskněte Vypínač přepínač režimu 2 dokud se ...

Page 120: ...č režimu 2 dokud nebude zvýrazněna nabídka BRIGHT JAS Nabídku BRIGHT otevřete tlačítkem záznamu 9 Požadovanou možnost vyberete stiskem vypínače přepínače režimu 2 K dispozici jsou tato nastavení 100 60 a 30 Jas displeje lze nastavit ve třech úrovních 100 jas až do 30 tlumené osvětlení Výběr potvrďte tlačítkem záznamu 9 Chcete li nabídku MORE DALŠÍ opustit několikrát stiskněte Vypínač přepínač reži...

Page 121: ...č přepínač režimu 2 dokud nebude zvýrazněna nabídka BEEP ZVUKOVÝ SIGNÁL Nabídku BEEP otevřete tlačítkem záznamu 9 Požadovanou možnost vyberete stiskem vypínače přepínače režimu 2 K dispozici jsou tato nastavení Nastavení vyšší úrovně hlasitosti Nastavení střední úrovně hlasitosti Zvukový signál je vypnutý Výběr potvrďte tlačítkem záznamu 9 Chcete li nabídku MORE DALŠÍ opustit několikrát stiskněte ...

Page 122: ... tlačítkem záznamu 9 Několikrát stiskněte Vypínač přepínač režimu 2 dokud nebude zvýrazněna nabídka AUTO OFF AUTOMATICKÉ VYPNUTÍ Nabídku AUTO OFF otevřete tlačítkem záznamu 9 Požadovanou možnost vyberete stiskem vypínače přepínače režimu 2 K dispozici jsou tato nastavení 1 MIN 3 MIN 5 MIN 10 MIN 30 MIN 60 MIN a OFF Vyberte časový interval po jehož uplynutí se videokamera automaticky vypne pokud se...

Page 123: ...razněna nabídka TIME ČAS Nabídku TIME otevřete tlačítkem záznamu 9 Potom můžete postupně nastavit rok měsíc den hodiny a minuty Ke zvýšení hodnoty o krok použijte tlačítko záznamu 9 Každé zadání potvrďte stiskem vypínače přepínače režimu 2 Po zadání všech parametrů vyberte vypínačem přepínačem režimu 2 OK Potvrďte stiskem tlačítka záznamu 9 Chcete li nabídku MORE DALŠÍ opustit několikrát stiskněte...

Page 124: ... materiál např přilnavé podložky lze objednat na naší lince podpory nebo e mailem viz strana 151 Při připojování dálkového ovladače k videokameře postupujte následovně Několikerým stiskem vypínače přepínače režimu 2 vyberte nabídku MORE DALŠÍ a poté akci potvrďte tlačítkem záznamu 9 Několikrát stiskněte Vypínač přepínač režimu 2 dokud nebude zvýrazněna nabídka BINDING PROPOJENÍ Nabídku BINDING ote...

Page 125: ...t fotografování prostřednictvím dálkového ovladače musíte videokameru nejprve přepnout do požadovaného režimu Fotografie Sekvenční režim Časosběrný režim nebo Samospoušť Chcete li použít dálkový ovladač k natáčení videozáznamů přepněte videokameru do režimu Video V režimu Video lze také pořizovat snímky stačí stisknout tlačítko ikona kamery na dálkovém ovladači Dálkový ovladač je vodotěsný až do h...

Page 126: ...e zvýrazněna nabídka obnovení výchozího nastavení DEFAULT Nabídku DEFAULT otevřete tlačítkem záznamu 9 Obnovení výchozího nastavení musíte potvrdit Pokud chcete můžete proces také přerušit Požadovanou možnost vyberete stiskem vypínače přepínače režimu 2 K dispozici jsou následující možnosti Potvrdit obnovení původního nastavení z výroby Storno EXIT Výběr potvrďte tlačítkem záznamu 9 Chcete li nabí...

Page 127: ...lížet i na televizoru Televizor musí být vybaven konektorem HDMI K připojení videokamery k dostupnému portu HDMI na televizoru použijte kabel HDMI Malý konektor na dodaném kabelu HDMI zapojíte do zdířky HDMI na videokameře 8 a velký konektor do portu HDMI na televizoru Zapněte televizor a vyberte vstup HDMI do něhož je zapojena videokamera Videokameru zapnete tak že stisknete Vypínač přepínač reži...

Page 128: ...a Režim Kapacita baterie Paměťová karta Typ záznamu Náhledy záznamů Režim Zobrazení aktuálního provozního režimu Náhledové zobrazení záznamů Přehrávání záznamu snímek nebo video Kapacita baterie Zbývající energie baterie videokamery ...

Page 129: ...ítka záznamu 9 Náhledy záznamů V tomto režimu se zobrazí náhledy záznamů Stiskem vypínače přepínače režimu 2 zvýrazněte záznam Náhled zvýrazněného záznamu bude opatřen rámečkem Pokud jste zvýraznili videozáznam na levé straně se zobrazí také jeho rozlišení Chcete li zvýrazněný záznam zobrazit v celostránkovém zobrazení stiskněte tlačítko záznamu 9 Stiskem vypínače přepínače režimu 2 lze mezi zázna...

Page 130: ...ebude možno načíst Po zkopírování souborů a složek do počítače je můžete přejmenovat nebo upravit v počítači Připojení videokamery k počítači K připojení videokamery k dostupnému portu USB na počítači použijte kabel USB Malý konektor na dodaném kabelu USB zapojíte do portu USB nabíjení na videokameře 13 a velký konektor do portu USB na počítači Zapněte videokameru pokud je vypnutá Počítač nyní při...

Page 131: ... paměťových karet Otevřete nabídku Tento počítač a dvakrát klikněte na jednotku představující čtečku paměťové karty Všechny zaznamenané soubory jsou na této jednotce uloženy ve složce DCIM Nyní můžete soubory zaznamenané ve videokameře zkopírovat do požadované složky na pevném disku počítače Ochrana adaptéru na karty SD proti zápisu Adaptér na karty SD je opatřen západkou ochrany proti zápisu Je l...

Page 132: ...B 1 1 nebo vyšší Paměť Nejméně 2 GB volného místa na pevném disku Instalace softwaru Dodávaný software je na přiloženém disku CD ROM Před instalací softwaru musíte nejprve připojit videokameru k počítači kabelem USB K připojení videokamery k počítači použijte kabel USB Poté zapněte videokameru Do jednotky CD nebo DVD v počítači vložte přiložený disk CD ROM CD se spustí automaticky Poté nainstalujt...

Page 133: ...místo pro ukládání snímků a videozáznamů a kdykoli změnit jazyk softwaru V hlavním dialogovém okně klikněte na Options Možnosti Preferences Předvolby První pole umožňuje nastavit místo ukládání pro snímky a videozáznamy Potvrďte kliknutím na tlačítko OK nebo Ze seznamu vyberte požadovaný jazyk a potvrďte kliknutím na OK Zobrazí se zpráva s upozorněním že je třeba restartovat počítač Zprávu potvrďt...

Page 134: ...ace o aktuálním záznamu klikněte na ikonu informace Sem lze vložit komentář který lze dále použít k vyhledávání podle klíčových slov V náhledovém okně videozáznamů se zobrazuje ikona přehrávání a střihu Chcete li zobrazit záznam v novém okně dvakrát na něj klikněte Chcete li zobrazit předchozí nebo následující záznam v zobrazovacím okně klikněte na ikony se šipkami nebo použijte klávesy se šipkami...

Page 135: ...liknutím na šipku Nahoru se vrátíte na předchozí úroveň K procházení měsíci a roky použijte levou a pravou šipku Chcete li otevřít nabídku Počítač klikněte na tlačítko Zde můžete vyhledat všechny jednotky nainstalované na svém počítači Například získáte přístup ke všech záznamům na disku CD ROM Náhledové okno Náhledové okno vám poskytne různé možnosti řazení a úpravy vašich záznamů Zobrazení všech...

Page 136: ...videoportál který není vhodný k použití v evropských zemích Import záznamů Chcete li své záznamy archivovat můžete použít funkci Importovat Záznamy se zkopírují do počítače Jakmile budou záznamy naimportovány nebudete k jejich prohlížení potřebovat videokameru Z vybrané jednotky vyberte všechny záznamy které chcete importovat a klikněte na tlačítko Import Importovat na panelu nástrojů Otevře se vý...

Page 137: ...iž umístěny na časové ose Vytvoření disku AVCHD AVCHD Advanced Video Codec High Definition je inovovaný digitální standard s vysokým rozlišením a brilantní kvalitou obrazu i zvuku Tento formát umožňuje záznam na zapisovatelné disky DVD které lze přehrávat na vhodných přehrávačích DVD Jedná se o dobrý doplněk k televizoru s vysokým rozlišením Všechny přehrávače nepodporují přehrávání z vlastnoručně...

Page 138: ...ednom klipu lze definovat větší počet úseků k vystřižení Střih zahájíte kliknutím na ikonu potvrzení Úsek bude vystřižen a vytvoří se nový videoklip bez výběru Nový klip bude uloženo do složky My Creations Má tvorba Přenos na YouTube Klikněte na ikonu přenosu na YouTube Požadovaný videoklip přetáhněte na časovou osu ve spodní části okna Klikněte na tlačítko Next Další Zadejte své uživatelské jméno...

Page 139: ...Klikněte na tlačítko Next Další Automaticky se spustí program ArcSoft Print Creations Z aplikace vyberte kategorii a poté šablonu Požadovanou šablonu vyberte dvojitým kliknutím Album Page Stránka alba Tato možnost umožňuje vytvořit stránku alba obsahující jeden snímek nebo větší počet snímků Existuje několik šablon které můžete použít Klikněte na ikonu Stránka alba Požadované snímky přetáhněte na ...

Page 140: ...y pod vodou nebo při provádění sportovních aktivit souvisejících s vodou Pokud je videokamera umístěna ve vodotěsném pouzdře můžete ovládat její tlačítka jako obvykle Před zahájením záznamu sundejte z vodotěsného pouzdra kryt objektivu Videokamera se do vodotěsného pouzdra vkládá následujícím způsobem Odklopte pojistku a poté otevřete přidržovací mechanizmus Otevřete vodotěsné pouzdro a videokamer...

Page 141: ...chanizmus a pojistku Při používání videokamery pod vodou nebo při provádění sportovních aktivit souvisejících s vodou si zapamatujte tyto zásady Ověřte si zda na vodotěsném pouzdře nejsou žádné známky poškození Ověřte si zda je přidržovací mechanizmus vodotěsného pouzdra pevně uzavřen a mezi pružným těsněním a pouzdrem není prach nebo písek Zámek pojistky musí zaklapnout jinak nebude pouzdro spole...

Page 142: ...amžitě setřít Pod vodou se vyhněte nadměrným vibracím nebo otřesům Jinak existuje nebezpečí že se vodotěsné pouzdro otevře Čištění po použití pod vodou Vodotěsné pouzdro vyčistěte po každém použití pod vodo Ověřte si zda na vodotěsném pouzdře nejsou žádné známky poškození Po použití vodotěsného pouzdra pod vodou ho opláchněte pitnou vodou Pouzdro ponořte do pitné vody asi na 10 minut aby se odstra...

Page 143: ...ní sportovních aktivit souvisejících s vodou Otevřený zadní kryt lze použít pouze pokud chcete natáčet videozáznamy se zvukem Nezapomeňte že při instalaci otevřeného krytu pouzdro není vodotěsné Vodotěsný zadní kryt včetně redukce oranžové těsnění Otevřený zadní kryt žluté těsnění Při výměně zadního krytu postupujte následovně Odklopte pojistku a poté otevřete přidržovací mechanizmus ...

Page 144: ...otěsném zadním krytu Tyto adaptéry umožňují instalaci vodotěsného pouzdra a dalšího příslušenství Pokud potřebujete redukci nainstalovat na otevřený zadní kryt můžete ji sejmout a upevnit do požadované polohy Postupujte následujícím způsobem Povolte čtyři šrouby a sundejte požadovanou redukci Poté pomocí čtyř šroubů nainstalujte redukci do požadované polohy Adaptéry lze připevnit na vodotěsné pouz...

Page 145: ...ipem s přezkou a s jedním bez přezky Suchý zip s přezkou lze připevnit například takto Suchý zip protáhněte vodicími štěrbinami redukce Dbejte na to aby byla hladká strana pásky vložena dovnitř Poté protáhněte suchý zip přezkou a jeho konec upevněte podle následujícího vyobrazení Pokud není suchý zip s přezkou vhodný pro momentální použití můžete použít i suchý zip bez přezky ...

Page 146: ... zajistěte upevňovacím šroubem Uvolňovací západka zabraňuje náhodné oddělení od vodotěsného pouzdra Poté lze otočný držák připevnit k přilnavé koncovce V tomto případě zasuňte otočný držák do přilnavé koncovky dokud nezaklapne na místo Chcete li připevnit přilnavou koncovku na plochu sundejte červenou fólii Poté nalepte přilnavou koncovku na předem očištěnou plochu Přilnavou část lze opakovaně něk...

Page 147: ...k sundejte z vodotěsného pouzdra Aby byla zaručena dobrá přilnavá fixace očištěná montážní plocha musí být zbavena prachu oleje a mastnoty Výměna přilnavé podložky Videokamera se dodává se třemi náhradními přilnavými podložkami Pokud se přilnavá schopnost jedné přilnavé podložky sníží můžete ji vyměnit Postupujte následujícím způsobem Přilnavou podložku úplně sundejte z přilnavé koncovky Z přilnav...

Page 148: ... Držák otevřete povolte šrouby do té míry aby bylo možno vyjmout šroub umístěný na straně spony na spodním dílu Spodní díl otočte na stranu Horní díl umístěte na trubku a znovu nasaďte spodní díl Do spodního dílu znovu zasuňte šroub Utažením šroubů zajistěte držák na trubce Potom můžete videokameru s jejím vodotěsným pouzdrem a otočným držákem připevnit na jízdní kolo Podrobnosti naleznete v odsta...

Page 149: ... řešení kontaktujte naši servisní linku viz strana 151 Nepokoušejte se sami výrobek opravovat Kryt videokamery neotvírejte nejsou v ní žádné opravitelné součásti Závada Řešení Videokameru nelze zapnout Baterie je vybitá Nabijte ji Videokamera se náhle vypne Baterie je vybitá Nabijte ji Videokamera se náhle vypne Je aktivována funkce Automatické vypnutí Zkontrolujte nastavení viz strana 120 Videoka...

Page 150: ...ispozici Videokamera je pravděpodobně přepnutá do režimu Wi Fi nebo do režimu záznamu ve smyčce Použijte jiný provozní režim Ujistěte se že používáte nejnovější verzi firmwaru Pokud je nový firmware k dispozici naleznete ho na webových stránkách www lidl service com Pokud se výrobek nepoužívá Pokud videokameru delší dobu nepoužíváte doporučuje se čas od času nabít akumulátor To mu zajistí delší ži...

Page 151: ...odevzdat k recyklaci ve veřejných sběrnách Veškeré fólie nebo plasty které obal obsahuje je třeba odevzdat k likvidaci ve veřejné sběrně Chraňte životní prostředí Staré baterie se nesmí likvidovat jako běžný domácí odpad Odevzdejte je na sběrném místě pro použité baterie Pamatujte si že baterie musí být na příslušném sběrném místě pro použité baterie odevzdány ve stavu úplného vybití V případě lik...

Page 152: ...ihned po vybalení Opravy po uplynutí záruční doby jsou zpoplatněny Rozsah záruky Přístroj byl pečlivě vyroben dle nejpřísnějších kvalitativních směrnic a před dodáním svědomitě zkontrolován Záruční plnění platí pro materiálové a výrobní vady tato záruka se nevztahuje na součásti výrobku které jsou vystaveny normálnímu užívání a mohou být roto považovány za opotřebované součástky nebo jsou zhotoven...

Page 153: ...i zákaznickou linku Pro veškeré požadavky z vaší strany si připravte pokladní doklad a číslo výrobku popř je li k dispozici i sériové číslo jako doklad o koupi Pro případ že není možné telefonické řešení zahájí naše zákaznická linka v závislosti na příčině chyby další servisní postup Servis Telefon 2 39 000 290 E mailový service CZ targa online com IAN 113944 Výrobce Uvědomte si prosím že následuj...

Page 154: ...icherheitshinweise 162 Urheberrecht 167 Übersicht 168 Vor der Inbetriebnahme 169 Einlegen entnehmen einer Speicherkarte 169 Einlegen des Akkus 170 Tasten 172 LEDs 172 Aufladen des Akkus 173 Datum Uhrzeit einstellen 174 Inbetriebnahme 176 Camcorder ein und ausschalten 176 Das Display 176 Modus auswählen 178 Aufnahme 178 Aufnehmen von Videos 178 ...

Page 155: ...ahme einstellen 185 Aufnahme um 180 drehen 186 Endlosaufnahmemodus ein bzw ausschalten 187 Tauchmodus ein bzw ausschalten 188 Aufnahmen löschen Speicherkarte formatieren 189 Displayanzeige um 180 drehen 191 Status LEDs ein bzw ausschalten 192 Displayhelligkeit anpassen 193 Signalton Lautstärke anpassen 194 Automatische Abschaltzeit anpassen 195 Datum Uhrzeit einstellen 196 Eine Fernbedienung nicht...

Page 156: ...5 Systemanforderungen 205 Die Software installieren 205 Die Software deinstallieren 205 Das Hauptfenster 206 Speicherort festlegen Sprache auswählen 206 Aufnahmen bearbeiten 207 Aufnahmen betrachten 207 Die Ansicht der Navigation auswählen 208 Das Vorschaufenster 208 Die Symbolleiste 209 Aufnahmen importieren 209 Video Zusammenfügung 210 AVCHD Disk erstellen 210 Videoclips schneiden 212 Hochladen ...

Page 157: ...ckwand austauschen 217 Adapter lösen und befestigen 218 Klettband 219 Schwenkhalterung 220 Klebepad austauschen 221 Fahrradhalterung 222 Adapter für andere Befestigungssysteme 223 Fehlerbehebung 223 Hinweise zur Nichtbenutzung 224 Umwelthinweise und Entsorgungsangaben 225 Konformitätsvermerke 225 Hinweise zu Garantie und Serviceabwicklung 226 ...

Page 158: ...verCrest SCW 5 A2 Action Camcorders Der Action Camcorder ist der ideale Begleiter für Ihre sportlichen Aktivitäten Das umfangreiche Zubehör ermöglicht den Einsatz des Action Camcorders für verschiedenste Gelegenheiten So können Sie jederzeit Ihre actionreichen Erlebnisse festhalten Bestimmungsgemäße Verwendung Der Camcorder ist ein Gerät der Unterhaltungstechnik und dient ausschließlich der Aufnah...

Page 159: ...ie die Vollständigkeit Entfernen Sie alle Verpackungsmaterialien vollständig Im Falle einer unvollständigen oder beschädigten Lieferung wenden Sie sich bitte an den Service SilverCrest SCW 5 A2 Action Camcorder Akku FJ SLB 10A 4 GB microSD Karte inkl SD Karten Adapter USB Kabel HDMI Kabel wasserdichtes Gehäuse inkl Adapter ...

Page 160: ...A2 158 Deutsch Linsenabdeckung wasserdichte Rückwand inkl Adapter am wasserdichten Gehäuse befestigt orange Dichtung offene Rückwand gelbe Dichtung Fahrradhalterung Schwenkhalterung Adapter für andere Befestigungssysteme ...

Page 161: ...he Klettband ohne Lasche 3 x Ersatzklebepads 6 x Antibeschlagpads Software CD ROM Symbolbild Bedienungsanleitung Symbolbild Diesem Produkt ist ein separater Flyer zum Thema GNU General Public License beigelegt Dieser Flyer steht zusätzlich auf der Seite www lidl service com zum Download bereit ...

Page 162: ...eo Format H 264 MP4 Auflösung 1080p 1920 x 1080 30 fps 960p 1280 x 960 30 fps 720p 1280 x 720 60 fps Foto Format JPEG Auflösung 5 Megapixel Stromversorgung 5V 0 5A bei Versorgung über USB Anschluss eines PC 5V 1 0A bei Versorgung über externes Netzteil Akkuladezeit Ca 3 0 Std bei Versorgung über USB Anschluss eines PC Ca 2 5 Std bei Versorgung über externes Netzteil Betriebsdauer mit vollgeladenem...

Page 163: ...in diesem Fall durch die Eigenerwärmung bei Betrieb des Camcorders eine Unterkühlung des Akkus verhindert wird Bei Nichtgebrauch des Camcorders sollten Sie den Akku zum Beispiel in der Hosentasche warm halten Änderungen der technischen Daten sowie des Designs können ohne Ankündigung erfolgen Mikrofon integriert Eingebauter Funkempfänger Modulationsart GFSK Frequenz 2403MHz 2477MHz Datenrate 250kbp...

Page 164: ...en oder sogar zum Tod führen kann WARNUNG Dieses Symbol in Verbindung mit dem Hinweis Warnung kennzeichnet wichtige Hinweise für den sicheren Betrieb des Gerätes und zum Schutz des Anwenders Dieses Symbol kennzeichnet weitere informative Hinweise zum Thema Betreiben Sie den Camcorder ausschließlich mit dem mitgelieferten Akku Hersteller FUJI ELECTRONICS SHENZHEN CO LTD Typenbezeichnung FJ SLB 10A ...

Page 165: ...igt wird um Gefährdungen zu vermeiden Überprüfen Sie aus diesem Grund das Gerät und das Zubehör regelmäßig auf Beschädigungen Sollten Sie Beschädigungen feststellen dürfen Sie die entsprechenden Komponenten nicht weiter verwenden Öffnen Sie niemals das Gehäuse des Camcorders und lassen Sie Reparaturen nur von qualifiziertem Fachpersonal durchführen Bei Nichtbeachtung der zuvor genannten Hinweise b...

Page 166: ...sprechend eingewiesen oder werden durch eine für Ihre Sicherheit zuständige Person beaufsichtigt Kinder sollten grundsätzlich beaufsichtigt werden damit sichergestellt werden kann dass sie mit diesem Gerät nicht spielen Kleinteile können bei Verschlucken lebensgefährlich sein Halten Sie auch die Verpackungsfolien fern GEFAHR Es besteht Erstickungsgefahr GEFAHR Akku Legen Sie den Akku stets polrich...

Page 167: ...immer eindeutig ausgewiesen Dazu zählen Tankbereiche wie z B unter Deck bei Booten Kraftstoffüberführungen oder Kraftstoffaufbewahrungsbereiche Auch Bereiche in denen die Luft Chemikalien oder Teilchen enthält wie z B Getreide Staub oder Metallpulver und alle anderen Bereiche in denen Sie normalerweise angewiesen werden Ihren Kraftfahrzeugmotor abzuschalten Denken Sie an den Umweltschutz Verbrauch...

Page 168: ...d Vibrationen unter Wasser Es besteht die Möglichkeit dass sich dadurch das wasserdichte Gehäuse öffnen kann Hierdurch kann der Camcorder sowie bereits gespeicherte Aufnahmen beschädigt werden WARNUNG Wartung Reinigung Wartung Reparaturarbeiten sind erforderlich wenn das Gerät oder das Gehäuse beschädigt wurde Flüssigkeit oder Gegenstände ins Innere des Gerätes gelangt sind oder wenn es nicht einw...

Page 169: ... dem Urheberrecht und werden dem Leser ausschließlich als Informationsquelle bereitgestellt Jegliches Kopieren oder Vervielfältigen von Daten und Informationen ist ohne ausdrückliche und schriftliche Genehmigung durch den Autor verboten Dies betrifft auch die gewerbliche Nutzung der Inhalte und Daten Text und Abbildungen entsprechen dem technischen Stand bei Drucklegung ...

Page 170: ...nen diese Umschlagseite ausgeklappt lassen während Sie weitere Kapitel der Anleitung lesen So haben Sie immer eine Referenz zum betreffenden Bedienelement vor Augen 1 Display 2 Ein Aus Modus Taste 3 Status LED 4 Lautsprecher 5 Linse 6 Status LED 7 microSD Kartenslot 8 HDMI Ausgang 9 Aufnahme Taste 10 Akkufach 11 Status LED 12 Mikrofon 13 USB Ladeanschluss 14 Mikrofonanschluss 15 Status LED ...

Page 171: ...olgt vor Schalten Sie den Camcorder aus bevor Sie eine Speicherkarte einlegen oder entnehmen Schieben Sie die Speicherkarte mit den Kontakten nach vorne Richtung Linse 5 zeigend in den microSD Kartenslot 7 bis diese einrastet Um die Speicherkarte wieder zu entnehmen drücken Sie leicht auf die Speicherkarte Die Speicherkarte wird dadurch ein kleines Stück hinaus geschoben sodass Sie diese greifen u...

Page 172: ...schlossene Pfeil auf der Akku fachabdeckung und der geöffnete Pfeil auf dem Kameragehäuse auf einer Höhe liegen Heben Sie jetzt die Akkufachabdeckung nach oben ab Legen Sie die Kontakte des Akkus an die Kontakte im Akkufach 10 Achten Sie darauf dass die Kontaktbezeichnungen und auf dem Akku und im Akkufach 10 überein stimmen Legen Sie den Akku nun vollständig ins Akkufach 10 Achten Sie darauf dass...

Page 173: ... einrastet und der geschlossene Pfeil auf der Akkufachabdeckung mit dem geschlossenen Pfeil auf dem Kameragehäuse auf einer Höhe liegt Wenn Sie den Akku entnehmen möchten öffnen Sie das Akkufach 10 wie zuvor beschrieben Den Akku können Sie durch Ziehen am Band leicht entnehmen Im Auslieferzustand ist der Akku nicht aufgeladen Laden Sie den Akku vor der ersten Verwendung vollständig auf ...

Page 174: ...rücken Sie diese Taste im Menü um ein Menüpunkt auszuwählen LEDs Die Status LEDs befinden sich oben unten vorne und an der Rückseite des Camcorders Dies ermöglicht Ihnen den Status des Camcorders bei den verschiedensten Montagemöglichkeiten zu erkennen LED Farbe Bedeutung Status LED 3 Grün Betrieb Einschaltvorgang oder Fotoaufnahme USB Betrieb Akku wird geladen Langsam grün blinkend Betrieb WiFi i...

Page 175: ...ferten USB Kabels in den USB Ladeanschluss 13 des Camcorders und den großen Stecker in einen USB Anschluss Ihres Computers Der Camcorder kann während des Ladevorgangs ausgeschaltet werden Drücken Sie die Ein Aus Modus Taste 2 drei Sekunden um den Camcorder auszuschalten Die Status LED 6 blinkt während des Ladevorgangs orange Wenn der Ladevorgang abgeschlossen ist erlischt die Status LED 6 Manche C...

Page 176: ...hbaren Steckdose betrieben werden um es in einer Gefahren situation schnell ausstecken zu können Datum Uhrzeit einstellen Stellen Sie das Datum und die Uhrzeit wie folgt ein Drücken Sie die Ein Aus Modus Taste 2 mindestens 3 Sekunden um den Camcorder einzuschalten Der Camcorder startet automatisch im Videomodus Um zum Menü zu gelangen drücken Sie die Ein Aus Modus Taste 2 sechsmal Sollte sich das ...

Page 177: ...n Tag die Stunde und die Minute festlegen Wählen Sie den einzustellenden Wert durch Drücken der Ein Aus Modus Taste 2 aus Den Wert können Sie durch Drücken der Aufnahme Taste 9 schrittweise erhöhen Wählen Sie nach vollständiger Eingabe mit der Ein Aus Modus Taste 2 OK aus Drücken Sie die Aufnahme Taste 9 um Ihre Eingabe zu bestätigen Um das MORE Menü zu verlassen drücken Sie die Ein Aus Modus Tast...

Page 178: ...ormationen an 23 25 21 22 24 Nr Symbol Beschreibung 21 Anzahl der gespeicherten Aufnahmen Fotos und Videos 22 Akkukapazität 23 Zeigt im Wechsel folgendes an Zeigt das Sichtfeld der Kamera an WIDE bzw ULTRA Zeigt den freien Speicherplatz in Prozent an 24 Zeigt die Option an welche beim Drücken der Aufnahme Taste 9 ausgeführt wird Bei diesem Symbol wird beim Drücken der Aufnahme Taste 9 eine Videoau...

Page 179: ...eaktivieren Bei aktiviertem WiFi können Sie den Camcorder mit der SilverCrest Action Camcorder App steuern Serienbildmodus Verwenden Sie diesen Modus um 10 Serienbilder aufzunehmen Zeitraffermodus Verwenden Sie diesen Modus um Fotos bzw ein Video im Zeitraffer aufzunehmen Das Symbol zeigt auch die aktuellen Einstellungen an Selbstauslöser Verwenden Sie diesen Modus um den Selbstauslöser zu verwend...

Page 180: ...ie Modi werden wie folgt durchgeschaltet Videomodus Fotomodus WiFi Modus Serienbildmodus Setup Selbstauslöser Zeitraffermodus Sollte sich das Display im abgedunkelten Energiesparmodus befinden drücken Sie einmal die Ein Aus Modus Taste 2 um in den aktiven Modus zu schalten Aufnahme Aufnehmen von Videos Drücken Sie die Ein Aus Modus Taste 2 mindestens 3 Sekunden um den Camcorder einzuschalten Der C...

Page 181: ...nbildmodus Drücken Sie die Ein Aus Modus Taste 2 mindestens 3 Sekunden um den Camcorder einzuschalten Der Camcorder startet automatisch im Videomodus Um in den Serienbildmodus BURST zu gelangen drücken Sie die Ein Aus Modus Taste 2 dreimal Drücken Sie die Aufnahme Taste 9 um 10 Fotos Serienbild aufzunehmen Während der Speicherung leuchtet die Status LED 3 grün Zeitraffermodus Drücken Sie die Ein A...

Page 182: ...e oder Tablet PC Die App können Sie im Apple App Store und im Google Play Store herunterladen Wählen Sie für iOS Geräte und Android Geräte bis 4 x die SilverCrest Action Camcorder App bzw für Android Geräte ab 5 x die SilverCrest Action Camcorder 2 App aus Damit die App auf einem Apple iPad im Apple App Store angezeigt wird muss der Filter Nur iPhone ausgewählt sein Schalten Sie WiFi am Action Cam...

Page 183: ... Camcorder damit steuern Eine Anleitung zur SilverCrest Action Camcorder App können Sie auf der Internetseite www lidl service com herunterladen Das Menü Im Menü können Sie die Einstellungen für Ihre Aufnahmen und des Camcorders anpassen Drücken Sie die Ein Aus Modus Taste 2 mindestens 3 Sekunden um den Camcorder einzuschalten Der Camcorder startet automatisch im Videomodus Um zum Menü zu gelangen...

Page 184: ... ein bzw ausschalten Aufnahmen löschen Speicherkarte formatieren Menü verlassen Camcorder Einstellungen anpassen Displayanzeige um 180 drehen Status LEDs ein bzw ausschalten Displayhelligkeit anpassen Signalton Lautstärke anpassen Automatische Abschaltzeit anpassen Datum Uhrzeit einstellen Eine Fernbedienung nicht im Lieferumfang verbinden Auslieferungszustand wiederherstellen Menü verlassen Aufna...

Page 185: ...igen Sie Ihre Auswahl mit der Aufnahme Taste 9 Das VIDEO Menü ist nun markiert Drücken Sie die Aufnahme Taste 9 um das VIDEO Menü zu öffnen Drücken Sie die Ein Aus Modus Taste 2 um eine Auswahl zu treffen Folgende Einstellungen stehen zur Verfügung 1080p 1920 x 1080 30 fps 960p 1280 x 960 30 fps 720p 1280 x 720 60 fps Drücken Sie die Aufnahme Taste 9 um eine Auswahl zu bestätigen Um das SETUP Menü...

Page 186: ...aste 9 um das FOV Menü zu öffnen Drücken Sie die Ein Aus Modus Taste 2 um eine Auswahl zu treffen Folgende Einstellungen stehen zur Verfügung Ultra Weitwinkelobjektiv Weitwinkelobjektiv Drücken Sie die Aufnahme Taste 9 um eine Auswahl zu bestätigen Um das SETUP Menü zu verlassen drücken Sie die Ein Aus Modus Taste 2 mehr fach bis das EXIT Symbol markiert ist und bestätigen Sie mit der Aufnahme Tas...

Page 187: ...hl zu treffen und bestätigen Sie Ihre Auswahl mit der Aufnahme Taste 9 Folgende Optionen stehen zur Verfügung Wählen Sie in diesem Menü die Einstellung um eine Zeitrafferaufnahme in einem Video aufzunehmen bzw die Einstellung um eine Fotoserie aufzunehmen Wählen Sie in diesem Menü das Zeitintervall für die Aufnahme auf Folgende Einstellungen stehen zur Verfügung 1 SEC nicht bei Fotoserie 3 SEC 5 S...

Page 188: ...ch bis das UP DOWN Menü markiert ist Drücken Sie die Aufnahme Taste 9 um das UP DOWN Menü zu öffnen Drücken Sie die Ein Aus Modus Taste 2 um eine Auswahl zu treffen Folgende Einstellungen stehen zur Verfügung ON und OFF Bei der Einstellung ON werden die Aufnahmen um 180 gedreht aufgenommen Nutzen Sie die Einstellung OFF um die Aufnahmen nicht zu drehen Drücken Sie die Aufnahme Taste 9 um eine Ausw...

Page 189: ...ufnahme Taste 9 um das LOOP Menü zu öffnen Drücken Sie die Ein Aus Modus Taste 2 um eine Auswahl zu treffen Folgende Einstellungen stehen zur Verfügung ON und OFF Die Einstellung ON aktiviert und die Einstellung OFF deaktiviert den Endlosaufnahmemodus Drücken Sie die Aufnahme Taste 9 um eine Auswahl zu bestätigen Sobald der Endlosaufnahmemodus aktiviert wurde kann eine Aufnahme direkt mit der Aufn...

Page 190: ...e Taste 9 um das DIVING Menü zu öffnen Drücken Sie die Ein Aus Modus Taste 2 um eine Auswahl zu treffen Folgende Einstellungen stehen zur Verfügung ON und OFF Die Einstellung ON aktiviert und die Einstellung OFF deaktiviert den Tauchmodus Drücken Sie die Aufnahme Taste 9 um eine Auswahl zu bestätigen Sobald der Tauchmodus aktiviert wurde steht nur noch der Video und Fotomodus zur Verfügung Die and...

Page 191: ...tnehmen falls eingelegt In diesem Menü können Sie Aufnahmen löschen und die Speicherkarte bzw den internen Speicher formatieren Gehen Sie dazu wie folgt vor Drücken Sie die Ein Aus Modus Taste 2 um das SETUP Menü auszuwählen und bestätigen Sie Ihre Auswahl mit der Aufnahme Taste 9 Drücken Sie die Ein Aus Modus Taste 2 mehrfach bis das DELETE Menü markiert ist Drücken Sie die Aufnahme Taste 9 um da...

Page 192: ...s Taste 2 um eine Auswahl zu treffen Folgende Optionen stehen zur Verfügung Bestätigen DELETE bzw FORMAT Abbrechen EXIT Drücken Sie die Aufnahme Taste 9 um eine Auswahl zu bestätigen Um das DELETE Menü zu verlassen drücken Sie die Ein Aus Modus Taste 2 mehr fach bis das EXIT Symbol markiert ist und bestätigen Sie mit der Aufnahme Taste 9 Um das SETUP Menü zu verlassen drücken Sie die Ein Aus Modus...

Page 193: ...cken Sie die Aufnahme Taste 9 um das UP DOWN Menü zu öffnen Drücken Sie die Ein Aus Modus Taste 2 um eine Auswahl zu treffen Folgende Einstellungen stehen zur Verfügung und Wählen Sie die Einstellung um den Auslieferungszustand wiederherzustellen Die Einstellung dreht die Display anzeige um 180 Drücken Sie die Aufnahme Taste 9 um eine Auswahl zu bestätigen Um das MORE Menü zu verlassen drücken Sie...

Page 194: ... Sie die Aufnahme Taste 9 um das LED Menü zu öffnen Drücken Sie die Ein Aus Modus Taste 2 um eine Auswahl zu treffen Folgende Einstellungen stehen zur Verfügung ON und OFF Die Einstellung ON schaltet die Status LEDs des Camcorders ein und die Einstellung OFF schaltet sie aus Drücken Sie die Aufnahme Taste 9 um eine Auswahl zu bestätigen Um das MORE Menü zu verlassen drücken Sie die Ein Aus Modus T...

Page 195: ...h bis das BRIGHT Menü markiert ist Drücken Sie die Aufnahme Taste 9 um das BRIGHT Menü zu öffnen Drücken Sie die Ein Aus Modus Taste 2 um eine Auswahl zu treffen Folgende Einstellungen stehen zur Verfügung 100 60 und 30 Sie können die Displayhelligkeit in drei Stufen 100 hell bis 30 dunkel anpassen Drücken Sie die Aufnahme Taste 9 um eine Auswahl zu bestätigen Um das MORE Menü zu verlassen drücken...

Page 196: ...BEEP Menü markiert ist Drücken Sie die Aufnahme Taste 9 um das BEEP Menü zu öffnen Drücken Sie die Ein Aus Modus Taste 2 um eine Auswahl zu treffen Folgende Einstellungen stehen zur Verfügung Stellt den Signalton auf die höchste Lautstärke Stellt den Signalton auf die mittlere Lautstärke Stellt den Signalton aus Drücken Sie die Aufnahme Taste 9 um eine Auswahl zu bestätigen Um das MORE Menü zu ver...

Page 197: ...hme Taste 9 Drücken Sie die Ein Aus Modus Taste 2 mehrfach bis das AUTO OFF Menü markiert ist Drücken Sie die Aufnahme Taste 9 um das AUTO OFF Menü zu öffnen Drücken Sie die Ein Aus Modus Taste 2 um eine Auswahl zu treffen Folgende Einstellungen stehen zur Verfügung 1 MIN 3 MIN 5 MIN 10 MIN 30 MIN 60 MIN und OFF Wählen Sie eine Zeit aus wann sich der Camcorder bei Nichtbenutzung automatisch aussch...

Page 198: ...ie Aufnahme Taste 9 um das TIME Menü zu öffnen Jetzt können Sie nacheinander das Jahr den Monat den Tag die Stunde und die Minute festlegen Den Wert können Sie durch Drücken der Aufnahme Taste 9 schrittweise erhöhen Bestätigen Sie jede Eingabe mit der Ein Aus Modus Taste 2 Wählen Sie nach vollständiger Eingabe mit der Ein Aus Modus Taste 2 OK aus Drücken Sie die Aufnahme Taste 9 um Ihre Eingabe zu...

Page 199: ...lebepads können Sie über unsere Service Hotline oder per E Mail bestellen siehe Seite 228 Um die Fernbedienung mit dem Camcorder zu verbinden gehen Sie wie folgt vor Drücken Sie die Ein Aus Modus Taste 2 um das MORE Menü auszuwählen und bestätigen Sie Ihre Auswahl mit der Aufnahme Taste 9 Drücken Sie die Ein Aus Modus Taste 2 mehrfach bis das BINDING Menü markiert ist Drücken Sie die Aufnahme Tast...

Page 200: ...or auf den gewünschten Modus Foto Serienbild Zeitraffermodus bzw Selbstauslöser stellen Stellen Sie den Camcorder auf den Videomodus um über die Fernbedienung Videos aufzunehmen Im Videomodus können über die Fernbedienung durch Drücken der Taste Kamerasymbol zusätzlich auch Fotos aufgenommen werden Die Fernbedienung ist bis zu 60 m Tiefe wasserdicht Verwenden Sie die Fernbedienung zur Gewährleistu...

Page 201: ...kiert ist Drücken Sie die Aufnahme Taste 9 um das DEFAULT Menü zu öffnen Sie müssen nun das Wiederherstellen des Auslieferungszustandes bestätigen Weiterhin können Sie den Vorgang auch abbrechen Drücken Sie die Ein Aus Modus Taste 2 um eine Auswahl zu treffen Folgende Optionen stehen zur Verfügung Bestätigen Auslieferungszustand wiederherstellen Abbrechen EXIT Drücken Sie die Aufnahme Taste 9 um e...

Page 202: ...rät muss dazu über einen HDMI Anschluss verfügen Verbinden Sie den Camcorder mit Hilfe des HDMI Kabels mit einem HDMI Anschluss Ihres Fernsehgeräts Stecken Sie dazu den kleinen Stecker des mitgelieferten HDMI Kabels in den HDMI Ausgang 8 des Camcorders und den großen Stecker in einem HDMI Anschluss Ihres Fernsehgeräts Schalten Sie Ihr Fernsehgerät ein und wählen Sie den HDMI Eingang aus an dem Sie...

Page 203: ...karte Art der Aufnahmen Miniaturansicht der Aufnahmen Modus Hier wird Ihnen der aktuelle Modus angezeigt Aufnahmen werden in der Miniaturansicht angezeigt Aufnahme Video oder Foto wird wiedergegeben Akkukapazität Zeigt die aktuelle Akkukapazität des Camcorders an ...

Page 204: ...rt auszuwählen Miniaturansicht der Aufnahmen Hier werden Ihnen die Aufnahmen in der Miniaturansicht angezeigt Drücken Sie die Ein Aus Modus Taste 2 um eine Aufnahme zu markieren Die aktuell markierte Aufnahme wird in der Miniaturansicht umrahmt Wurde ein Video markiert wird Ihnen links im Bild zusätzlich die Auflösung angezeigt Drücken Sie die Aufnahme Taste 9 um ein markiertes Video bzw Foto groß...

Page 205: ... Computer kopiert sind können diese selbstverständlich umbenannt oder bearbeitet werden Camcorder mit einem Computer verbinden Verbinden Sie den Camcorder mit Hilfe des USB Kabels mit einem USB Anschluss Ihres Computers Stecken Sie dazu den kleinen Stecker des mitgelieferten USB Kabels in den USB Ladeanschluss 13 des Camcorders und den großen Stecker in einen USB Anschluss Ihres Computers Schalten...

Page 206: ...rt ist Öffnen Sie den Arbeitsplatz auf Ihrem Computer und führen einen Doppelklick auf das Laufwerk des Kartenlesegerätes aus Innerhalb des Laufwerks sind alle Aufnahmen in einem Unterordner des Verzeichnisses DCIM abgelegt Kopieren Sie jetzt Aufnahmen vom Camcorder in ein Verzeichnis Ihrer Wahl auf die Festplatte des Computers Schreibschutz des SD Karten Adapters Der SD Karten Adapter ist mit ein...

Page 207: ...re installieren Die mitgelieferte Software befindet sich auf der beigelegten CD Rom Um die Software installieren zu können muss der Camcorder unbedingt mit dem USB Kabel an den Computer angeschlossen sein Verwenden Sie das USB Kabel um den Camcorder mit Ihrem Computer zu verbinden Schalten Sie den Camcorder dann ein Legen Sie die beigelegte CD Rom in das CD oder DVD Laufwerk Ihres Computers ein Di...

Page 208: ...für Bilder und Videos festlegen bzw nachträglich die Sprache der Software verändern Klicken Sie im Hauptfenster Options Optionen Preferences Voreinstellungen Im ersten Feld können Sie den Speicherort für Bilder und Videos festlegen Bestätigen Sie dies durch Klicken auf OK oder Wählen Sie eine Sprache aus der Liste aus und bestätigen Sie dann durch Klicken auf OK Die Software meldet dass ein Neusta...

Page 209: ...nferreihe am oberen Rand des zu bewertenden Objektes Filmstreifen um die Aufnahme zu bewerten Klicken Sie auf das Infosymbol um weitere Informationen der Aufnahme zu erhalten Hier können Sie einen kurzen Kommentar hinzufügen welcher dann auch für die Schlagwortsuche verwendet werden kann Videoaufnahmen erkennen Sie im Vorschaufenster an den Wiedergabe und Schnittsymbolen Um eine Aufnahme in einem ...

Page 210: ... sortieren Klicken Sie auf das Kalendersymbol Es erscheinen Ordner der verschiedenen Jahre Nachdem auf einem Ordner ein Doppelklick ausgeführt wurde öffnet sich eine Monatsübersicht nach einem weiteren Doppelklick die Tagesübersicht des entsprechenden Monats Klicken Sie auf den Pfeil nach oben um auf die übergeordnete Ebene zu springen Die Pfeile nach links und rechts dienen zum Durchblättern der ...

Page 211: ...Ihren Zugang bei YouTube hoch Hochladen auf Facebook Lädt Videoaufnahmen auf Ihren Zugang bei Facebook hoch Fotoalbum Erzeugt ein Fotoalbum aus Ihren Fotos Albumseite Erzeugt eine Seite z B Einladungskarte aus Ihren Fotos Das Symbol mit dem Titel YouKu verweist auf ein asiatisches Videoportal und ist für die Nutzung in europäischen Ländern nicht geeignet Aufnahmen importieren Um die Aufnahmen zu a...

Page 212: ...Videoclips mit gleicher Auflösung und Bitrate zusammengeführt werden können Klicken Sie auf das Symbol Video Zusammenfügung um die Zeitleiste für die Videobearbeitung anzuzeigen Ziehen Sie alle gewünschten Videoclips mit gehaltener linker Maustaste in die Zeitleiste am unteren Fensterrand Klicken Sie auf die Schaltfläche Nächste um den Prozess zu starten Geben Sie den Speicherpfad auf Ihrem Comput...

Page 213: ...e alle gewünschten Videoclips mit gehaltener linker Maustaste in die Zeitleiste am unteren Fensterrand Klicken Sie auf die Schaltfläche Nächste um den Prozess zu starten Wählen Sie das Laufwerk bzw den Pfad auf der Festplatte aus und klicken Sie dann auf OK Um diese Funktion nutzen zu können muss Ihr Computer über ein DVD Laufwerk verfügen mit dem eines der folgenden Medien beschrieben werden kann...

Page 214: ...en Führen Sie das Schneiden durch indem Sie auf das Bestätigungssymbol klicken Der Schnitt wird ausgeführt und ein neuer Clip ohne den Ausschnitt erzeugt Der neue Clip wird im Ordner Eigene Kreationen gespeichert Hochladen auf YouTube Klicken Sie auf das Symbol Hochladen auf YouTube Ziehen Sie die gewünschte Videoaufnahme mit gehaltener linker Maustaste in die Leiste am unteren Fensterrand Klicken...

Page 215: ...Klicken Sie auf Nächste Die Anwendung ArcSoft Print Creations startet automatisch Wählen Sie in der Anwendung eine Kategorie und dann eine Vorlage Führen Sie dazu einen Doppelklick auf die jeweilige Vorlage aus Albumseite Mit dieser Funktion können Sie aus einem oder mehreren Fotos eine Albumseite erstellen Dafür stehen zahlreiche Vorlagen zur Verfügung Klicken Sie auf das Symbol Albumseite Ziehen...

Page 216: ... die Verwendung des Camcorder zum Beispiel bei Unterwasseraufnahmen oder beim Wassersport Den Camcorder können Sie wie gewohnt auch im wasserdichten Gehäuse bedienen Entfernen Sie vor der Aufnahme die Linsenabdeckung vom wasserdichten Gehäuse Legen Sie den Camcorder wie folgt in das wasserdichte Gehäuse ein Öffnen Sie die Verriegelung und danach den Verschluss Öffnen Sie das wasserdichte Gehäuse u...

Page 217: ...erschluss und dann die Verriegelung Bitte beachten Sie die folgenden Punkte wenn Sie den Camcorder unter Wasser oder beim Wassersport nutzen Stellen Sie sicher dass das wasserdichte Gehäuse keine Beschädigungen aufweist Überprüfen Sie dass der Verschluss des wasserdichten Gehäuses richtig verschlossen ist und sich kein Schmutz oder Sand zwischen der Gummidichtung und dem Gehäuse befindet Die Verri...

Page 218: ...rationen unter Wasser Es besteht die Möglichkeit dass sich dadurch das wasserdichte Gehäuse öffnet Reinigung nach Unterwasserbetrieb Das wasserdichte Gehäuse muss nach jedem Unterwassereinsatz gereinigt werden Stellen Sie sicher dass das wasserdichte Gehäuse keine Beschädigungen aufweist Nach der Verwendung unter Wasser reinigen Sie das wasserdichte Gehäuse mit Leitungswasser Tauchen Sie das wasse...

Page 219: ... bzw beim Wassersport einsetzen möchten Die offene Rückwand kann verwendet werden wenn Videos mit Ton aufgenommen werden sollen Bitte beachten Sie jedoch dass das Gehäuse mit der offenen Rückwand nicht wasserdicht ist wasserdichte Rückwand inkl Adapter orange Dichtung offene Rückwand gelbe Dichtung Um die Rückwand auszutauschen gehen Sie wie folgt vor Öffnen Sie die Verriegelung und danach den Ver...

Page 220: ...Adapter an das wasserdichte Gehäuse und ein weiterer Adapter an der wasserdichten Rückwand befestigt Diese Adapter ermöglichen die Befestigung des wasserdichten Gehäuses in Verbindung mit dem weiteren Zubehör Benötigen Sie den Adapter an der offenen Rückwand können Sie die Adapter lösen und an der gewünschten Position befestigen Gehen Sie dazu wie folgt vor Entfernen Sie den gewünschten Adapter in...

Page 221: ...chen anzubringen Dem Camcorder liegt je ein Klettband mit und ohne Lasche bei Befestigen Sie zum Beispiel das Klettband mit Lasche wie folgt Ziehen Sie das Klettband durch die Führungsschlitze des Adapters Achten Sie darauf dass die glatte Seite des Klettbands innen liegt Führen Sie dann das Klettband durch die Lasche und befestigen Sie das Ende des Klettbandes wie in der folgenden Abbildung gezei...

Page 222: ...ung in den Adapter bis die Schwenkhalterung einrastet Befestigen Sie den Entriegelungsschutz mit der Feststellschraube Der Entriegelungsschutz verhindert ein unbeabsichtigtes Lösen vom wasserdichten Gehäuse Nun können Sie die Schwenkhalterung mit einem Klebesockel befestigen Schieben Sie dazu die Schwenkhalterung in den Klebesockel bis die Schwenkhalterung einrastet Um den Klebesockel am Montageor...

Page 223: ...e Feststellschraube vollständig und entfernen Sie danach den Entriegelungsschutz Drücken Sie die Klammer an der Schwenkhalterung um die Schwenkhalterung vom wasserdichten Gehäuse abziehen zu können Um ein optimales Klebeergebnis zu erzielen muss die gesäuberte Montagefläche staubfrei sowie öl und fettfrei sein Klebepad austauschen Dem Camcorder liegen drei Ersatzklebepads bei Sollte die Klebewirku...

Page 224: ... Seite der Klammer vom Unterteil entfernen können Drehen Sie das Unterteil zur Seite Legen Sie das Oberteil um eine passende Stange und setzen Sie das Unterteil wieder auf Setzen Sie nun wieder die Schraube in das Unterteil ein Befestigen Sie die Halterung an der Stange indem Sie die Schrauben wieder anziehen Nun können Sie den Camcorder in Verbindung mit dem wasserdichten Gehäuse und der Schwenkh...

Page 225: ...der folgenden Tabelle lösen Falls ein Fehler nach Durcharbeiten dieser Ansätze fortbesteht wenden Sie sich an unsere Service Hotline siehe Seite 228 Führen Sie keine eigenhändigen Reparaturarbeiten durch Das Gehäuse des Camcorders darf niemals geöffnet werden es befinden sich keine zu wartenden Teile im Inneren Fehler Lösung Der Camcorder lässt sich nicht einschalten Akku ist leer Laden Sie den Ak...

Page 226: ...erkarten der Speed Class 4 oder schneller Es stehen nicht alle Modi zur Verfügung Der Camcorder befindet sich ggf im WiFi Modus bzw im Endlosaufnahmemodus Wechseln Sie den Modus Bitte verwenden Sie immer die aktuellste Firmware Version Sollte eine neue Firmware Version zur Verfügung stehen finden Sie diese auf der folgenden Website www lidl service com Hinweise zur Nichtbenutzung Wenn Sie den Camc...

Page 227: ... Wiederverwertung abgegeben werden Folien und Kunststoffe des Lieferumfangs werden über Ihr örtliches Entsorgungsunternehmen eingesammelt und umweltgerecht entsorgt Denken Sie an den Umweltschutz Verbrauchte Akkus gehören nicht in den Hausmüll Sie müssen bei einer Sammelstelle für Altbatterien abgegeben werden Bitte beachten Sie dass Akkus nur im entladenen Zustand in die Sammelbehälter für Geräte...

Page 228: ... Dies gilt auch für ersetzte und reparierte Teile Eventuell schon beim Kauf vorhandene Schäden und Mängel müssen sofort nach dem Auspacken gemeldet werden Nach Ablauf der Garantiezeit anfallende Reparaturen sind kostenpflichtig Garantieumfang Das Gerät wurde nach strengen Qualitätsrichtlinien sorgfältig produziert und vor Auslieferung gewissenhaft geprüft Die Garantieleistung gilt für Material ode...

Page 229: ...s Anliegens zu gewährleisten folgen Sie bitte den folgenden Hinweisen Bitte lesen Sie vor Inbetriebnahme Ihres Produktes sorgfältig die beigefügte Dokumentation Sollte es mal zu einem Problem kommen welches auf diese Weise nicht gelöst werden kann wenden Sie sich bitte an unsere Hotline Bitte halten Sie für alle Anfragen den Kassenbon und die Artikelnummer bzw wenn vorhanden die Seriennummer als N...

Page 230: ...1 79 57 60 09 E Mail service AT targa online com Telefon 0041 0 44 511 82 91 E Mail service CH targa online com IAN 113944 Hersteller Bitte beachten Sie dass die folgende Anschrift keine Serviceanschrift ist Kontaktieren Sie zunächst die oben benannte Servicestelle TARGA GmbH Coesterweg 45 59494 SOEST DEUTSCHLAND GERMANY ...

Page 231: ......

Page 232: ......

Reviews: