6
2
1
2
3
1
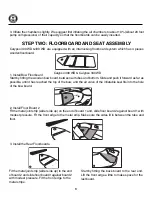
Fit the metal joint strip (wider side up) to the end
of board 2 and slide floor board 3 against board 2
with modest pressure. Fit the front edge to the
metal stripe.
Start by fitting the back board to the rear end.
Lift the front edge a little to make space for the
last board.
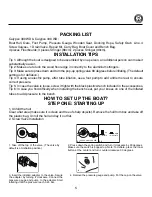
3. Inflate the chambers slightly. We suggest first inflating the air chambers to about 10% (About 20 foot
pump compressions) of their capacity so that the floorboards can be easily inserted.
STEP TWO: FLOORBOARD AND SEAT ASSEMBLY
Calypso 300 WD&330 WD are equipped with an interlocking floorboard system which has 4 pieces
wooden floorboard.
1. Install Bow Floorboard
Start by fitting the wooden bow board, between air tubes and bottom. Slide and push it forward as far as
possible, until it has reached the top of the bow, and the air valve of the inflatable keel fits into the hole
of the bow board.
2. Install Floor Board 2
Fit the metal joint strip (wider side up) on the end of board 1 and, slide floor board 2 against board 1 with
modest pressure. Fit the front edge to the metal strip. Make sure the sides fit in between the tube and
floor.
3. Install the Rear Floorboards.
2
1
Calypso 300 WD & Calypso 330 WD
1
2
3
4
Summary of Contents for Calypso 300 WD
Page 1: ...Calypso 300 WD Calypso 330 WD Owner s manual www silvermarine com ...
Page 5: ...4 PARTS TERMINOLOGY ...
Page 15: ...14 ...


