background image

English

   - 37 -

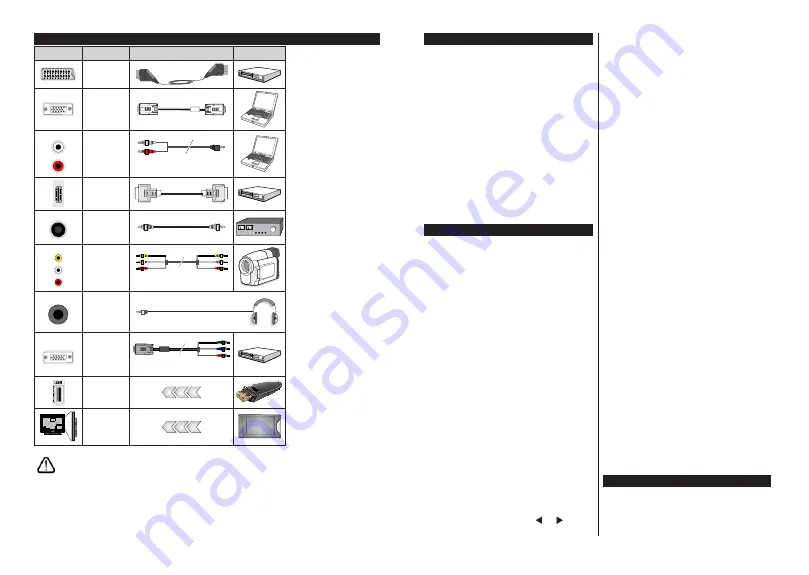
Connections

Connector

Type

Cables

Device

Scart 

Connection 

(back)

VGA 

Connection 

(back)

SIDE AV 

PC/YPbPr 

Audio 

Connection 

(side)

YPbPr/PC Audio Cable

HDMI 

Connection 

(back)

SPDIF 

SPDIF 

(Coaxial Out) 

Connection 

(back)

SIDE AV 

Side AV 

(Audio/Video) 

Connection 

(side)

AV Cable

HEADPHONE

Headphone 
Connection 

(side)

PC to YPBPR 

YPbPr Video 

Connection 

(back)

PC to YPbPr Connection Cable

USB 

Connection 

(side)

CI 

Connection 

(side)

CAM 

module


NOTE: When connecting a 
device via the YPbPr or Side 
AV input, you must use the 
connection cables to enable 
connection.
 See the illustrations 
on the left side. You can use 
YPbPr to VGA cable to enable 
YPbPr signal via VGA input. 
You cannot use VGA and YPbPr 
at the same time. To enable 
PC/YPbPr audio, you will need 
to use the side audio inputs 
with a YPbPr/PC audio cable 
f o r   a u d i o   c o n n e c t i o n .  If an 
external device is connected via 
the SCART socket, the TV will 
automatically switch to AV mode.| 
When receiving DTV channels 
(Mpeg4 H.264) or while in Media 
Browser mode, output will not be 
available via the scart socket.  
When using the wall mounting 
kit (available from third party 
in the market, if not supplied), 
we recommend that you plug all 
your cables into the back of the 
TV before mounting on the wall.  
Insert or remove the CI module 
only when the TV is SWITCHED 
OFF. You should refer to the 
module instruction manual for 
details of the settings. The/Each 
USB input of your TV supports 
devices up to 500mA. Connecting 
devices that have current value 
above 500mA may damage your 
TV. By connecting an HDMI cable 
to your TV, you have to use only a 
shielded HDMI cable to guarantee 
a sufficient immunity against 
parasitic frequency radiation.


If you want to connect a device to the TV, make sure that both the TV and the device are turned off before making 

any connection. After the connection is done, you can turn on the units and use them.

English

   - 38 -

Switching On/Off

To Switch the TV On

Connect the power cord to a power source such as a 
wall socket (220-240V AC, 50 Hz). 

To switch on the TV from standby mode either:

• Press the 

Standby

 button, 

Pro/-

 or a 

numeric button on the remote control.

•  Press the side function switch on the TV until the TV 

comes on from standby.

To Switch the TV Off

Press the 

Standby 

button on the remote control or 

press the side function switch on the TV until the TV 
switches into standby mode.

To power down the TV completely, unplug the 
power cord from the mains socket.

Note: When the TV is switched into standby mode, the standby 
LED can blink to indicate that features such as Standby 
Search, Over Air Download or Timer is active. The LED can 
also blink when you switch on the TV from standby mode.

First Time Installation

When turned on for the first time, the language 
selection screen is displayed. Select the desired 
language and press 

OK

.

On the next screen, set your preferences using the 
directional buttons.

Note: Depending on the Country selection you may be asked 

WRVHWDQGFRQ¿UPD3,1DWWKLVSRLQW7KHVHOHFWHG3,1FDQQRW
EH<RXKDYHWRHQWHULWLI\RXDUHDVNHGWRHQWHUD3,1

for any menu operation later.

About Selecting Broadcast Type

Digital Aerial:

 If 

Digital Aerial

 broadcast search 

option is turned on, the TV will search for digital 
terrestrial broadcasts after other initial settings are 
completed.

Digital Cable:

 If 

Digital Cable

 broadcast search 

option is turned on, the TV will search for digital cable 
broadcasts after other initial settings are completed. 

$FFRUGLQJ WR \RXU RWKHU SUHIHUHQFHV D FRQ¿UPDWLRQ

message may be displayed before starting to search. 
Select 

YES

 and press 

OK

 to proceed. To cancel 

operation, select 

NO

 and press 

OK

. You can select 

Network

 or set values such as 

Frequency

Network 

ID

 and 

Search Step

.

:KHQ¿QLVKHGSUHVV

OK

 button. 

Note: Searching duration will change depending on the 
selected Search Step.

Satellite:

 If 

Satellite

 broadcast search option is turned 

on, the TV will search for digital satellite broadcasts 
after other initial settings are completed. Before 
satellite search is performed some settings should be 
made. 

Antenna Type

PHQXZLOOEHGLVSOD\HG¿UVW<RX

can select 

Antenna Type

 as 

Direct

Single Satellite 

Cable

 or 

DiSEqC switch

 by using “ ” or “ ” buttons.

• Direct: 

If you have a single receiver and a direct 

satellite dish, select this antenna type. Press 

OK

 to 

continue. Select an available satellite on the next 
screen and press 

OK

 to scan for services. 

• Single Satellite Cable:

 If you have multiple 

receivers and a single satellite cable system, select 
this antenna type. Press 

OK

WRFRQWLQXH&RQ¿JXUH

settings by following instructions on the next screen. 
Press 

OK

 to scan for services.

• DiSEqC switch:

 If you have multiple satellite dishes 

and a 

DiSEqC switch

, select this antenna type. 

Press 

OK

 to continue. You can set four 

DiSEqC


options (if available) on the next screen. Press 

OK


EXWWRQWRVFDQWKH¿UVWVDWHOOLWHLQWKHOLVW

Analogue: 

If 

Analogue

 broadcast search option is 

turned on, the TV will search for analogue broadcasts 
after other initial settings are completed.

Additionally you can set a broadcast type as your 
favourite one. Priority will be given to the selected 
broadcast type during the search process and the 
channels of it will be listed on the top of the 

Channel 

List

:KHQ¿QLVKHGSUHVV

OK

 to continue.

You can activate 

Store Mode

 option at this point. 

7KLVRSWLRQZLOOFRQ¿JXUH\RXU79¶VVHWWLQJVIRUVWRUH

environment and depending on the TV model being 
used, the supported features of it may be displayed 
on the top of the screen as an info banner. This option 
is intended only for store use. It is recommended to 
select 

Home Mode

 for home use. This option will be 

available in 

System>Settings>More

 menu and can 

be turned off/on later. 

Press 

OK

 button on the remote control to continue.

After the initial settings are completed TV will start 
to search for available broadcasts of the selected 
broadcast types.

After all the available stations are stored, scan results 
will be displayed. Press 

OK

 to continue. The 

Edit 

Channel List

 menu will be displayed next. You can 

edit the channel list according to your preferences or 
press the 

Menu

 button to quit and watch TV.

While the search continues a message may appear, 
asking whether you want to sort channels according 
to the LCN

(*)

. Select 

Yes

 and press 

OK 

WRFRQ¿UP

.

(*) 

/&1LVWKH/RJLFDO&KDQQHO1XPEHUV\VWHPWKDWRUJDQL]HV

DYDLODEOH EURDGFDVWV LQ DFFRUGDQFH ZLWK D UHFRJQL]DEOH

channel number sequence (if available).

Note:

 'R QRW WXUQ RII WKH 79 ZKLOH LQLWLDOL]LQJ ILUVW WLPH

LQVWDOODWLRQ 1RWH WKDW VRPH RSWLRQV PD\ QRW EH DYDLODEOH

depending on the country selection.

Using SatcoDX Feature

You can perform SatcoDX operations using the 

Installation>Satelite Settings

 menu. In the 

SatcoDX


menu, there are two options regarding to the SatcoDx.

Summary of Contents for 10111503

Page 1: ...24 88 T2CS BEDIENUNGSANLEITUNG INSTRUCTION MANUAL 24 LED TV...

Page 2: ...ist f r den Einsatz im Haushalt oder f r eine vergleichbare Nutzung vorgesehen jedoch ist der Einsatz an ffentlichen Orten zul ssig Lassen Sie f r L ftungszwecke mindestens 5 cm Abstand um das TV Ger...

Page 3: ...e ber die Netzverbindung oder andere Ger te an die Schutzerdung des Geb udes angeschlossen sind ber Koaxialkabel an ein TV Verteilersystem kann unter Umst nden eine m gliche Feuergefahr darstellen Ein...

Page 4: ...es Batteriefachs auf der R ckseite der Fernbedienung ab Heben Sie die Abdeckung vorsichtig an Legen Sie zwei AAA Batterien ein Vergewissern Sie sich dass die und Zeichen sich einander entsprechen korr...

Page 5: ...wieder schlie en um zu dem vorherigen Bildschirm zu gelangen 27 Schnellmen Zeigt eine Liste der Men s f r schnellen Zugriff 28 Keine Funktion 29 Programm 30 Swap Sucht schnell zwischen vorherigen und...

Page 6: ...ew hlten Sendertypen Nachdem alle verf gbaren Sender gespeichert sind werden die Suchergebnisse angezeigt Dr cken Sie Deutsch 10 OK um fortzufahren Das Men Kanalliste bearbeiten wird als N chstes ange...

Page 7: ...Laufwerks O VFKW VLFK GDUDXI EH QGOLFKHQ DWHQ XQG GDV Dateisystem wird zu FAT32 umgewandelt In den meisten F llen k nnen so Laufwerksfehler repariert werden aber nach der Formatierung sind ALLE Ihre...

Page 8: ...die Eingangsquelle auf VGA PC gesetzt ist Auto Position Passt den Bildschirm automatisch an Zur Optimierung m ssen Sie OK dr cken H Stellung Mit dieser Option k nnen Sie das Bild auf die rechte oder...

Page 9: ...n k nnen Sie diese Einstellung verwenden Markieren Sie Biss Schl ssel und dr cken Sie die OK Taste um den Schl ssel f r die gew nschte Sendung einzugeben Vorf hr Modus W hlen Sie diesen Modus wenn der...

Page 10: ...des vorherigen bzw des n chsten Tages an Deutsch 18 Suchen Text Taste Zeigt die Men Suche an Jetzt Quelle Taste Zeigt die aktuelle Sendung des markierten Kanals Rec Stop Aufnahme Taste Das TV Ger t ze...

Page 11: ...t angeschlossen Pr fen Sie die AV Kabel und deren Anschl sse wenn Sie versuchen die dem angeschlossenen Ger t zugewiesene Eingangsquelle einzuschalten Aufnahme nicht verf gbar Um ein Programm aufzune...

Page 12: ...e 48kHz 44 1kHz 32kHz 24kHz 22 05kHz 16kHz 12kHz 11 025kHz 8kHz Abtastrate EAC3 32Kbps 6Kbps Bitrate 32kHz 44 1kHz 48kHz Abtastrate LPCM Unsigned 8bit PCM Signed Unsigned 16bit PCM jeweils big little...

Page 13: ...gt vom Inhalt der eingelegten Disc ab und kann unterschiedlich ausfallen Hinweis Schritte 3 und 4 sind nur relevant wenn die Disc ein Men enth lt 3 Dr cken Sie Abw rts Aufw rts Links Rechts oder die Z...

Page 14: ...aloge Langspielplatte wird als Analogsignal mit gr erer Verzerrung aufgenommen Auf einer CD wird ein digitales Signal mit besserer Audioqualit t geringerer Verzerrung und geringerem Qualit tsverlust d...

Page 15: ...bar TASTE GELB Kehrt zum Stammverzeichnis zur ck sofern verf gbar SUCHEN Direktwahl von Szenen oder Zeitpunkten Auswahl der gew nschten Datei Auswahl der gew nschten Datei UNTERTITEL Untertitel Ein Au...

Page 16: ...t Scart Analoger Audio Video Anschluss mit 21 Pins Wird haupts chlich bei TV Ger ten in Europa verwendet Sch rfe Eine Steuerung die den Effekt einer gr eren X VXQJ GXUFK HOO XQNHO EHUJlQJH HU HXJW Sys...

Page 17: ...normal operating conditions Caution See Operating Instructions The marked area s contain s user replaceable coin or button cell batteries Class 1 Laser Product This product contains Class 1 laser sour...

Page 18: ...n on Notes If you turn the TV off this circle starts again beginning with the volume setting Main menu OSD cannot be displayed via control buttons Operation with the Remote Control Press Menu button o...

Page 19: ...My button 1 13 Coloured Buttons Follow the on screen instructions for coloured button functions 14 Language Switches between sound modes analogue TV displays and changes audio subtitle language digita...

Page 20: ...al settings are completed Digital Cable If Digital Cable broadcast search option is turned on the TV will search for digital cable broadcasts after other initial settings are completed FFRUGLQJ WR RXU...

Page 21: ...s may freeze during playback Record Play Pause Display for PlayListDialog keys can not be used when teletext is on If a recording starts from timer when teletext is on teletext is automatically turned...

Page 22: ...ark values on the screen Brightness Adjusts the brightness values on the screen Sharpness Sets the sharpness value for the objects displayed on the screen Colour Sets the colour value adjusting the co...

Page 23: ...DYH GH QHG WKH 3 1 LV UHTXHVWHG GHSHQGLQJ RQ the country selection during the First Time Installation XVH WKH 3 1 WKDW RX KDYH GH QHG Timers Sets sleep timer to turn off the TV after a certain time Se...

Page 24: ...to be displayed everytime the Channel list is opened 7KH OWHULQJ IXQFWLRQ LQ WKH Channel list menu will only OWHU WKH FXUUHQWO GLVSOD HG Channel list in order to QG D FKDQQHO DQG WXQH LQ WR LW 7KHVH...

Page 25: ...ade RXU 79 LV FDSDEOH RI QGLQJ DQG XSGDWLQJ WKH UPZDUH automatically via the broadcast signal Software upgrade search via user interface On the main menu select System Settings and then More Navigate...

Page 26: ...r USB Mode Media Extension Format Notes Video mpg mpeg MPEG1 2 MPEG1 768x576 30P MPEG2 1920x1080 30P vob MPEG2 1920x1080 30P mp4 MPEG4 Xvid H 264 mkv H 264 MPEG4 VC 1 avi MPEG2 MPEG4 Xvid H 264 Y H 26...

Page 27: ...ght as the temperature can rise quickly and damage the disc After playing store the disc in its case On cleaning Before playing clean the disc with a cleaning cloth Wipe the disc from the center out D...

Page 28: ...isc or condensation may effect the equipment Wait for 1 to 2 hours in Stand by to dry the equipment Disc does not play No disc in the machine Place a disc into the loader Disc incorrectly loaded Ensur...

Page 29: ...eturns back to the previous menu if available YELLOW BUTTON Goes back to the root folder if available SEARCH Direct selection of scenes or time Selects the desired file Selects the desired file SUBTIT...

Page 30: ...orsk Produktinformasjon Kommersiell merkevare Produkt nr Modell nr Energieffektivitet klasse Synlig skjermst rrelse diagonal ca tommer cm Portugu s Ficha do produto Marca Comercial Produto N Modelo N...

Page 31: ...ybie wy czonym Wat w Rozdzielczo obrazu pikseli Magyar Energiafogyaszt s bekapcsolva hagyott zemm dban Watt ves energiafogyaszt s kWh ves Energiafogyaszt s standby zemm dban Watt Energiafogyaszt s kik...

Page 32: ...X Tr d Y Nederlands VESAWANDMONTAGEMETINGEN Groottebooropening mm Schroefgroote Lengte X Draad Y Suomi VESA SEIN ASENNUKSEN MITAT Reik kuvionkoot mm Ruuvinkoot Pituus x Kierre Y Norsk VESAVEGGMONTERI...

Page 33: ...a hogy a TFT IDTV t pus r di berendez s megfelel a 2014 53 EU ir nyelvnek Az EU megfelel s gi nyilatkozat teljes sz vege el rhet a k vetkez internetes c men doc vosshub com IT Il fabbricante VESTEL El...

Page 34: ...fehlerhafte Bedienung Einwirkung von Feuchtigkeit oder durch andere u ere Einwirkungen oder auch auf Eingriff Dritter zur ckzuf hren sind Im Garantiefall ist das Ger t mit Rechnung oder Lieferschein b...

Page 35: ...50405880...

Reviews: