Silex technology ClickShow R101 User Manual Download Page 11

User Guide - Silex ClickShow R101

15. Multicasting

If you have multiple ClickShow devices in your enterprise, it is possible to use them for 

multicasting by setting one of them as a sender and the others as receivers.

1.  Requirements:

•  Each ClickShow Base unit should be connected to one display screen

•  All ClickShow devices used for multicasting should all be from the same model

•  One Clickshow device only can be set as a sender

•  Up to 254 ClickShow devices can be set as receivers

•  All ClickShow devices should be connected on the same LAN. For a better 

performance, it is recommended to connect the devices to the LAN rather than 

through the wireless network.

•  The Switches and routers should support the multicast function 
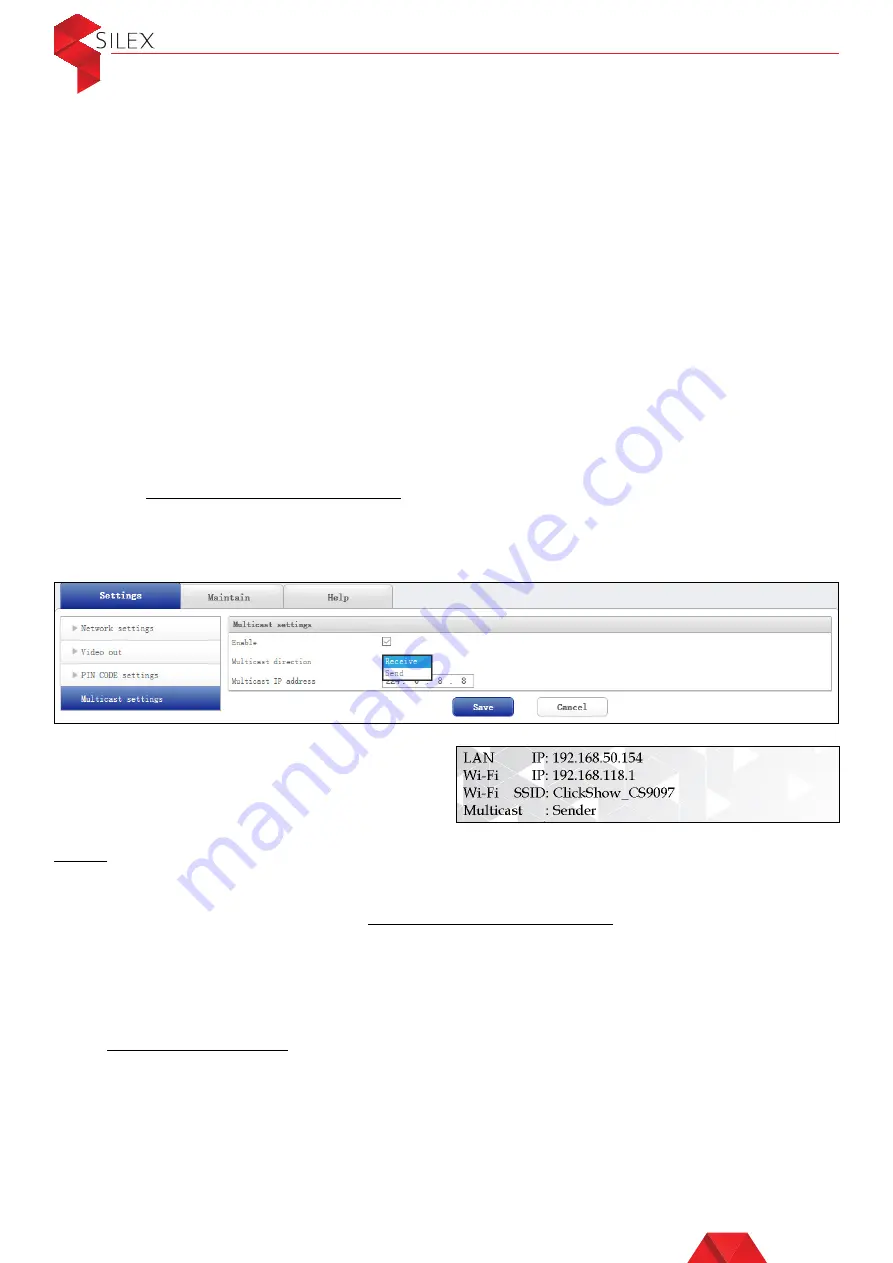
2.  Configuration:

Log in to each ClickShow Base unit using the Configurator as explained in 

Section 11 

and go to Settings – Multicast settings. Enable the multicast function and chose the 

‘Multicast direction’ to set the ClickShow device as a sender or as a receiver. If it is the 

sender device, then choose ‘Send’ and if it is a receiver device then choose ‘Receive’. 

Click on ‘Save’ and the ClickShow Base unit will automatically restart.

Note: 

If many ClickShow devices are installed in the same environment, you can reduce the 

WiFi interference by disabling the WiFi hotspot on the Receiver devices. Login to the 

Configurator (see 

Section 11

), go to Settings – Network settings and disable the ‘WiFi AP 

settings’ and click on ‘Save’.

16. Video Settings

To modify the HDMI video output settings, login to the configurator (see 

Section 11

) and 

go to Settings – Video out. The following parameters can be adjusted: 

•  HDMI resolution: The default HDMI output resolution is set to auto, but 12 possible 

resolutions are also available

•  OSD Transparency: This parameter is used to adjust the transparency of the caption 

displayed on the top left corner of the meeting room main display in case it is not 

displaying clearly

11

Once the ClickShow Base unit restarts, the 

configured Multicast direction will appear 

on the top left corner of the wallpaper on 

the meeting room main display.

Summary of Contents for ClickShow R101

Page 1: ...User Guide Silex ClickShow R101...

Page 2: ...haring from Windows laptops in extended desktop mode 7 10 Pairing the Buttons with the Base unit 7 11 How to access the configurator 8 12 Enable disable pin code 8 13 WiFi configuration 9 13 1 WiFi ho...

Page 3: ...ckShow base unit then the first line will display the device version number 3 Sharing using the Button Sharing content using the HDMI Button can be done from any device that has an HDMI output such as...

Page 4: ...W icon to open the soft button Desktop App If the laptop and the base unit are connected as described in Section 7 then the App should directly display the name of the ClickShow base unit it is connec...

Page 5: ...can be found on the ClickShow Wallpaper on the main display 6 Sharing from an Android device using the soft Button App To share from Android tablets and smart phones users need to install the ClickSho...

Page 6: ...o the base unit To share using the Desktop App from Windows laptops the Android App from Android tablets and smart phones and AirPlay from iOS devices or to access the Configurator the device used sho...

Page 7: ...When another user tries to share from another device the content of the second user will be displayed instead 9 Sharing from Windows laptops in extended desktop mode Sharing content in extended mode...

Page 8: ...LAN then enter the LAN IP If you are connected wirelessly to the Base unit directly then enter the WiFi IP Both the WiFi IP and the LAN IP are displayed on the top left corner of the ClickShow wallpap...

Page 9: ...ted via the LAN or with a Button can share content To Enable disable the WiFi Hotspot on the ClickShow Base unit connect to the Configurator See Section 11 then go to Settings Network settings and tic...

Page 10: ...tions connected click on save The ClickShow base unit will automatically restart 14 Network configuration The LAN is set to DHCP by default on the ClickShow base unit However it is possible to configu...

Page 11: ...e ClickShow device as a sender or as a receiver If it is the sender device then choose Send and if it is a receiver device then choose Receive Click on Save and the ClickShow Base unit will automatica...

Page 12: ...cifications prior to uploading it Image format JPG Image name lowercase logo Image resolution 800 600 Image size less than 256K The wallpaper image should meet the following specifications prior to up...

Page 13: ...e ClickShow Base unit remove the USB flash drive and then power on again The new start up wallpaper images will be displayed 19 Touch back reverse control If the Silex ClickShow Base unit is connected...

Page 14: ...flash drive anything except ESHOW The file format of the USB flash drive should be FAT32 or FAT If it is not the case you need to format the USB flash drive into FAT32 or FAT file format Create a new...

Reviews: