9
ENGLISH
The hot air fryer is a healthy alternative to frying while maintaining the flavors and aromas
without fat and is extremely versatile. Thanks to the hot air, it cooks delicious food with
little or no oil, which allows you to enjoy fried delicacies while maintaining the principles
of a healthy lifestyle.
Before first use
• Remove all packaging materials from the appliance.
• Clean the appliance following the instruction in the section
Cleaning and
maintenance
.
• Place the fryer on a stable, even, heat -resistant surface to a height that is comfortable
to use
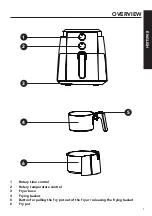
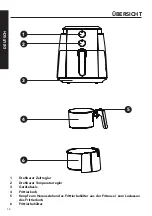
• Always use the fryer fully assembled, that is with the frypot inserted, in which is
inserted the frying basket. Otherwise, the fryer will not turn on.
General frying instructions
1. Plug in the power cord and turn on the fryer.
2. Preheat the fryer for about 5 minutes using the timer and temperature controls. The
power and temperature lights are on to indicate that the fryer is warming up. When
the desired temperature is reached, the green light goes out automatically.
3. Grasp the fry pot by the handle and pull it out of the fryer. Set the fry pot on a stable,
even, heat -resistant surface. Take extra care not to touch the heated surface.
4. Put the food in the non -stick basket in the fry pot and slide the fry pot back into the
fryer. When loading food, do not exceed the MAX line marked on the removable
basket.
5. Never put food directly into the fry pot!
6. Use the temperature control to set the desired temperature for frying.
7. Set the desired frying time according to the inserted food; when the controller is
released, the time countdown begins.
8. Some foods require shaking during frying. In this case, remove the fry pot by the
handle from the fryer. Make sure that the plastic cover still covers the basket release
button so that the basket cannot fall out. Carefully shake the contents of the basket
and then slide it back into the fryer to continue cooking.
9. When the set time has elapsed, an audible signal sounds and the operation ends
automatically. To end the operation sooner, set the timer to position 0. Carefully open
the fry pot to make sure the food is ready. If additional frying is required, close the fry
pot and use the timer to set additional frying time. After cooking, remove the non -stick
basket from the fry pot and empty it onto a tray or plate.
Attention:
Do not flip food out of the fry pot with the basket directly into the bowl or
plate, since excess oil may collect at the bottom of the fry pot and spill onto the food.
Always remove the basket from the fry pot first.
WARNING!
Place the fry pot on a stable
surface before releasing the frying basket. There is a risk of injury if the pot is dropped.
Cooking guide
The table below shows the approximate length and temperature of the preparation of
the various dishes. Keep in mind that the specific time and temperature required will vary
USE


