5
INSTALLATION
The dispenser should be placed at least 4 feet
from the machinery that it will be serving.. The
Options Section contains the optional hardware
required to accommodate the less common
locations relative to the machine. Once
permanent location has been determined, use
the base as a template to transfer the mounting
hole locations to the floor to accept 3/8"
anchors. Securely fasten the dispenser in
place.
COIL LOADING INSTRUCTIONS
There are two methods used to load a coil of strap into the dispenser. The first assumes that
there is no strap in the dispenser and requires hand threading the multi-roller accumulating
system. The second method takes advantage of strap already threaded through the system.
NO STRAP IN THE DISPENSER
1. Remove the wing nut then lift the outer flange
from the dispenser.
2. Swing the lacing latch down from the upper arm.
Raise the dancer arm and hook it onto the latch.
This will release the brake and reduce the
distance between the dancer arm and the upper
arm.
3. Before installing the coil of strap, note the
direction of pay-off of the lead end. The coil
should be placed on the dispenser with the lead
end of hte strap feeding off the top towards the
upper roller stack, (1).
4. Leave the crossties and the face blocks intact.
Place new coil on the step of the rear flange and
reinstall the outer reel disc assembly. Snug the wing nut.
5. Cut the crossties on the coil, carefully remove the ties and the face blocks and securely
tighten the wing nut.
6. Make sure there are no twists or kinks in the strap. Feed it around the outermost roller on the
upper roller stack.
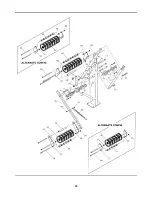
7. Direct the lead end down and around the outermost roller on the lower roller stack (2).
Summary of Contents for 513684
Page 1: ...PSD 109 STRAP DISPENSER ...
Page 4: ...4 RIGHT HAND ORIENTATION LEFT HAND ORIENTATION MAJOR COMPONENTS ...
Page 15: ...15 BLANK ...
Page 17: ...17 ...
Page 19: ...19 ...
Page 21: ...21 ...
Page 23: ...23 ...


