background image

SHOWING A SLIDESHOW

TO STOP/PAUSE A SLIDESHOW

Press

<  


CANCEL

to stop a slideshow and return to the previous view

(Single-Image, Contact Sheet, etc.).

·

The image that the slideshow stops on will become the currently selected image.

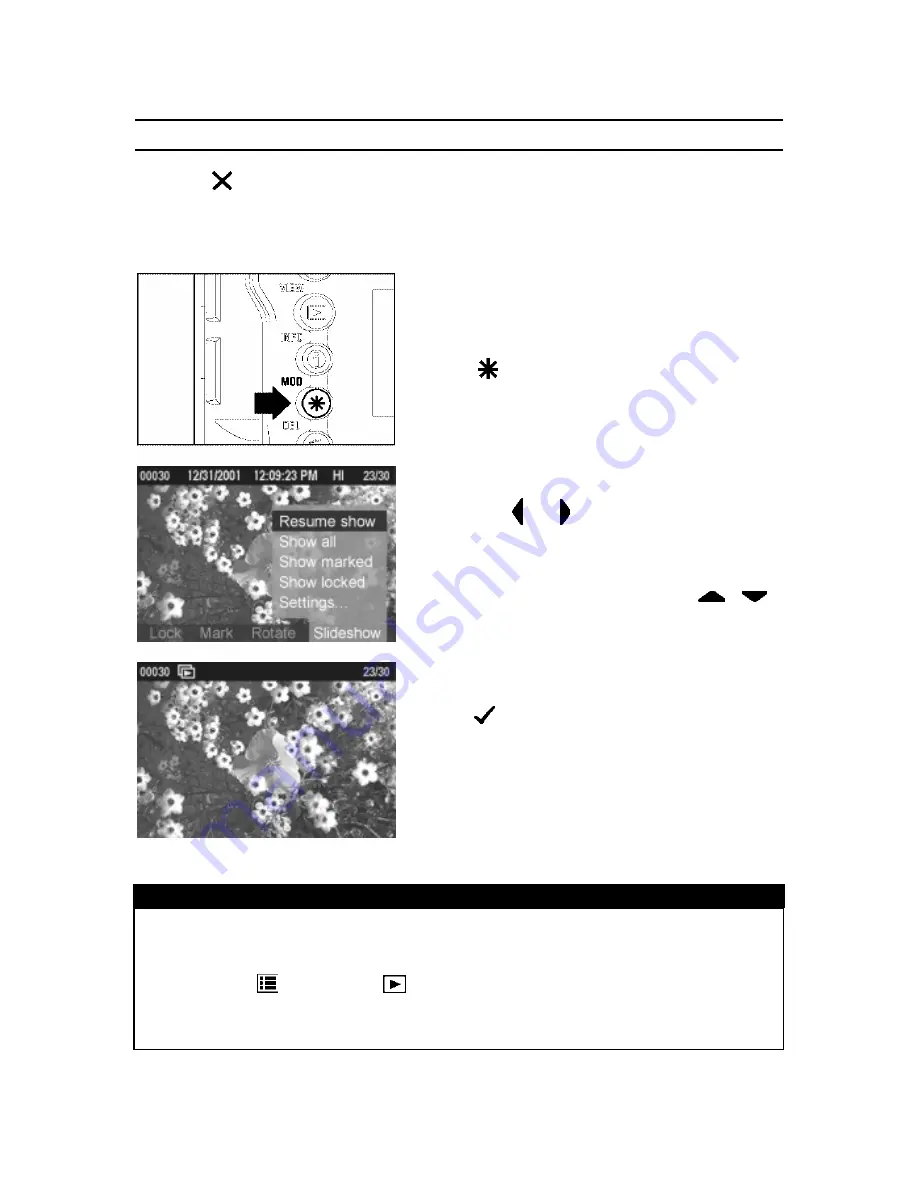
TO RESUME A STOPPED SLIDESHOW

1

Press


MOD

to display the Modification

Menu.

2

Use the

<     /     >

arrows on the 4-way

controller to select the Slideshow Menu.

3

If not already selected, use the

arrows on the 4-way controller

to select

“Resume show”.

4

Press


OK

to close the Modification Menu

and resume the slideshow.

·

The slideshow will resume with the next image

in the sequence following the one the slideshow
was stopped on.

TIP

·

It will not be possible to resume a slideshow that has stopped automatically after

the last image.

(See

P.95

 for setting slideshow repetition.)

·

Pressing

MENU

,

VIEW

or the shutter release will also stop a

slideshow, however, it will not be possible to resume a slideshow stopped in this
manner.

94

Summary of Contents for C21EN0291

Page 1: ...D9 digital SLR camera Please refer to the SIGMA Photo Pro User Guide which is available in the PDF format of the supplied CD ROM to get information about installation of SIGMA Photo Pro software to yo...

Page 2: ...e operating it Enjoy your new Sigma camera SPECIAL FEATURES OF THE SD9 Powered by Foveon X3 technology Uses a lossless compression RAW data format to eliminate image deterioration giving superior pict...

Page 3: ...or trademarks of Microsoft Corporation in the United States and or other countries Macintosh and FireWire are registered trademarks or trademarks of Apple Computer Inc in the U S A and or other count...

Page 4: ...ORMATTING THE CF CARD 29 FILE NUMBERING SYSTEM 30 FRAME NUMBER COUNTER 32 DIOPTER ADJUSTMENT 34 SPORTS FINDER 34 HOLDING THE CAMERA 35 SHUTTER BUTTON 35 SETTING THE ELECTRONIC SOUND 36 BASIC OPERATION...

Page 5: ...72 IMAGE INFO SCREEN FOR MAGNIFIED IMAGES 73 HISTOGRAM 74 OVER EXPOSURE WARNING 75 VIEWING IMAGES ON A TV 76 DELETING IMAGES 77 DELETING A SINGLE IMAGE 78 DELETING MULTIPLE IMAGES 79 RECOVERING A DEL...

Page 6: ...eries of the same brand Otherwise it might cause battery explosion battery leakage camera damage injury or fire Insert the batteries into the chamber according to the and polarity marks Incorrectly pl...

Page 7: ...ERA Never use your camera in an environment where flammable or burnable gas liquids or chemicals exist such as Propane Gasoline etc Keep the camera in a safe place that children cannot reach Playing w...

Page 8: ...e a tripod is attached as this could result in injury or a fall Please do not grasp the camera with wet hand as it might cause electric shock Do not leave the camera in a hot place or in a car parked...

Page 9: ...ck This camera is not waterproof and cannot be used underwater Wipe off any water droplets with a dry cloth as soon as possible If the camera gets really wet promptly consult your nearest Sigma Servic...

Page 10: ...ut it will return to normal at room temperature NOTES ON CF CARD AND MICRODRIVE Although CF card is resistant to vibration compared to a hard disk and it is the optimal recording medium for a digital...

Page 11: ...FT Color LCD Monitor cover is attached to the camera the following operations are still possible 1 Normal photography 2 Deleting the last image P 66 TO REMOVE THE TFT COLOR LCD MONITOR COVER Pull up t...

Page 12: ...DESCRIPTION OF THE PARTS 1 2 3 4 5 6 11 12 13 14 15 16 17 18 19 20 7 8 9 10 21 22 23 24 25 15 26 27 28 29 11...

Page 13: ...AF MODE BUTTON 15 CAMERA STRAP EYELET 16 RESOLUTION BUTTON 17 ISO BUTTON 18 EYEPIECE CUP 19 DIOPTER ADJUSTER 20 HOT SHOE 21 S DIAL SHUTTER DIAL 22 C DIAL COMMAND DIAL 23 SHUTTER BUTTON 24 TOP LCD PANE...

Page 14: ...AE LOCK INDICATOR CENTERAREAMETERING FLASH INDICATOR FOCUS INDICATOR SHUTTER SPEED APERTURE VALUE METERING MODE REMOTE CONTROL AF MODE BATTERY INDICATORS AUTO WHITE BALANCE SOUND SETTING SHUTTER SPEE...

Page 15: ...E AREA AUTO BRACKETING MIRROR LOCK UP SELF TIMER 2s SELF TIMER 10s CONTINUOUS HOOTING S SINGLE FRAME SHOOTING POWER OFF S DIAL MODE SELECTOR MANUAL EXPOSURE SETTING SHUTTER SPEED PRIORITY AE APERTURE...

Page 16: ...tteries are oriented correctly Incorrect positioning of the poles may damage the camera The AC adapter and AC cable can be used with a household power supply P 22 Mount the lens P 23 Align the red mar...

Page 17: ...ton and open the CF card cover Position the CF card label facing toward you as shown in the illustration and push the CF card gently all the way into the slot The eject button pops out Close the CF ca...

Page 18: ...ocus P 43 Compose the subject on the Focusing Screen in the viewfinder and then press the shutter button Half way to activate exposure metering and autofocus Take a picture Press the shutter button Al...

Page 19: ...ead the Finder Cap onto the strap 3 Attach the carry strap as shown HOW TO USE THE FINDER CAP When using the self timer or remote control cover the viewfinder eyepiece with the Finder Cap to prevent s...

Page 20: ...cover lock to the OPEN position 2 Insert the lithium batteries into the chamber according to the and marks as indicated 3 Close the battery cover and turn the battery cover lock to the CLOSE position...

Page 21: ...etal Hydride Batteries WARNING Always use same battery type and do not mix battery types Avoid using following battery combinations CR 3V and AA type battery combination Alkaline Dry Cell Battery and...

Page 22: ...tomatically shut down the shutter speed and aperture value disappear from the top LCD panel the display in the viewfinder turns off and some buttons no longer work however it is still be possible to r...

Page 23: ...t the plug of the AC adapter to the camera 3 Insert the plug of the AC cable into a wall socket When you finish using please disconnect the plug from the wall socket When using the SD9 with AC power s...

Page 24: ...into the mount of the camera and rotate the lens clockwise until it clicks into the locked position CAUTION To ensure proper connection please do not press the lens lock button while mounting the lens...

Page 25: ...clockwise until it stops Gently remove the lens from the camera body CAUTION On the mount surface of the lens there are a number of electric contacts Please keep them clean to ensure proper connectio...

Page 26: ...ke sure the camera is turned on 2 Press the MENU button on the back of the camera to display the Camera Set up Menu See P 96 3 Use the arrows on the 4 way controller to select Language 4 Press the arr...

Page 27: ...t a setting and use the arrows to cycle through the setting options 6 Once all changes have been made press OK to save the settings and return to the main menu Press CANCEL at any time to close the da...

Page 28: ...the CF card smoothly in the direction of the arrow as far as it can go into the slot The eject button will pop out slightly 4 Close the CF card cover until it clicks shut TIP It may be necessary to f...

Page 29: ...card while the camera is on Never do any of the following while the CF Card busy light is on The CF card busy light indicates when the camera is writing reading or erasing images from the CF card Doin...

Page 30: ...mation dialog 5 Press OK to format the CF card or CANCEL to close the confirmation dialog without formatting the card CAUTION Formatting erases all card contents including locked SD9 images and all no...

Page 31: ...numbering system FILE NUMBERING OPTIONS OPTION DESCRIPTION Continuous Default Numbering is continuous The first file number assigned on an empty card will be one higher than the last assigned number...

Page 32: ...thout making any changes TIP Using continuous file numbering helps prevent files from being accidentally overwritten when they are transferred to a computer In continuous file numbering the file numbe...

Page 33: ...corded will depend on the subject shooting conditions and shooting mode l Even if it is possible to record more than 999 images on the CF Card the maximum number of frames that can be displayed by the...

Page 34: ...the frame number value blinks on the top LCD panel A cursor will be in motion on the frame number value to show the progress l The shutter will not release when the camera is busy with processing It i...

Page 35: ...that you purchase a viewfinder diopter adjustment eyepiece and use it together with the built in Diopter Adjuster SPORTS FINDER Sports Finder can reveal the objects and activity surrounding the photog...

Page 36: ...Keep your elbow close to your body and take a half step forward for a more stable stance SHUTTER BUTTON The shutter button of the SD9 cameras has two positions When you press the shutter button Halfwa...

Page 37: ...at 2nd time The LCD panel will indicate mark 2 Press the and hold the FUNC button and turn the C dial to select on for choosing beep sound If you want to cancel this electronic sound then choose TIP...

Page 38: ...and aperture value according to brightness of the subject 1 Set the D Dial to the Drive Area P 14 2 Set the Mode Selector to the P position 3 Press the shutter button Half way to verify the focus and...

Page 39: ...era if you desire If you turn the C Dial the combination of the shutter speed and aperture value will change within the range of combinations which give the equivalent exposure It will be canceled aut...

Page 40: ...by turning the C Dial 4 Verify the setting in the viewfinder If the appropriate shutter speed is out of the range of suitable combinations due to the subject being too bright or too dark the shutter...

Page 41: ...red Shutter Speed value by turning the S Dial 4 Verify the setting in the viewfinder If the appropriate aperture value is beyond the range of the lens in use due to the subject being too bright or too...

Page 42: ...or to the M position When you press the shutter button Half way the shutter speed and aperture value are displayed in the viewfinder and the display indicates the difference between selected exposure...

Page 43: ...S Dial until bulb is displayed on the top LCD panel And select the aperture value by C Dial 4 Depress the shutter button fully to take the picture CAUTION Bulb photography is possible only when ISO se...

Page 44: ...ess the shutter button Half way and check the sharpness of the subject on the focusing screen This camera will inform you with an Electronic Sound to confirm correct focus in Single AF Mode Although y...

Page 45: ...he focus is locked Press the shutter button the rest of the way to take the picture If the camera cannot focus on the subject properly remove your finger from the shutter button and press again Focus...

Page 46: ...picture as desired Then press the shutter button the rest of the way to take picture MANUAL FOCUS In situations where autofocus or focus lock are not effective you can focus manually 1 Set the focus...

Page 47: ...Such as single frame shooting continuous shooting self timer and mirror lock up MIRROR LOCK UP SELF TIMER 2s SELF TIMER 10s CONTINUOUS SHOOTING SINGLE FRAME SHOOTING DRIVE AREA SINGLE FRAME SHOOTING...

Page 48: ...ession such as during Continuous shooting are initially stored in the camera s internal memory buffer This allows you to continue shooting without having to wait for images to be recorded to the CF ca...

Page 49: ...As you press the shutter button further the mirror will move up and the exposure value will be memorized Remove your finger from the shutter button and lightly press again to release the shutter Mirr...

Page 50: ...ypes to adjust for these differences in lighting Digital cameras however are able to use software to mimic the adjustments made by the brain so that colors that appear white to the human eye also appe...

Page 51: ...0 K Select this setting when taking pictures indoors under fluorescent lighting Flash Approx 5850 K Select this setting when taking pictures with the Sigma EF 500 DG flash Custom Select this setting w...

Page 52: ...e lighting conditions that will be used for the final photograph frame a white or neutral color object such as a sheet of white paper or a white wall so that it fills the Center Area Metering circle i...

Page 53: ...ISO EQUIVALENCY The photosensitivity of digital cameras is described in terms of ISO equivalent like silver halide film cameras ISO sensitivity P 105 To choose a sensitivity setting turn the C dial w...

Page 54: ...dial to select the desired mode and display it on the LCD panel Then release the metering button The selected metering mode is now set 8 SEGMENT METERING The camera measures the brightness of the scen...

Page 55: ...on Half way depressed and then push the AE lock button While operating the AE lock the displays of the shutter speed and aperture value in the viewfinder are locked and AEL is visible You can release...

Page 56: ...sure Exposure compensation can be set in 0 5EV increments from 3 0 to 3 0 stops For example if you set 1 0 then the shutter speed will be one stop slower in Aperture Priority mode In Shutter Speed Pri...

Page 57: ...le If you set the bracketing amount to 2 0 the indicator in the viewfinder will show as follow P A S mode M mode First Frame 0 0 Measured Value Second Frame 2 0 2 0 EV deviation from Measured Value Th...

Page 58: ...de for flash photography Auto Bracketing will not affect the output level of the flash Auto Bracketing mode can be used in combination with Exposure Compensation You can take pictures with Auto Bracke...

Page 59: ...e delay time Shutter will be released immediately after the transmit button is pressed Shutter will be released 3 second after the transmit button is pressed 2 Select the channel for RS 21 only SETTIN...

Page 60: ...is use the finder cap while using the remote controller USING THE MIRROR LOCK UP WITH REMOTE CONTROL When using mirror up mode with the remote controller we recommend that after adjusting the focus fu...

Page 61: ...called the Depth of Field Depth of Field will increase when Using a smaller aperture value Larger F number i e When you photograph the subject under the same conditions but change the aperture value...

Page 62: ...ns in use from 28 to 105mm A built in wide panel can provide the ultra wide angle coverage of a 17mm lens Flexible For bounce flash the flash head can be tilted up or down or swiveled to the left or r...

Page 63: ...faster than the 1 180sec flash synchronized speed See the instruction manual of the particular flash used for additional information The PC terminal on the PC Synchro Terminal Adapter ST 11 is compati...

Page 64: ...G THE QUICK PREVIEW DURATION The Quick Preview image can be completely disabled displayed for 2 5 or 10 seconds or set to remain on until further action Use the Camera Set up Menu to hange Quick Previ...

Page 65: ...ub menu without making any changes TIP To manually turn off the Quick Preview image press the CANCEL button or the shutter button half way While the Quick Preview image is being displayed the OK butto...

Page 66: ...ss the MENU button on the back of the camera to display the Camera Set up Menu See P 96 3 Use the arrows on the 4 way controller to select Preview Style 4 Press the arrow or OK to open sub menu 5 Use...

Page 67: ...layed The Quick Delete confirmation dialog will open 2 Press OK to delete the image or CANCEL to close the confirmation dialog without deleting the image If the image is deleted the confirmation windo...

Page 68: ...LCD monitor and display image Pressing VIEW again will turn off the LCD monitor TIP If no new images have been captured in the meantime the last reviewed image will be displayed instead If there are n...

Page 69: ...d three images Press arrow on the 4 way controller to jump back three images TIP It is not necessary to wait for the current image to finish loading before proceeding to another image To scroll throug...

Page 70: ...ller to increase magnification Maximum magnification is 400 Press on the Controller to decrease magnification Press the arrows on the 4 way controller to pan around the image Press CANCEL to return to...

Page 71: ...troller from Single Image View While in Contact Sheet View Use the arrows on the 4 way controller to change the image selection Press on the Controller or CANCEL to return to Single Image View Press o...

Page 72: ...ontroller to jump to the previous page of images Press the arrow on the 4 way controller to jump to the last page of images Press the arrow on the 4 way controller to jump to the first page of images...

Page 73: ...ress the INFO button from Single Image Contact Sheet or Zoomed In View While in Image Info Screen Press INFO again or CANCEL to close the Image Info Screen and return to the previous view Use arrows o...

Page 74: ...ile in Image Info Screen for a Magnified Image Press the arrows on the 4 way controller to pan to another part of the image Histogram will update automatically to reflect the new values Press on the C...

Page 75: ...at the image is underexposed and therefore will appear dark In general when the histogram is higher on the left side the image is mostly composed of dark pixels causing it to appear dark either becaus...

Page 76: ...camera is turned on 2 Press the MENU button on the back of the camera to display the Camera Set up Menu See P 96 3 Use arrows on the 4 way controller to select Exposure Warning 4 Press arrow or OK to...

Page 77: ...on the camera and to the video input terminal on the television or video cassette recorder 3 Turn on the camera and the video device WARNING Please do not use any video cable other than provided with...

Page 78: ...Press the DEL button on the back of the camera Press DEL again or CANCEL to close the Delete Menu without deleting any images DELETE MENU MENU ITEM DESCRIPTION Current image Delete the currently selec...

Page 79: ...be deleted without any further confirmation If the image is locked a confirmation dialog will come up asking if you are sure you want to delete the locked image Press OK to unlock and delete the image...

Page 80: ...marked images or all the marked images are locked the All marked menu item will not be available from the Delete Menu 3 Press OK to display the confirmation dialog 4 Press OK to delete all the images...

Page 81: ...o select Recover last delete The Recover last delete menu item will not be available if there are no images available for recovery 3 Press OK to recover the deleted images Once images are recovered th...

Page 82: ...NU Press the MOD button on the back of the camera Press MOD again or CANCEL to close the Modification Menu without applying any changes TIP The Modification Menu can be opened from all views Single Im...

Page 83: ...k Menu is opened from Jump Mode Lock all marked Unlock all marked Lock all marked images on the CF card See P 85 for information on marking images If all marked images are already locked the menu item...

Page 84: ...ock Menu 4 Use the arrows on the 4 way controller to select Lock If the selected image is already locked the Lock menu item will change to Unlock 5 Press OK OK to lock the image A key icon will appear...

Page 85: ...d menu item changes to Unlock all marked If all images are already locked the Lock all menu item will not be available 4 Press OK to display the confirmation dialog 5 Press OK to lock the images or pr...

Page 86: ...ark Unmark Mark the currently selected image only If the image is already marked the menu item changes to Unmark Not available if the Mark Menu is opened from Jump Mode Mark all Mark all images on the...

Page 87: ...way controller to select Mark If the selected image is already marked the Mark menu item will change to Unmark 5 Press OK to mark the image A flag icon will appear in the upper right corner of the ima...

Page 88: ...elect Mark all If all images are already marked the Mark all menu item will not be available 4 Press OK to display the confirmation dialog 5 Press OK to mark the images or press CANCEL to return to re...

Page 89: ...displayed in their rotated orientation in SIGMA Photo Pro ROTATE MENU MENU ITEM DESCRIPTION Rotate Rotate the currently selected image 90 degrees to the right clockwise Rotate Rotate the currently sel...

Page 90: ...ating TIP To rotate an image 180 degrees rotate it twice in the same direction To get an image back into its original orientation rotate it in the opposite direction The OK button can be used as a sho...

Page 91: ...the over exposure overlay on or off TO SET THE OK SHORTCUT 1 Press the MENU button on the back of the camera to display the Camera Set up Menu See P 96 2 Use the arrows on the 4 way controller to sel...

Page 92: ...g depending on the shortcut setting TIP If the shortcut is set to Lock images that are already locked can be unlocked by pressing the OK button Similarly if the shortcut is set to Mark images that are...

Page 93: ...marked images on the CF card Show locked Start an automated slideshow of all locked images on the CF card Settings Change slideshow settings TO START A SLIDESHOW 1 Identify the images that you wish to...

Page 94: ...adapter during automatic slideshow playback to avoid draining the battery For best results rotate all slideshow images to the correct orientation and use an attached television monitor to display the...

Page 95: ...Menu 3 If not already selected use the arrows on the 4 way controller to select Resume show 4 Press OK to close the Modification Menu and resume the slideshow The slideshow will resume with the next i...

Page 96: ...he slideshow is manually advanced Repeat Yes default No Set whether the slideshow loops continuously or stops on the last image TO CHANGE SLIDESHOW SETTINGS 1 Press MOD to display the Modification Men...

Page 97: ...MENU Press the MENU button on the back of the camera Press MENU again to close the Set up Menu and turn off the color LCD monitor While in the Set up Menu Use the arrows on the 4 way controller to se...

Page 98: ...d 26 Language English Deutsch Fran ais Sets the language in which menus and messages will be displayed 25 Quick Preview Off 2 sec 5 sec 10 sec Hold Sets the duration of the Quick Preview image that is...

Page 99: ...peration has occurred Auto Power Off 10 sec 30 sec 1 min 5 min Off Sets the delay before the camera shuts down automatically if no operation has occurred 107 108 Key Sound Long Short Off Sets the dura...

Page 100: ...E CAMERA INFO PAGE 1 Make sure the camera is turned on 2 Press the MENU button on the back of the camera to display the Camera Set up Menu See P 96 3 Use the arrows on the 4 way controller to select C...

Page 101: ...L system Auto Flash or Multi Flash etc Please refer to page 61 for details ELECTRONIC FLASH EF 500 DG ST SA Auto zoom flash with abundant light and STTL Automatic Exposure with the maximum guide numbe...

Page 102: ...monitor The Sigma SD9 camera contains a dust protector located inside the lens mount The dust protector is a very delicate device and care must be taken not to scratch its surface Use a blower to remo...

Page 103: ...e AC adapter to the camera and plug it into a wall socket Refer to page 22 3 Turn the D Dial to the OFF position and remove the lens 4 Use the Phillips head screwdriver to loosen and remove the screw...

Page 104: ...These delicate parts could hit the blower and damage the camera 8 Once you are done cleaning the image sensor turn the D Dial to the OFF position Check that there is no dust or dirt on the dust protec...

Page 105: ...bject off center and take shots Please press the shutter button Half way to use this feature with Sigma SD9 Aperture The lens opening of the iris diaphragm inside the lens The amount of light which st...

Page 106: ...of light reaches the film surface then the difference in exposure value will be 1 and if the amount of light is reduced by half the exposure value changes by 1 Histogram The histogram function is a gr...

Page 107: ...fore transferring the image to computer Shutter Speed The camera s shutter opens for a length of time to control the amount of light that reaches the imaging element The length of time that shutter bl...

Page 108: ...e the camera out of low power mode and allow you to perform all regular camera functions It will still be possible to take pictures while the camera is in low power mode To take a picture simply press...

Page 109: ...mera to display the Camera Set up Menu See P 96 3 Use arrows on the 4 way controller to select Auto Power Off 4 Press arrow or OK to open sub menu 5 Use arrows on the 4 way controller to select desire...

Page 110: ...is possible to record more than 999 images on the CF Card the maximum number of frames that can be seen on the counter is 999 The frame counter changes if frame counter is 998 or less P 32 Shutter spe...

Page 111: ...sert a card with valid SD9 images capture new images onto the card or press VIEW button again to turn off display Error writing to CF card There was an error writing to the CF card Turn the camera off...

Page 112: ...hen set to AF S mode Try focusing on a different subject or focus the camera manually P 43 45 CF card is not inserted or is inserted improperly Insert the CF card correctly P 27 The camera is busy wri...

Page 113: ...switch on the lens to AF P 43 Hand movement or camera shake occurred when the shutter button was pressed To prevent blurring press the shutter button more gently or use remote controller cable releas...

Page 114: ...Flash Custom white balance Viewfinder Type Pentaprism SLR Viewfinder Viewfinder Frame Coverage 98 horizontal 97 vertical Viewfinder Magnification 0 77x 50mm F1 4 at infinity Eyepoint 18mm Diopter Adju...

Page 115: ...uter using the provided USB or IEEE 1394 FireWireTM cable Make sure that the camera is off before connecting it to the computer Data transfer rates will vary depending on the computer and operating sy...

Page 116: ...aged to try to correct the interference by one or more of the following measures l Reorient or relocate the receiving antenna l Increase the separation between the equipment and receiver l Connect the...

Reviews: