


13
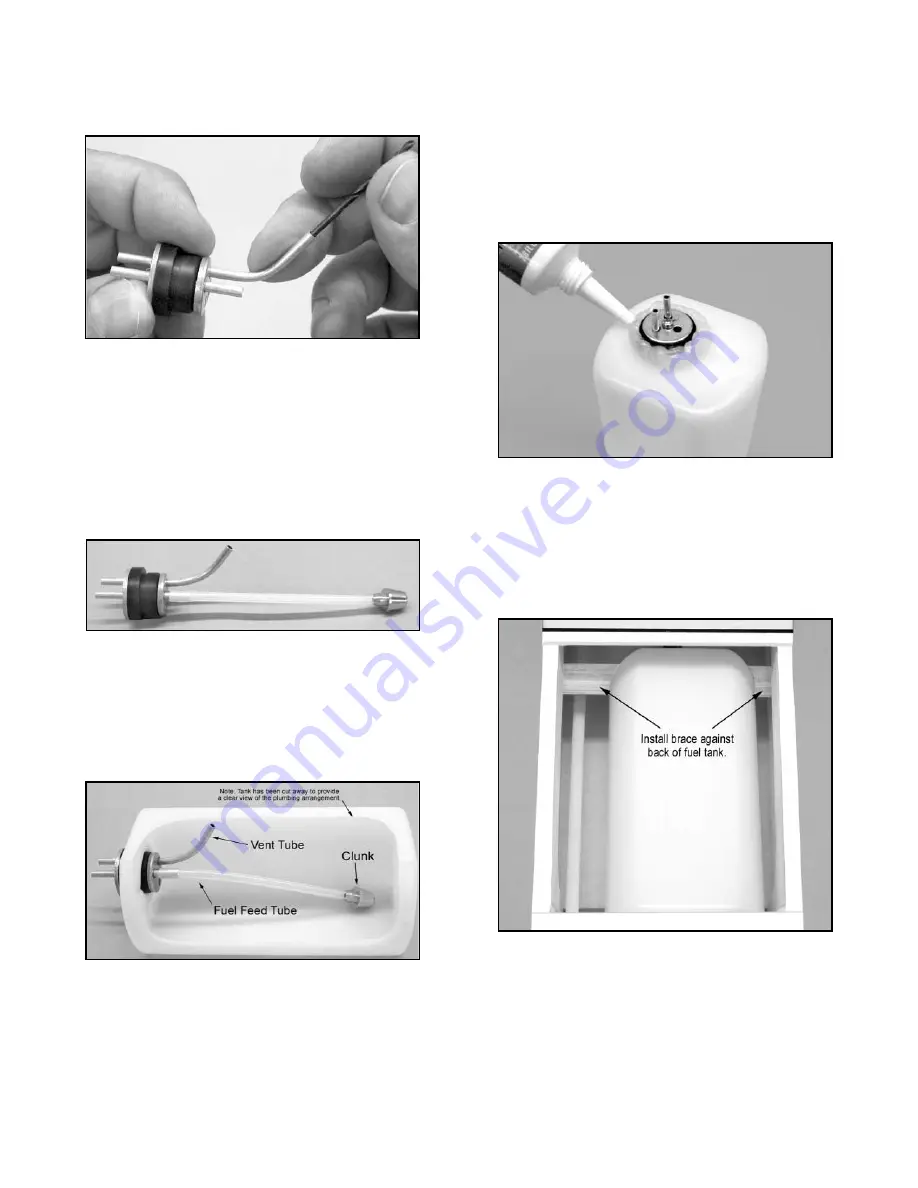
4) Put the plain end of a #47 drill bit about 1/4" inside the back end
of the vent tube. Using the drill bit for leverage, slowly bend the
back end of the vent tube upwards at least 45
O
. Try not to put a
kink in the aluminum tube.
Test fit the completed stopper assembly into the neck of the fuel
tank. Rotate the stopper so the aluminum tubes are horizontal at
the top of the stopper. Hold the tank up to a strong light and look
inside to see if the vent tube is close to the top of the tank. If not,
adjust the bend in the vent tube as needed.
5) Cut the piece of silicone fuel tubing that came with the tank to
3-1/2” long. Slide one end of the fuel tubing onto the back end of
the aluminum fuel feed tube. Attach the metal clunk pickup on the
other end of the fuel tubing.
6) Test fit the stopper back in the tank to make sure the clunk can
swing freely freely from side-to-side, whether the tank is right side
up or upside down, without hitting the back of the tank. If it hits the
back end of the tank, take the stopper back out, shorten the length
of the silicone tubing a little, and then test again. Shorten the fuel
tubing a small amount at a time until the clunk can swing freely
inside the tank.
7) When everything is right, tighten the screw in the stopper cap
until the cap is snug in the neck of the tank. Then test the fuel tank
for leaks! Fill your kitchen sink with water. Slip a piece of fuel line
tubing onto the tank vent tube. Submerge the tank in the water,
holding your thumb firmly over the fuel feed tube. Blow air into the
other end of the fuel tubing and watch for air bubbles coming
around the cap of the tank. If it's leaking, tighten the screw in the
cap a little at a time until the leaking stops.
8) Trial fit the tank in place inside the fuselage to familiarize
yourself with how it mounts. The neck of the tank should fit through
the hole in the firewall.
9) Apply a generous bead of silicone sealer around the neck of the
tank (regular household bathroom type silicone sealer, available at
most hardware stores, is recommended). Slide the tank in place in
the fuselage. Push the tank firmly up against the back side of the
firewall, compressing the silicone sealer to make a good seal. If
excess silicone sealer oozes out onto the front of the firewall, clean
it off.
10) Cut a piece of scrap wood 3-1/4” long (can be stick or sheet,
balsa or plywood) to use as a rear tank brace. Reach in through
the servo area and wedge the brace between the fuselage sides,
right up tight against the back end of the tank. Spread some Slow
CA glue on the ends of the brace to glue it to the fuselage sides.
(HINT: Put some glue on the end of a long stick or nail, then reach
in and dab the glue on the ends of the brace.) This brace will
insure that the tank cannot shift backwards in flight.
11) Cut strips of 1/2” thick soft foam rubber (not supplied) to fit
between the sides of the fuel tank and the fuselage sides - see first
photo on next page. This is to keep the tank from shifting sideways
in flight. Cut another strip of 1/2” thick soft foam rubber to lay on
top of the tank, filling the space between the tank and the Hatch.
Then screw the Hatch in place.
12) Cut two 6" lengths of silicone fuel tubing, and install them on
the two aluminum fuel tubes coming out of the firewall. Attach the
fuel feed line to the engine's carburetor and the vent line to the
pressure fitting on the muffler. NOTE: Trim off any excess length