background image

3

Board Setup

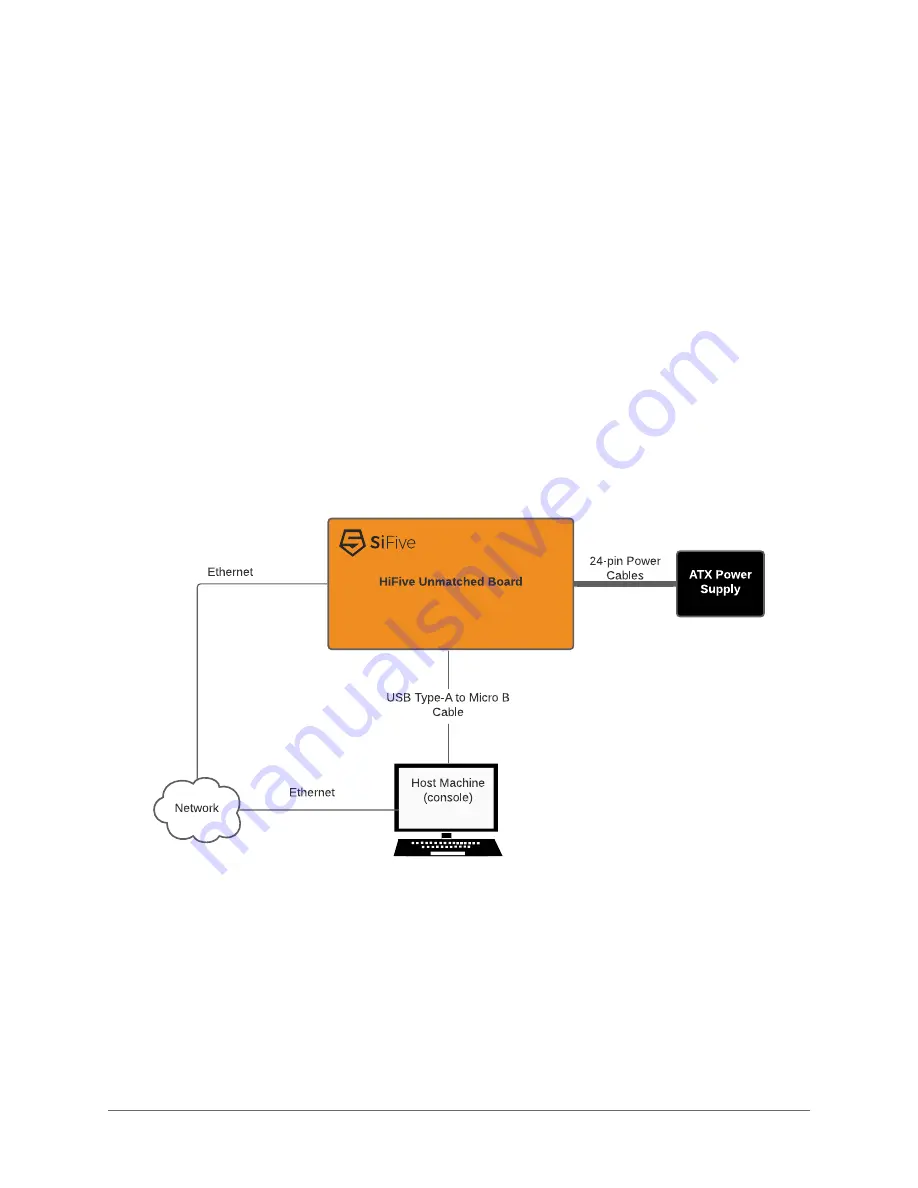
The following chapter provides the steps necessary to setup the HiFive Unmatched develop-
ment board. Figure 3 shows the proper board setup, where the board is connected to a host
machine and network.

Figure 3:

HiFive Unmatched System Block Diagram

3.1

Initial Setup

Before powering the board, consider the following requirements.

Boot Mode Select DIP Switch:

The Bootmode Select DIP switch (see

16

in Figure 1) should be set to the following:

MSEL[3:0] – [ON, OFF, ON, ON] or

1011

.

HiFive Unmatched Getting Started Guide

© SiFive, Inc.

Page 8

Summary of Contents for HiFive Unmatched

Page 1: ...SiFive HiFive Unmatched Getting Started Guide v1p1 SiFive Inc ...

Page 2: ...itness for a particular purpose and non infringement SiFive does not assume any liability rising out of the application or use of any product or circuit and specifically disclaims any and all liability including without limitation indirect incidental spe cial exemplary or consequential damages SiFive reserves the right to make changes without further notice to any products herein Release Informati...

Page 3: ...g to the Power Supply 10 3 3 Slotting the MicroSD Card 11 3 4 Checking the Fan Connection 12 3 5 Powering the Board 12 3 5 1 Turn ON Power to Board 12 3 5 2 Turn OFF Power to Board 12 3 6 Connecting IOs to the Board 12 4 Boot and Run 13 4 1 Connecting with USB Console 13 4 1 1 Installing USB UART Drivers on macOS 13 4 1 2 Setting up the Terminal on Windows 14 5 Support for HiFive Unmatched 17 HiFi...

Page 4: ...velopment platform based on SiFive s Freedom U740 SoC The platform features 64 bit DDR4 high speed interconnects via PCIe Gen 3 x8 operating at 7 8 GB s Gigabit Ethernet and SuperSpeed USB 5Gbps HiFive Unmatched Getting Started Guide SiFive Inc Page 2 ...

Page 5: ...1 1 HiFive Unmatched Components Figure 1 HiFive Unmatched Components 1 Introduction HiFive Unmatched Getting Started Guide SiFive Inc Page 3 ...

Page 6: ...oC 6 JTAG Header 19 32MB QSPI Flash 7 UART USB Controller 20 PCIe Switch 8 Ethernet PHY 21 CPU Fan Header 9 PCIe USB Bridge 22 x16 PCIe Connector 10 USB Hub 23 CR1220 Battery Connector 11 M 2 E Key Connector for WiFi Bluetooth 24 Power Pushbutton 12 M 2 M Key Connector for NVMe SSD 25 Reset Pushbutton 13 Case Fan Header 26 ATX Power Connector 27 Front Panel Connector 1 Introduction HiFive Unmatche...

Page 7: ...uired Hardware Using the HiFive Unmatched Development Kit requires the following parts which are not included in the kit ATX Power Supply Unit PSU Power to the board is provided by an ATX Power Supply via a 24 pin ATX Power Connec tor see 26 in Figure 1 The PSU must be rated at a minimum of 150W Note If the user is implementing a PCIe expansion device please reference the manufacturer specificatio...

Page 8: ...box with the Unmatched board ATX Power Supply If the user is utilizing a PCIe expansion card consult the manufacturer specification sheet to identify the wattage needed to power the device before buying a power supply unit SiFive has tested the HiFive Unmatched board using the FSP Mini ITX Solution Flex ATX 250W power supply part FSP250 50FGBBI M without any PCIe expansion card PCIe Expansion Card...

Page 9: ...ntified as causing errors and crashes when connected to the HiFive Unmatched board Other Sandisk microSD cards that do not have the A2 labeling function without problems Please avoid using the microSD cards marked with A2 to load the HiFive Unmatched firmware 2 Hardware HiFive Unmatched Getting Started Guide SiFive Inc Page 7 ...

Page 10: ...d is connected to a host machine and network Figure 3 HiFive Unmatched System Block Diagram 3 1 Initial Setup Before powering the board consider the following requirements Boot Mode Select DIP Switch The Bootmode Select DIP switch see 16 in Figure 1 should be set to the following MSEL 3 0 ON OFF ON ON or 1011 HiFive Unmatched Getting Started Guide SiFive Inc Page 8 ...

Page 11: ...itch with default setting MSEL 4b 1011 Table 2 Boot Mode Select Configuration Settings MSEL 3 0 FSBL Location Access Method SPI Width 4b 0101 QSPI0 Flash Memory mapped X1 4b 0110 QSPI0 Flash Memory mapped X4 4b 0111 QSPI1 Flash Memory mapped X4 4b 1000 QSPI1 SD Card Bit banged X1 4b 1001 QSPI2 Flash Bit banged X1 4b 1010 QSPI0 Flash Memory mapped X4 4b 1011 Default QSPI2 SD Card Bit banged X1 4b 1...

Page 12: ...Power LED 3 HDD LED 4 Power LED 5 Reset Switch 6 Power Switch 7 Reset Switch 8 Power Switch 9 5V 10 No connection 3 2 Connecting to the Power Supply First connect the ATX power supply 24 pin connector to ATX header 26 in Figure 1 on the board Some 24 pin ATX power connectors are made of 20 pin and 4 pin connectors that must be merged to ensure a good connection Consider Figure 6 3 Board Setup HiFi...

Page 13: ...ersions of the fan header position the red cable on the left and the black cable on the right Then connect USB to microUSB cable to the microUSB connector see 2 in Figure 1 3 3 Slotting the MicroSD Card The HiFive Unmatched kit comes packaged with a preloaded microSD card Connect this microSD card to the microSD card slot see 1 in Figure 1 3 Board Setup HiFive Unmatched Getting Started Guide SiFiv...

Page 14: ...EDs will illuminate indicating that the ATX power supply is turned ON and power is being regulated from the on board power sup ply Alternatively if the board is connected to the case connect the front panel wires as shown in Table 3 and press the power button on the PC case to turn ON the HiFive Unmatched board 3 5 2 Turn OFF Power to Board To turn off the board press and hold the power pushbutton...

Page 15: ...ing directory If major issues occur such as kernel crashes and boot stage errors this logfile can be used to help the SiFive support team identify the source of an error More information about the L flag is available in the manual page command man screen Alternatively the user can use minicom and picocom commands to access the console Hit enter a few times to see the login prompt Username root pas...

Page 16: ...e Unmatched con sole via USB UART 4 1 2 Setting up the Terminal on Windows The following section describes getting started with the HiFive Unmatched terminal on Windows using PuTTY After plugging your microUSB cable to the microUSB connector 2 in Figure 1 connect the USB to your host machine The HiFive Unmatched board should then appear in your Device Manager as shown in Figure 7 Note that the COM...

Page 17: ...m putty latest html Then configure PuTTY as shown in Figure 9 1 Select Serial connection type 2 Select Serial line for the COM port the HiFive Unmatched board is connected to as shown in the Device Manager 3 Select Speed of 115200 4 Click the Open button 4 Boot and Run HiFive Unmatched Getting Started Guide SiFive Inc Page 15 ...

Page 18: ...Figure 9 PuTTY Configuration 4 Boot and Run HiFive Unmatched Getting Started Guide SiFive Inc Page 16 ...

Page 19: ...d develop ment board https forums sifive com c hifive unmatched 16 For supplemental information about HiFive Unmatched and the latest versions of the supporting documentation visit https www sifive com For direct questions contact your SiFive representative HiFive Unmatched Getting Started Guide SiFive Inc Page 17 ...

Reviews: