background image

AirLink RV55 Hardware User Guide

Rev. 1  June 2019

20

41113042

To install the antennas:

1.

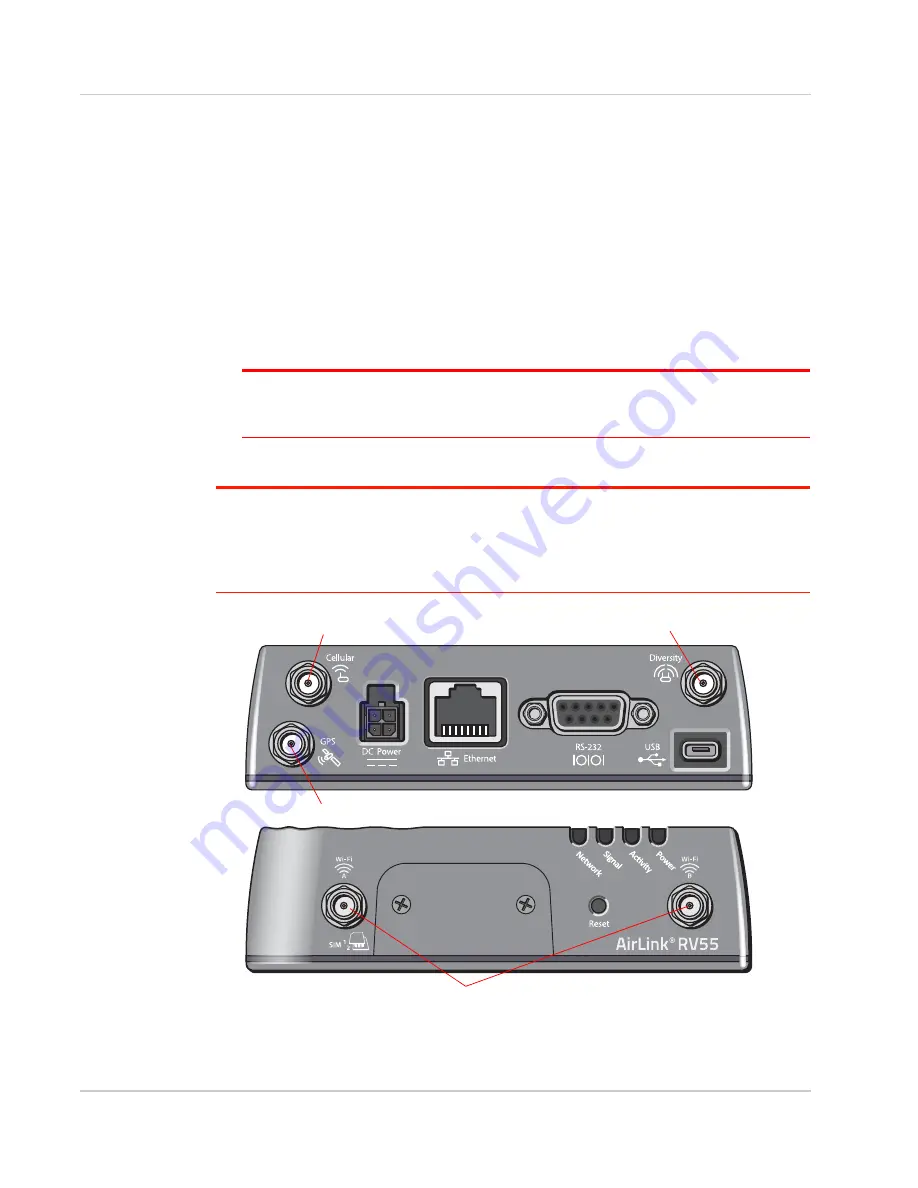
Connect the cellular antenna to the SMA cellular antenna connector.

Mount the cellular antenna so there is at least 20 cm between the antenna and the 
user or bystander.

2.

Connect a second antenna to the SMA Diversity antenna connector. 

For 3G networks, the second antenna operates as a diversity antenna, providing a 
second receive path.

For 4G networks, the second antenna operates as a MIMO antenna, providing a sec-
ond receive path and a second transmit path.

3.

If used, connect a GPS antenna to the SMA GPS antenna connector.

Mount the GPS antenna where it has a good view of the sky (at least 90º).

Note: ALEOS is configured by default for an active GPS / GNSS antenna. If you are using a 
passive antenna, after the router is installed, launch ACEmanager, go to Location > Advanced 
and set the GNSS Antenna Bias field to Disable.

4.

For Wi-Fi-capable routers, connect the Wi-Fi antennas to the SMA Wi-Fi connectors.

Note: If any antenna is located away from the router, keep the cables as short as possible to prevent 
the loss of antenna gain. Route the cables so that they are protected from damage and will not be 
snagged or pulled on. There should be no binding or sharp corners in the cable routing. Excess 
cabling should be bundled and tied off. Make sure the cables are secured so their weight will not 
loosen the connector from the router over time.

Figure 2-4: Antenna Connectors

Cellular antenna connector

GPS antenna connector

Diversity antenna connector

Wi-Fi antenna connectors (Wi-Fi models only)

Summary of Contents for AirLink RV55

Page 1: ...AirLink RV55 Hardware User Guide 41113042 Rev 1 ...

Page 2: ...product MUST BE POWERED OFF The Sierra Wireless product can transmit signals that could interfere with this equipment The driver or operator of any vehicle should not operate the Sierra Wireless product while in control of a vehicle Doing so will detract from the driver or operator s control and operation of that vehicle In some states and provinces operating such communications devices while in c...

Page 3: ...art of Sierra Wireless SIERRA WIRELESS AND ITS AFFILIATES SPECIFICALLY DISCLAIM LIABILITY FOR ANY AND ALL DIRECT INDIRECT SPECIAL GENERAL INCIDENTAL CONSEQUENTIAL PUNITIVE OR EXEMPLARY DAMAGES INCLUDING BUT NOT LIMITED TO LOSS OF PROFITS OR REVENUE OR ANTICIPATED PROFITS OR REVENUE ARISING OUT OF THE USE OR INABILITY TO USE ANY SIERRA WIRELESS PRODUCT EVEN IF SIERRA WIRELESS AND OR ITS AFFILIATES ...

Page 4: ...e U S and other countries QUALCOMM is a registered trademark of QUALCOMM Incorporated Used under license Other trademarks are the property of their respective owners Contact Information Sales information and technical support including warranty and returns Web sierrawireless com company contact us Global toll free number 1 877 687 7795 6 00 am to 5 00 pm PST Corporate and product information Web s...

Page 5: ...n and Startup 15 Tools and Materials Required 15 Installation Overview 15 Step 1 Insert the SIM Cards 16 Step 2 Mounting the RV55 Router 17 Mounting Brackets 17 Flat Surface Mount 17 DIN Rail Mount 18 Grounding the RV55 Router Chassis 19 Step 3 Connect the Antennas 19 Recommended Antenna Separation 21 Step 4 Connect the Data Cables 21 Step 5 Connect the Power 24 Cable Strain Relief 24 Fusing 24 DC...

Page 6: ...ns at a Glance 41 Certification and Interoperability 41 Environmental Testing 41 Reliability Specifications 42 Mobile Network Operator Certification 43 Host Interfaces 44 SIM Card Interface 45 Operating Voltage 46 Power Specifications 46 GNSS Technology 46 Protocols 47 Wi Fi Performance 47 Radio Frequency Bands 48 GNSS Bands supported 56 GNSS Technology 56 Mechanical Specifications 57 Screw Torque...

Page 7: ...pter Input 63 AC Power Adapter Output 63 AC Power Adapter Environmental Specifications 64 AC Power Adapter Reliability and Quality Control 64 AC Power Adapter Safety Standards 64 AC Power Adapter EMC Standards 65 AC Power Adapter Hazardous Substances 65 AC Power Adapter Energy Efficiency 65 Dual Serial Port Adapter Cable 66 Index 67 ...

Page 8: ... Cat 12 LTE M NB IoT LTE performance at 2G power consumption less than 1 W in idle mode State of the art LTE coverage 21 LTE frequency bands with support for band 48 Private Network CBRS Product variants Single product variant for all major North American operators Single for global FirstNet support Band 14 Dual Wi Fi 2 4 5 GHz Dual serial port mode accessory required Fully automatic network opera...

Page 9: ...g Mode LED power saving mode Standby mode Power saving strategies such as turning off unused interfaces USB Serial Ethernet turning off GNSS and adjusting the Ethernet data rate Multi function digital input analog input switchable low side current sink and high side configurable pull up For information on configuring these features refer to the ALEOS Software Configuration User Guide for the RV55 ...

Page 10: ...tenna Connector Back Panel 9 pin RS 232 Serial Port USB 2 0 Micro AB Port See Ethernet Port on page 22 See Connect the Antennas on page 19 See Connect the Antennas on page 19 See Serial Port on page 22 See USB Port on page 22 Reset button See Reboot the RV55 Router and Reset the RV55 Router to Factory Default Settings on page 39 RJ 45 Ethernet Port GPS Antenna Connector LEDs See LED Behavior on pa...

Page 11: ...ity Manager AMM a Network Management solution that provides a consolidated view of the entire vehicle fleet and enables simplified management control and monitoring of connected AirLink routers AT Commands For a complete list of AT Commands refer to the ALEOS Software Configuration User Guide Power Modes The AirLink RV55 router has three power modes On The CPU and the radio are on The current draw...

Page 12: ... Ethernet Set Ethernet Data Rate LAN Ethernet Advanced Ethernet data rates can be set to Auto 100 Mbits 10 Mbits If your use case does not require a Gigabit Ethernet connection choosing a slower rate results in substantial power savings When set to 10 or 100 Mbits both sides of the link must be set to the same fixed speed and duplex settings If you are unable to ensure that both sides of the link ...

Page 13: ...aving Features Attached and connected 20 dBm LTE 100 BaseT Full duplex Enabled Idle Enabled Idle Enabled Active antenna Disabled Disabled 3700 mW 308 3 mA Maximum without Power Saving Features Attached and connected 23 dBm LTE A 1000 BaseT Full duplex maximum throughput Enabled Enabled Enabled Active antenna Disabled Disabled 5500 mW 458 3 mA Peak without Power Saving Featuresc Attached and connec...

Page 14: ...owered on it checks the stored radio module firmware versions and automatically loads the appropriate version for the installed Primary SIM card onto the radio module While Network Operator Switching is in progress the LEDs sequentially flash green green LED chase If there is no SIM card installed in the Primary SIM card slot the router uses the firmware associated with the SIM card in the Seconda...

Page 15: ...sity Optional GPS antenna Optional a 9 pin connection cable for the RS 232 port Optional DIN Rail Mounting Bracket kit available from Sierra Wireless Caution The router has a hardened case for use in industrial and extreme environments If you are installing it in these types of environments use cables designed and specified for use in these types of environments to avoid cable failure Installation...

Page 16: ...ent or power to the router To install the SIM cards 1 Use a 1 Phillips screwdriver to remove the SIM card cover 2 Orient the SIM card s as shown in Figure 2 1 The gold contacts on the upper SIM card face down and the gold contacts on the lower SIM card face up If you are using only one SIM card insert it in the upper SIM slot Slot 1 3 Gently slide the SIM cards into the slots until they click into...

Page 17: ...re to the elements such as sun rain dust etc It will not be hit or come into contact with people cargo tools equipment etc Mounting Brackets The RV55 router comes with mounting screws An optional DIN rail mounting bracket P N 6000659 is available from Sierra Wireless Flat Surface Mount If you are mounting the RV55 router on a flat surface use the mounting screws that come with the router Figure 2 ...

Page 18: ...ower it up and ensure that you have network connectivity See Step 5 Connect the Power on page 24 3 Place the router on the DIN rail mounting bracket lining up the mounting holes on the underside of the router with the holes on the DIN rail mounting bracket 4 Use the screws provided to attach the router to the bracket Torque the screws to a maximum of 1 1 N m 10 in lb 5 Use the screws provided to a...

Page 19: ...e to the human body Antennas should be at least 8 inches 20 cm away from the operator The RV55 router has up to three female SMA antenna connectors The number of connectors depends on product variant Cellular Main antenna connector Cellular Diversity antenna connector Required for 4G LTE networks1 GPS antenna connector1 In addition the RV55 with Wi Fi has two male SMA antenna connectors see Figure...

Page 20: ... ALEOS is configured by default for an active GPS GNSS antenna If you are using a passive antenna after the router is installed launch ACEmanager go to Location Advanced and set the GNSS Antenna Bias field to Disable 4 For Wi Fi capable routers connect the Wi Fi antennas to the SMA Wi Fi connectors Note If any antenna is located away from the router keep the cables as short as possible to prevent ...

Page 21: ...es The RV55 router has the following ports for connecting data cables USB Port Micro AB Ethernet Port RJ 45 Use a Cat 5e or Cat 6 Ethernet cable Serial Port 9 pin RS 232 Table 2 1 Recommended Antenna Separation Service Frequency MHz Wavelength mm Best Antenna Separation mm 1 2 Good Antenna Separation mm 1 4 LTE 700 428 214 107 LTE 800 375 187 94 LTE 900 333 167 83 LTE 1800 167 83 42 LTE 2100 143 7...

Page 22: ...de and installing the USB driver see the ALEOS Software Configuration User Guide Sierra Wireless recommends you Use a USB 2 0 cable Connect directly to your computer for best throughput Ethernet Port IEEE 802 3 Ethernet specification for 1000 Mbps speed Gigabit Ethernet with fallback to 100 or 10 Mbps Cat 5e or Cat 6 cable is required for Gigabit Ethernet Auto crossover support Auto negotiation de...

Page 23: ...ternally to BOARD GND GND DSR 6 Data Set Ready OUT RTS 7 Ready To Send IN CTS 8 Clear To Send OUT RI 9 Not connected Table 2 3 Serial Connector Pin out Dual Port Mode Name Pin Description Type CTS 1 Port 2 Clear To Send OUT TXD 2 Port 1 Transmit Data OUT RXD 3 Port 1 Receive Data IN RXD 4 Port 2 Receive Data IN GND 5 Main GND Connected internally to BOARD GND GND TXD 6 Port 2 Transmit Data OUT RTS...

Page 24: ...ss recommends using cable strain relief for installations in high vibration environments Place the cable strain relief within 200 mm 8 in of the RV55 router to reduce the mass of cable supported by the power connector under vibration Ideally the strain relief mounting for the DC cable should be attached to the same object as the router so both the router and cable vibrate together The strain relie...

Page 25: ...d Ignition Sense Pin 1 Power Green Red Black White Optional Connect to switch relay or external device Ignition switch or external solar power low voltage disconnect device Table 2 4 Power Connector Pin and DC Cable Wires Pin Name DC Cable Wire Color Description Type 1 Power Red Main power supply for device Note When the router switches to Low Power mode based on a Low Voltage trigger the voltage ...

Page 26: ...ion Note To turn the router on off with the vehicle ignition Sierra Wireless strongly recommends using an unswitched VCC on Pin 1 Red Power wire on DC cable with Pin 3 White Ignition sense wire on DC cable connected to the ignition Turn the router on off with a low voltage disconnect device Note For solar applications if you want the router to turn off when the voltage drops below a defined level ...

Page 27: ...ble to connect Pin 1 to the power source Include a 4 0 A fast acting fuse in the input power line Sierra Wireless recom mends using a continuous unswitched DC power source Pin 2 Ground Use the black wire in the DC cable to connect Pin 2 to ground See also Grounding the RV55 Router Chassis on page 19 Pin 3 Ignition Sense Sierra Wireless recommends always using the Ignition Sense wire Pin 3 to turn ...

Page 28: ...Low voltage disconnect to force the router into Standby mode when the voltage is low Note When the router switches to Low Power mode based on a Low Voltage trigger the voltage is monitored on the Red Power wire Figure 2 9 Fixed Installation without I O Pin 1 Power Use the red wire in the DC cable to connect Pin 1 to the power source Include a 4 0 A fast acting fuse in the input power line Sierra W...

Page 29: ...Pin 4 GPIO Use the green wire for I O configurations See I O Configuration I O Configuration You can use the Pin 4 GPIO green wire as A pulse counter See Table 2 5 on page 30 and Figure 2 11 on page 30 A digital input See Table 2 5 on page 30 and Figure 2 12 on page 31 A high side pull up dry contact switch input See Table 2 7 on page 32 and Figure 2 13 on page 32 An analog input See Table 2 8 on ...

Page 30: ... the state of the monitored router changes for example when a switch is opened or closed For more information refer to the ALEOS Software Configuration User Guide Events Reporting chapter Pulse Counter You can use the green wire to connect Pin 4 to a pulse counter The digital pulse counter is not available in Standby mode Figure 2 11 Digital Input Pulse Counter Note Values may vary depending on si...

Page 31: ... or to monitor an external device such as a motion detector a remote solar panel or a remote camera Digital input can also be used with the standby timer Figure 2 12 Digital Input RV55 Digital Input Vin Internal pull up resistor Off default Protection Circuitry VHigh Ƌ 9 Pin 4 power connector Table 2 6 Digital Input Pull up State Minimum Typical Maximum Units Off Low 1 0 V High 2 7 Vin V ...

Page 32: ...r 10K On ISource 1 1 mA Typ Protection Circuitry Output Off default Pin 4 power connector Depending on the load this value can range from Vin to Vin 2 5 V Configurable on the ACEmanager I O tab Table 2 7 High Side Pull up Dry Contact Switch Input Minimum Typical Maximum Units Comments Source Current 0 6 Vin 7 V 1 1 Vin 12 V 3 5 Vin 36 V mA Maximum current the voltage output can provide depends on ...

Page 33: ...layed in the user interface and for use by Events Reporting Changes are considered significant if the change is 150 mV or more If there has not been a significant change to the parameter being monitored the CPU reads a sample every 2 5 minutes which detects small changes Figure 2 15 Analog Input Sampling and Reading Note The same method is used to sample the input voltage and the internal board te...

Page 34: ...ntered when the internal pull up resistor 10 k becomes active after bootup Depending on your application you may need to install an external pull up resistor 10 k in order to nullify the small input current flow for the first 30 seconds during bootup RV55 Vin Vin Internal pull up resistor Off Protection Circuitry Pin 4 power connector External solenoid relay circuit ISink 500 mA Typ See Table 2 9 ...

Page 35: ...nge 7 36 V low voltage standby mode is enabled by default so in order to avoid the router powering into standby mode ensure that it is supplied with more than 9 V at startup If desired you can change the low voltage standby settings once the router is operational If the Power LED is red the router is in standby mode Ignition Sense pin 3 is connected to the battery or power source see Step 5 Connec...

Page 36: ...o release the reset button to reset the router to the factory default settings Flashing Amber When you press the reset button for more than 20 seconds flashing amber indicates when to release the reset button to enter Recovery mode See Recovery Mode on page 40 Signal Solid Green Good signal equivalent to 4 5 bars Off Solid Amber Fair signal equivalent to 2 3 bars Off Flashing Amber Poor signal equ...

Page 37: ...efer to the ALEOS Software Configuration User Guide Admin chapter Activity Flashing Green Traffic is being transmitted or received over the WAN interface Flashing Red Traffic is being transmitted or received over the serial port This behavior only appears if the RV55 router is configured to display it For more information refer to the ALEOS Software Configuration Guide Serial chapter Flashing Ambe...

Page 38: ... Refer to the ALEOS Software Configuration User Guide for information on how to use ACEmanager to configure your RV55 router Configuring with AirLink Management Service AirLink Management Service ALMS allows remote management of all your routers from one user interface Some of its features include Centralized remote monitoring for all your AirLink routers and gateways Continuous status monitoring ...

Page 39: ...mmands For a complete list of AT commands refer to the ALEOS Software Configuration User Guide Reboot the RV55 Router To reboot the RV55 router use one of the following methods On the router press the Reset button for 1 5 seconds Release the button when the Power LED flashes green In ACEmanager click the Reboot button on the toolbar Reset the RV55 Router to Factory Default Settings To reset the ro...

Page 40: ...he router Update ALEOS using the Recovery mode interface Once the new ALEOS version is successfully uploaded and installed the router reboots and exits recovery mode When the process is complete the ACEmanager login screen appears Note After the recovery you need to reload the radio module firmware store and templates To exit Recovery mode if it has been inadvertently entered do one of the followi...

Page 41: ... CC RED Test Method Category Description MIL STD 810G Test method 514 6 IEC 60068 2 64 Vibration Frequency range 10 Hz 150 Hz Spectrum level 2 24G on all axes for 8 hours axis Operating mode powered on MIL STD 810G Test method 516 6 Mechanical Shock Half sine 40G 15 23 ms X Y Z directions 10 times per axis Operating mode powered on MIL STD 810G Test methods 501 5 502 5 Temperature Rugged category ...

Page 42: ...relative humidity hold 21 hours 1 hour ramp down to 20 C hold 4 hours 1 hour ramp up to 30 C hold 5 hours Operating mode powered on IEC 60529 Water Resistance Subject to spraying water Water sprayed at an angle up to 60 on either side of the vertical for 10 minutes Operating mode unpowered IEC 61000 4 2 Electrostatic Discharge 8 kV Contact 15 kV Air 15 kV Air at antenna connector Operating mode po...

Page 43: ...Specifications at a Glance Rev 1 June 2019 43 41113042 Mobile Network Operator Certification Verizon Wireless AT T FirstNet Rogersa a Certification planned Bell Mobilitya Telusa Telstraa ...

Page 44: ...and the RV55 s internal web server This is the default setting Virtual Serial Port The RV55 behaves as if it was connected to a standard serial port The primary use of this interface is for the AT command line interface of ALEOS and for diagnostic access to the radio module By default the USB port is configured as a virtual Ethernet port A Windows driver must be installed on the PC in order to sup...

Page 45: ...it Ethernet Auto crossover support Auto negotiation detects the speed of the connecting device Serial Port 9 pin RS232 serial port connects directly to most computers or other devices with a standard serial straight through cable Note If you have a DCE device you need to use a null modem cross over cable Operational as single 8 wire serial port or 2 4 wire serial port requires a DB9 Y cable For pi...

Page 46: ...pedance Typ Specification Parameter Minimum Maximum 3 IS Input only 80 kΩ minimum Input low state voltage maximum VIL 1 0 V Input high state voltage minimum guaranteed VIH 3 3 V Vin Note If you do not connect this pin to the ignition you MUST connect it to the positive terminal of your power supply or battery The device looks for a qualified voltage on this pin as part of the power up sequence If ...

Page 47: ... data rates vary 40 MHza 80 MHza 802 11n 2 4 GHz 1 1 72 Mbps 5 GHz 1 1 100 Mbps 150 Mbps 802 11ac 5 GHz 1 1 87 Mbps 200 Mbps 433 Mbps 2 4 GHz 5 GHz 1 2 412 GHz Ch 36 5 180 GHz 20 MHz 20 40 MHz 80 MHz 2 2 417 GHz Ch 40 5 200 GHz 20 MHz 20 40 MHz 80 MHz 3 2 422 GHz Ch 44 5 220 GHz 20 MHz 20 40 MHz 80 MHz 4 2 427 GHz Ch 48 5 240 GHz 20 MHz 20 40 MHz 80 MHz 5 2 432 GHz Ch 149 5 745 GHz 20 MHz 20 40 MH...

Page 48: ...es To determine which radio module your router has refer to the label on the bottom of the router or in ACEmanager go to Status About and check the Radio Module Type field RV55 Wi Fi RV55 Radio Module EM7511 EM7565 WP7702 Radio Frequency Bands Table 3 3 Table 3 5 Table 3 7 Radio Module Transmit Power Table 3 4 Table 3 6 Table 3 8 GNSS Technology GNSS Bands Supported Table 3 9 ...

Page 49: ...and 7 2500 2570 MHz 2620 2690 MHz Band 8 880 915 MHz 925 960 MHz Band 9 1749 9 1784 9 MHz 1844 9 1879 9 MHz Band 12 699 716 MHz 729 746 MHz Band 13 777 787 MHz 746 756 MHz Band 14 788 798 MHz 758 768 MHz Band 18 815 830 MHz 860 875 MHz Band 19 830 845 MHz 875 890 MHz Band 20 832 862 MHz 791 821 MHz Band 26 814 849 MHz 859 894 MHz Band 29 n a 717 728 MHz Band 30 n a 2350 2360 MHz Band 32 n a 1452 1...

Page 50: ...710 1755 MHz 2110 2155 MHz Band 5 824 849 MHz 869 894 MHz Band 6 830 840 MHz 875 885 MHz Band 8 880 915 MHz 925 960 MHz Band 9 1749 9 1784 9 MHz 1844 9 1879 9 MHz Band 19 830 845 MHz 875 890 MHz Table 3 3 RV55 LTE A Pro Radio Module EM7511 North America Continued Radio Technology SKU Band Frequency Tx Frequency Rx Generic Verizon Wireless AT T ...

Page 51: ... Band 8 Band 9 Band 12 Band 13 Band 14 Band 18 Band 19 Band 20 Band 26 Band 30 Band 66 23 1 Band 7 Band 41 Band 42 Band 43 Band 48 22 1 UMTS Band 1 IMT 2100 12 2 kbps Band 2 UMTS 1900 12 2 kbps Band 4 AWS 1700 2100 12 2 kbps Band 5 UMTS 850 12 2 kbps Band 6 UMTS 800 12 2 kbps Band 8 UMTS 900 12 2 kbps Band 9 UMTS 1700 12 2 kbps Band 19 UMTS 800 12 2 kbps 23 1 Connectorized Class 3 ...

Page 52: ...500 2570 MHz 2620 2690 MHz Band 8 880 915 MHz 925 960 MHz Band 9 1749 9 1784 9 MHz 1844 9 1879 9 MHz Band 12 699 716 MHz 729 746 MHz Band 13 777 787 MHz 746 756 MHz Band 18 815 830 MHz 860 875 MHz Band 19 830 845 MHz 875 890 MHz Band 20 832 862 MHz 791 821 MHz Band 26 814 849 MHz 859 894 MHz Band 28 703 748 MHz 758 803 MHz Band 29 n a 717 728 MHz Band 30 n a 2350 2360 MHz Band 32 n a 1452 1496 MHz...

Page 53: ...z Band 4 1710 1755 MHz 2110 2155 MHz Band 5 824 849 MHz 869 894 MHz Band 6 830 840 MHz 875 885 MHz Band 8 880 915 MHz 925 960 MHz Band 9 1749 9 1784 9 MHz 1844 9 1879 9 MHz Band 19 830 845 MHz 875 890 MHz Table 3 5 RV55 LTE A Pro Radio Module EM7565 Global Continued Radio Technology SKU Band Frequency Tx Frequency Rx Generic Telstra ...

Page 54: ...d 5 Band 8 Band 9 Band 12 Band 13 Band 18 Band 19 Band 20 Band 26 Band 28 Band 30 Band 66 23 1 Band 7 Band 41 Band 42 Band 43 Band 48 22 1 UMTS Band 1 IMT 2100 12 2 kbps Band 2 UMTS 1900 12 2 kbps Band 4 AWS 1700 2100 12 2 kbps Band 5 UMTS 850 12 2 kbps Band 6 UMTS 800 12 2 kbps Band 8 UMTS 900 12 2 kbps Band 9 UMTS 1700 12 2 kbps Band 19 UMTS 800 12 2 kbps 23 1 Connectorized Class 3 ...

Page 55: ...16 MHz 734 746 MHz Band 18 815 830 MHz 860 875 MHz Band 19 830 845 MHz 875 890 MHz Band 20 832 862 MHz 791 821 MHz Band 26 814 849 MHz 859 894 MHz Band 28 703 748 MHz 758 803 MHz GSM GPRS EDGE Band 850 824 849 MHz 869 894 MHz Band 900 880 915 MHz 925 960 MHz Band 1800 1710 1785 MHz 1805 1880 MHz Band 1900 1850 1910 MHz 1930 1990 MHz Table 3 8 Radio Module WP7702 Conducted Transmit Power Band Condu...

Page 56: ...E2 0 4 W 26 dBm Table 3 9 GNSS Bands Supported Band Frequency GPS 1575 42 MHz GLONASS 1602 MHz Galileo 1575 42 MHz BeiDou 1561 098 MHz QZSS 1176 45 1575 42 MHz Table 3 10 GNSS DC Bias Voltage Signal Description Current Voltage Minimum Typical Maximum GNSS Signal Active bias on GNSS port 50 mA 75 mA 100 mA Maximum voltage output at 75 mA 3 3 V Table 3 8 Radio Module WP7702 Conducted Transmit Power ...

Page 57: ...nic and electrical equipment Figure 3 1 RV55 Router Mechanical Specifications Weight 320 g 119 mm 33 mm Reset button LEDs P o w e r A c t i v i t y S i g n a l N e t w o r k SIM card panel Cellular RF antenna Power connector Ethernet Serial RS 232 Rx Diversity USB GNSS Underside view Back view Front view 1 34 in 4 69 in 11 3 oz Wi Fi A antenna Wi Fi B antenna connector connector connector Wi Fi mo...

Page 58: ...V55 Hardware User Guide Rev 1 June 2019 58 41113042 Screw Torque Settings DIN rail mount screws 1 1 N m 10 in lb Antennas Finger tight 5 7 in lb is sufficient The max torque should not go beyond 1 1 N m 10 in lb ...

Page 59: ...nt in a residential area is likely to cause harmful interference in which case the user will be required to correct the interference at his own expense Warning Changes or modifications to this device not expressly approved by Sierra Wireless could void the user s authority to operate this equipment RF Exposure In accordance with FCC IC requirements of human exposure to radio frequency fields the r...

Page 60: ...TE B2 6 dBi 4 dBi WCDMA Band 4 LTE B4 6 dBi 4 dBi WCDMA Band 5 LTE B5 6 dBi 4 dBi Band 7 9 dBi 4 dBi Band 12 6 dBi 4 dBi Band 13 6 dBi 4 dBi Band 14 6 dBi 4 dBi Band 26 6 dBi 4 dBi Band 41 9 dBi 4 dBi Band 66 6 dBi 4 dBi AirLink RV55 EM7565 N7NEM75L 2417C EM75L WCDMA Band 2 LTE B2 6 dBi 4 dBi WCDMA Band 4 LTE B4 6 dBi 4 dBi WCDMA Band 5 LTE B5 6 dBi 4 dBi Band 7 9 dBi 4 dBi Band 12 6 dBi 4 dBi Ban...

Page 61: ...n of Conformity made under Directive 2014 53 EU is available for viewing at source sierrawireless com resources airlink certification_and_type_approval RV55_ce_declaration_of_conformity WEEE Notice If you purchased your AirLink RV55 device in Europe please return it to your dealer or supplier at the end of its life WEEE products may be recognized by their wheeled bin label on the product label Air...

Page 62: ...ore cable 4 Molex female crimp terminals AWG 20 24 250 V 4 A Max phosphor bronze tin plated part number 43030 0001 1 Molex male 2 2P Ph 3 0 mm housing 250 V 5 A max PA65 black UL94V O part number 43025 0408 1 2 3 4 Power connector end view Power connector housing side view Pin Wire color Open 1 2 3 4 Red Black White Green 3048 mm 10 ft core cable Power connector housing Warning label Male housing ...

Page 63: ...ble A 2 Input Specifications Minimum Typical Maximum Input Input Voltage 90 VAC 100 240 VAC 264 VAC Input Frequency 47 Hz 50 60 Hz 63 Hz Note Input voltage range is 90 VAC to 264 VAC Maximum input current is 500 mA at 100 240 VAC Inrush current will not exceed 75 A at 100 240 VAC input and maximum load from a cold start at 25 C Table A 3 AC Power Adapter Output Specifications Minimum Typical Maxim...

Page 64: ...ional regulatory standards Table A 4 AC Power Adapter Environmental Specifications Operating Operating Temperature 0 C 40 C operates normally Relative Humidity 10 90 Altitude Sea level to 2 000 meters Vibration 1 0 mm 10 55 Hz 15 minutes per cycle for each axis X Y Z Non operating Storage Temperature 30 C 70 C Relative Humidity 10 90 Vibration and Shock MIL STD 810D method 514 Table 1 5 AC Power A...

Page 65: ...ective 2011 65 EU RoHS EU Directive 2012 19 EU WEEE REACH AC Power Adapter Energy Efficiency The AC adapter complies with International Efficiency Levels as shown in Table A 6 Table A 6 AC Adapter Energy Efficiency Supplied Input No load power consumption Average active mode efficiency International Efficiency Level 115 VAC 60 Hz Less than 0 1 W Greater than 85 VI 230 VAC 50 Hz Less than 0 3 W Gre...

Page 66: ...onnector Pin Assignment Description Type Port 3 Pin Port 1 Pin Port 2 Pin Port 2 Clear To Send OUT 1 8 Port 1 Transmit Data OUT 2 2 Port 1 Receive Data IN 3 3 Port 2 Receive Data IN 4 3 Main GND Connected internally to BOARD GND GND 5 5 5 Port 2 Transmit Data OUT 6 2 Port 1 Ready To Send IN 7 7 Port 1 Clear To Send OUT 8 8 Port 2 Ready To Send IN 9 7 Pin 1 Pin 9 Pin 1 Pin 9 Pin 1 Pin 9 Port 3 Port...

Page 67: ... 54 Frequency bands 52 Ethernet LEDs 37 Specification 22 Ethernet virtual Ethernet port 22 F Features 8 Fusing 24 G GNSS 46 GNSS bands supported 56 Grounding the chassis 19 H Host Interfaces 44 I I O Configuration 29 Input Analog 33 Dry contact switch 32 Ignition switch 31 Installation Connect data cables 21 Connect power cable 24 Connecting antennas 19 Fixed with I O 29 Fixed without I O 28 Inser...

Page 68: ... pin out 23 66 Serial port 22 45 Virtual serial port 22 SIM cards insert 16 SIM dual 14 Specifications 41 Environmental 41 GNSS 46 Regulatory 65 RF 19 Standards regulatory 65 T Tools required for install 15 U USB 22 V Vehicle installation Alternate 27 Recommended 27 Virtual port Ethernet or serial 22 Voltage input and ripple range 46 W Warranty 14 Wi Fi performance 47 Wiring diagrams 27 WP7702 rad...

Reviews: