background image

10

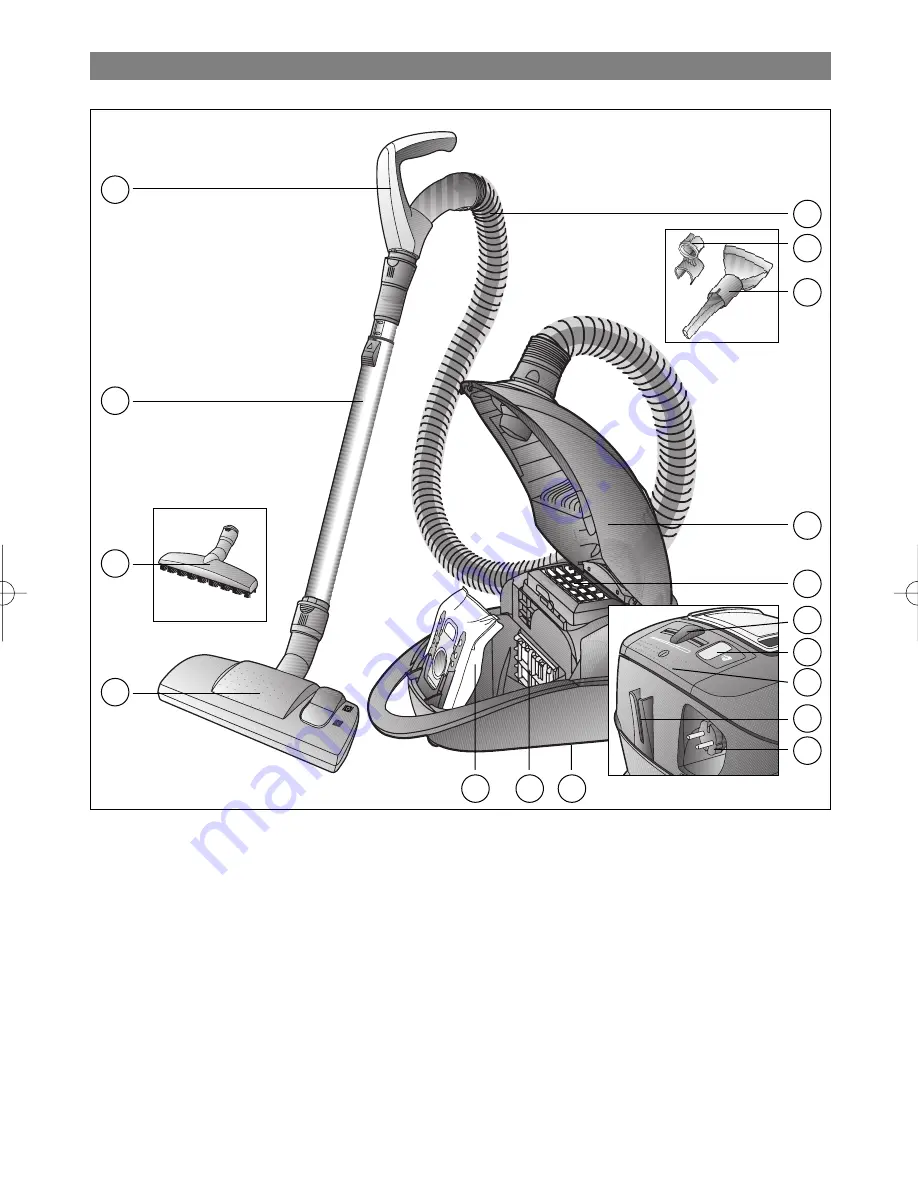
Your vacuum cleaner

en

14

13

12

11

10

9

8

7

6

5

4

3

1

17

16 15

2

9000 971 629 A  25.06.2014  9:38 Uhr  Seite 10

Summary of Contents for VSQ4G332

Page 1: ......

Page 2: ...2 ...

Page 3: ...4 Safety information 5 Disposal information 8 Notes on the energy label 9 Your vacuum cleaner 10 Optional accessories 12 Setting up 13 Vacuuming 16 When the work is done 18 Changing the dust bag and filters 20 Care 24 ...

Page 4: ...efore please note the following points The vacuum cleaner must only be operated with Original replacement parts accessories or special accesso ries In order to avoid invalidating the warranty we recommend that you operate your appliance using only original dust bags In order to prevent injuries and damage the vacuum cleaner must not be used for Vacuum cleaning persons or animals Vacuuming up insec...

Page 5: ...ental capacity or by persons with a lack of experience or knowledge if they are supervised or have been instructed on the safe use of the appliance and the have understood the potential dangers of using the appliance Children must never play with the appliance Cleaning and user maintenance must never be carried out by children without supervision Plastic bags and films must be kept out of the reac...

Page 6: ... service department or a similarlyqualified person If using the appliance for longer than 30 minutes pull out the power cord completely When disconnecting the appliance from the mains pull on the plug itself to remove it do not pull on the power cord When the cable is being automatically rewound ensure that the mains plug is not thrown towards persons body parts animals or objects Use the mains pl...

Page 7: ... and pull out the mains plug At the end of its life the appliance should immediately be rendered unusable then disposed of in an appropriate man ner Please note The mains socket must be protected by at least a 16 amp cir cuit breaker If a circuit breaker is tripped when you switch on the vacu um cleaner this may be because other electrical appliances which have a high current draw are connected to...

Page 8: ...nces still contain many valuable materials Therefore please take appliances that have reached the end of their service life to your retailer or recycling centre so that they can be recycled For current disposal methods please enquire at a retailer or your local council Disposal of filters and dust bags Filters and dust bags are manufactured from environmentally friendly materials Provided they do ...

Page 9: ... class on carpet please use the interchangeable univer sal nozzle To achieve the declared energy efficiency and cleaning perfor mance class on hard floor with nooks and crannies please use the hard floor nozzle provided The values provided on the energy label have been determi ned according to the prescribed measuring process in accordance with EN60312 1 ...

Page 10: ...10 Your vacuum cleaner en 14 13 12 11 10 9 8 7 6 5 4 3 1 17 16 15 2 ...

Page 11: ...ing switch and locking collar Handle Flexible hose Accessories holder for multi purpose nozzle Multi purpose nozzle Cover Exhaust filter Electronic slide control Dust bag change indicator ON OFF button Parking aid Power cord Storage aid on underside of unit Motor protection filter Dust bag 16 15 17 14 13 12 11 10 9 8 7 6 5 4 3 2 1 ...

Page 12: ...ERSAL brush VZ102TBB All in one brushing and vacuuming of short pile pile rugs and carpets and all hard floor coverings Especially suitable for picking up pet hair The brush roller is driven by the air flow through the vacuum cleaner No separate electrical connection is needed Hard floor brush VZ123HD For vacuuming hard floors parquet flooring tiles laminate etc Product code 575 069 ...

Page 13: ...n your purchase of a Siemens VSQ4 vacuum cleaner This instruction manual describes various VSQ4 models which means that some of the equipment features and functions described may not be available on your model You should only use original Siemens accessories which have been specially developed for your vacuum cleaner to achieve the best possible vacuuming results CLICK Push the handle into the tel...

Page 14: ... sliding switch in the direction of the arrow 1 2 Attach the accessories holder to the multi purpose nozzle and clip it onto the suction pipe telescopic tube Setting up en Push the telescopic tube straight into the connecting piece of the floor tool until it engages ...

Page 15: ...15 Press the ON OFF button in the direction of the arrow to switch your vacuum cleaner on Setting up en Take the mains plug pull the mains cable to the required length and insert the plug into a socket ...

Page 16: ...tubborn dirt and very heavily soiled surfaces min max Adjusting the floor tool For vacuuming rugs and carpets For vacuuming hard floors Caution Floor tools are subject to a certain amount of wear depending on the type of hard floors you have e g rough rustic tiles Therefore you must check the underside of the floor tool at regular intervals Worn undersides of floor tools may have sharp edges that ...

Page 17: ...r coverings tiles parquet flooring etc Push the telescopic tube into the connect ing piece of the hard floor brush until it engages Press on the unlatching sleeve and pull out the telescopic tube to disconnect Once you have switched off the vacuum cleaner you can use the parking aid on the back of the vacuum cleaner if you wish to stop vacuuming for a short time To do this slide the catch on the f...

Page 18: ... done en To store or transport the vacuum cleaner use the storage aid on the underside of the vacuum cleaner Stand the vacuum cleaner up on its end Slide the catch on the floor tool into the groove on the underside of the vacuum cleaner To remove the flexible hose press the release button and pull the hose out 1 1 2 ...

Page 19: ...To release the connection squeeze the locking collar and pull the telescopic tube out When the work is done en To release the connection squeeze the locking collar and pull the telescopic tube out 1 2 2 1 ...

Page 20: ...on power is selected the dust bag must be changed even though it may not yet be full In this case it is essential to change the dust bag due to the type of material it contains First check that the nozzle suction pipe and flexible hose are not blocked as this would also lead to the dust bag change indicator being triggered Open the lid by moving the locking lever in the direction of the arrow ...

Page 21: ...g compartment as far as possible You can order new filters from our after sales service using the following replacement part number 575 069 When closing the dust bag compartment lid make sure that the dust bag is not trapped Caution the dust bag compartment lid will only close when the dust bag or textile dust bag is inserted If the dust bag change indicator is still lit after the dust bag has bee...

Page 22: ... service using the following replacement part number 618 907 Open the dust bag compartment lid Release the motor protection filter from the catch and pull it out in the direction of the arrow Put the new motor protection filter into the appliance lock in place and close the dust bag compartment lid Caution The vacuum cleaner must not be operated without the motor protection filter ...

Page 23: ...our after sales service using the following replacement part number 574 020 Open the dust bag compartment lid Unlock the HEPA filter by pushing the locking tab in the direction of the arrow and remove it from the vacuum cleaner Insert the new HEPA filter and clip in place If you have used the vacuum cleaner for fine dust particles such as plaster or cement replace the motor protection filter and e...

Page 24: ...ic accessories can be cleaned with a commercial plastic cleaner Do not use a scourer glass cleaning agent or all purpose cleaning product Never immerse the vacuum cleaner in water The dust compartment can if necessary be cleaned with a second vacuum cleaner or simply wiped with a dry cloth or dusting brush Subject to technical modifications Care en ...

Page 25: ...25 ...

Page 26: ...26 ...

Page 27: ...27 ...

Page 28: ...28 ...

Page 29: ...nce the guarantee conditions as set out by our representatives in the country of sale apply Details regarding same may be obtained from the dealer from whom the appliance was purchased For claims under guarantee the sales receipt must be produced ...

Page 30: ... European Directive 2012 19 EU concerning used electrical and electronic appliances waste electrical and electronic equipment WEEE The guideline determines the framework for the return and recycling of used appliances as applicable throughout the EU ...

Page 31: ...31 ...

Page 32: ...32 ...

Page 33: ...33 ...

Page 34: ...34 ...

Page 35: ...35 The design of this product is environmentally friendly All plastic parts are marked for recycling Printed on recycled paper ...

Page 36: ...04 14 9000 971 629 A A ...

Reviews: