background image

en

18

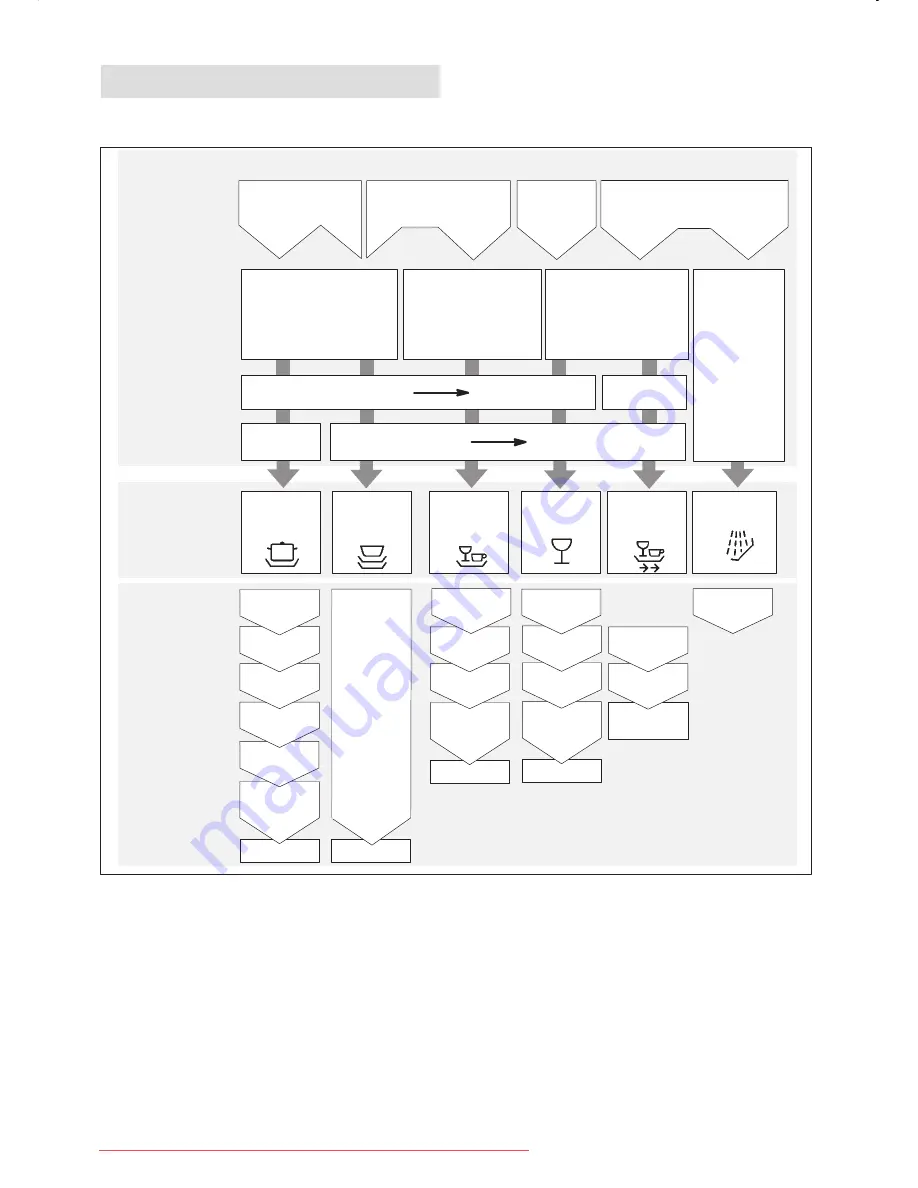
Programme overview

This overview lists the max. possible number of programmes. The programmes supplied with your
appliance are indicated on the fascia.

Type of crockery
e.g.china,

pots/pans,
cutlery,
glasses,
etc.

Type of food
remains

Amount of
food remains

Condition of
food remains

Wash 
programme

Programme 
sequence

Nondelicate

Soups, casseroles,

sauces, potatoes,

pasta, rice, eggs,

roast or fried food

Soups, potatoes,

pasta, rice, eggs,

roast or fried food

Coffee, cakes,
milk, sausage,

cold drinks, 

salads

a lot

very little

stuck

on hard

Auto

 55

°

⁄65

°

Intensive

70

°

Eco

 50

°

Quick

45

°

Pre-rinse

Rinse-aid

70

°

Drying

Drying

Drying

 Main rinse

Main rinse

Rinse-aid

55

°

Wash

45

°

Rinse-aid

65

°

Wash

50

°

Rinse off if

the dishes

have been

stacked for

several

days in the

dishwasher

prior to

washing.

Pre-rinse

Mixed

Delicate

Mixed

 Gentle

40

°

Pre-rinse

Wash

40

°

 Main rinse

Rinse-aid

55

°

Drying

a little

loosely attached

Third

rinse

Pre-rinse

50

°

Wash

70

°

First rinse

Second

rinse

medium

The programme sequence is

optimized and adapted with how

the appliance is loaded and how

dirty the dishes are.

Pre-rinse

Programme selection

The most appropriate programme can be
identified by comparing the type of
crockery, cutlery, etc., as well as the
amount and condition of food remains,
with the details contained in the
programme overview.

You will find the appropriate programme
information in the introduction.

Downloaded from DishWasher-Manual.com Manuals

Summary of Contents for SF 65T350

Page 1: ... Downloaded from DishWasher Manual com Manuals ...

Page 2: ...Downloaded from DishWasher Manual com Manuals ...

Page 3: ...rinse aid container 9 Not suitable for the dishwasher 10 Arranging crockery glasses etc in the dishwasher 11 Detergents 15 auto 3in1 16 Programme overview 18 Washing dishes 19 Maintenance and care 21 Fault finding 23 Customer Service 26 Information 26 Installation 27 Waste disposal 29 Downloaded from DishWasher Manual com Manuals ...

Page 4: ...rical connection conditions must correspond with the specifications on the rating plate of the dishwasher If the dishwasher is to be installed in a high sided unit ensure that the unit is attached properly and also at the rear Built under and built in appliances should always be installed under a continuous work surface which is attached to the adjacent cupboards in order to ensure that the applia...

Page 5: ...eep infants away from the open dishwasher It could contain residue of the cleaning agent If a fault occurs Repairs or other work on the dishwasher should only be carried out by a qualified specialist The dishwasher must be disconnected from the electricity supply before any repairs or other work are started Pull the mains plug out of the wall socket or switch off at the fuse box Grasp the plug to ...

Page 6: ... included with all models Appliance interior 20 Upper basket with 2 tiered cup rack 21 Additional cutlery basket for the top basket 22 Upper spray arm 23 Lower spray arm 24 Container for special salt with level indicator 25 Filters 26 Cutlery basket 27 Lower basket 28 Lock for detergent dispenser 29 Container for rinse aid with level indicator 30 Detergent compartment 31 Nameplate not on all model...

Page 7: ...u with this Identify setting from the following water hardness table Water hardness table Press and hold the B programme button and set the main switch 1 to ON before releasing the programme button again The indicator lamp for the B button flashes as does the figure in the numerical display The latter represents the value that was pre set in the factory To change the setting Press the B programme ...

Page 8: ...t the overflowing salt solution will be immediately diluted and rinsed out Then remove salt residue from the filler area and screw on the dispenser cover ensuring that it is not fitted askew not included with all models The LOW SALT indicator 6 on the front panel will light up initially but will extinguish again after a short period when the salt solution has become sufficiently concentrated Note ...

Page 9: ...omestic dishwashers Spilt rinse aid may result in excessive foam formation in the next rinse cycle Therefore remove any spilt rinse aid with a cloth Adjusting the amount of rinse aid The amount of rinse aid added to the water can be varied by adjusting the stepless control The rinse aid control has been set to 4 in the factory Do not alter the setting of the rinse aid control unless streaks turn k...

Page 10: ...asher The following should not be cleaned in the dishwasher Wooden cutlery and utensils these will leach out and become unsightly even the utilised stickers are not suitable for the temperatures which occur Sensitive ornamental glasses craft utensil and vases special antique or irretrievable utensils These ornaments are not dishwasher proof Plastic parts sensitive to hot water Copper and tin utens...

Page 11: ...s energy and water If you select the UPPER RACK function the lower rack must be empty Add a reduced amount of detergent compared to that which is recommended for a full load Arranging crockery glasses etc in the dishwasher Loading the dishwasher Scrape off any large amounts of left over food It is not necessary to rinse the dishes under running water Place objects in the dishwasher in such a way t...

Page 12: ...ng pointed accessories and knives on the étagère some models or on the knife shelf available as an accessory Folding spikes on applicable models To improve stacking of pots and pans the spikes can be folded down Shelf not on all models Lean tall glasses and those with long stems against the shelf not against other items to be washed Place glasses cups and small bowls on the additional cup rack The...

Page 13: ...lers according to requirement This enables more height to be gained for bigger dishes in either the top or bottom basket Top basket with side levers Rackmatic Pull out the top basket To lower the basket press in succession the two levers on the left and right sides of the basket Always take hold of the side of the basket on the upper edge otherwise the basket will not drop smoothly and may damage ...

Page 14: ...pper spray arm will not connect to the water circuit Baking sheet spray head some models You can clean large baking sheets or grilles with the baking sheet spray head To do this remove the top basket and insert the spray head as illustrated in the diagram To ensure that the spray jet can reach all parts arrange the baking sheets as illustrated max 2 baking sheets and 2 grilles Downloaded from Dish...

Page 15: ...particular product is suitable for use with silverware If you have any further questions we recommend that you contact the customer advice departments of the various detergent manufacturers Detergent compartment with measuring marks The side of the detergent compartment is marked with lines to help you determine how much powder to add The capacity of the detergent container is 15 ml up to the bott...

Page 16: ...nt rinse aid and salt function 2in1 They contain detergent and rinse aid or salt function Always check the type of detergent or combined product which you are using Always follow the operating instructions or the information on the packaging The rinse programme is automatically adjusted in order to obtain the best possible rinsing and drying result Observe the following important information if us...

Page 17: ... switch on the rinse aid indicator Switch off the main switch 1 the setting is saved Switching the salt refill indicator water softening system off and on Hold down the programme button B and switch on the main switch 1 then release the buttons The illuminated button B and the factory set value on the digital display flash To change the setting press the programme button B Each time the button is ...

Page 18: ...Drying Main rinse Main rinse Rinse aid 55 Wash 45 Rinse aid 65 Wash 50 Rinse off if the dishes have been stacked for several days in the dishwasher prior to washing Pre rinse Mixed Delicate Mixed Gentle 40 Pre rinse Wash 40 Main rinse Rinse aid 55 Drying a little loosely attached Third rinse Pre rinse 50 Wash 70 First rinse Second rinse medium The programme sequence is optimized and adapted with h...

Page 19: ...e water is drained and is replaced with fresh water In this way the water consumption is reduced by approx 4 litres for utensils which are less dirty Switching the dishwasher ON Turn on the tap Set main switch 1 to ON Indicators light up according to the last programme that was selected This same programme will run again if no other programme button 9 is pressed For appliances with top basket feat...

Page 20: ...s ended Open the door when the programme has ended Set main switch 1 to OFF Turn the water tap off Does not apply when Aqua Stop unit has been fitted Remove dishes etc when they have cooled down Interrupting the programme Open the door Caution There is a risk of water squirting out from inside the appliance Do not open the door fully until the spray arm has stopped rotating Set main switch 1 to OF...

Page 21: ...he setting is stored Maintenance and care A regular inspection and maintenance of your machine will help to prevent faults This saves time and prevents problems Therefore you should occasionally have a careful look inside your dishwasher Overall condition of the machine Check spray arm for grease and limescale deposits If you find such deposits Fill the detergent dispenser with detergent start the...

Page 22: ...ning water Insert the filter unit and tighten the coarse micro filter Coarse microfilter Spray arms Lime and remnants of food in the washing water can block the nozzles in the spray arms 22 and 23 and the arm mountings Inspect the nozzles in the spray arms for blocked holes due to remnants of food If necessary pull the lower arm 23 upwards and lift it off Unscrew the upper spray arm 22 Clean both ...

Page 23: ...ppliance is switched on The appliance does not start The mains fuse has tripped The appliance plug has not been inserted The appliance door has not been shut properly The tap has not been turned on The filter on the water supply hose is blocked Switch off the appliance and pull out the mains plug Turn off the tap Then clean the filter which is situated at the connection of the supply hose Finally ...

Page 24: ...e 0 Perform Reset function during washing Unusual amount of foam is created Normal washing up liquid has been poured into the rinse aid container Remove any spilled rinse aid with a cloth as it could otherwise lead to excessive foaming during the next washing cycle Appliance stops suddenly while washing is taking place Cut in electricity supply to appliance Water supply has been interrupted Knocki...

Page 25: ...s set too low Lid on salt container is not screwed tight If you used a phosphate free detergent try a detergent containing phosphates and compare results Dishes cutlery etc have not been dried Selected programme did not include drying function Amount of rinse aid was set too low Items were removed from dishwasher too soon Glasses have a dull appearance Amount of rinse aid was set too low Tea stain...

Page 26: ... conditions for the comparison tests on the additional Notes on comparison tests sheet The consumption values for the relevant programmes are given in the introduction General Built under and integrated appliances which are subsequently installed as free standing appliances must be secured to prevent them from falling over e g by screwing them to the wall or by installing them under a continuous w...

Page 27: ...Ensure that the drainage hose is not kinked crushed or twisted ensure that there is no sealing cover which prevents the waster water from flowing away Fresh water connection Using the enclosed parts connect the fresh water connection to the tap according to the installation instructions Ensure that the fresh water connection is not kinked crushed or twisted When replacing the appliance always conn...

Page 28: ...ay seep into the control module and cause subsequent errors with programme functions The appliance must be drained in the following sequence Turn on the tap Set main switch to ON Select the B programme The programme duration in minutes is shown in the numerical display Close the door Wait for approximately 4 minutes Terminate the programme by pressing A and C simultaneously The time display change...

Page 29: ... inquire at your local authority about current means of disposal Keep children away from shipping carton and packaging components Danger of suffocation from folding cartons and plastic film Disposal of the packaging Please dispose of the packaging material in an environmentally friendly manner Corrugated cardboard consists mainly of wastepaper The moulded polystyrene parts do not contain any chlor...

Page 30: ...en 30 en Subjekt to modification Downloaded from DishWasher Manual com Manuals ...

Page 31: ...Downloaded from DishWasher Manual com Manuals ...

Page 32: ... 34 4 4 4 00 2 7 4 52 3425 4 3 3 3 5 3 22 4 34 4 4 15 4 0 84 3 2 33 29 52 7 22 49 3 4 6 2 4 6 3500 9 3 2 44 3 50 4 4 15 4 0 4 4 4 0 02 0 4 3 4 33 29 4 4 2 00 44 7 4 15 4 0 52 0 2 4 2 4 3 52 4 4 27 2 3 9 452 4 4 0 5 3 5 9 452 4 4 0 9 5 2 3 4 2 2 02 0 2 9 2 3 6 2 7 3 Siemens Electrogeräte GmbH Carl Wery Straße 34 81739 München To contact us directly use the tel no or fax no in the enclosed customer ...

Reviews: