background image

4

Contents

Gigaset SL785 / EN-US / A31008-M2009-R301-2-6019 / SL785IVZ.fm / 27.02.2009

Ve

rs

ion 4,

 16

.09.

2005

Operating the answering machine on the Gigaset SL785 
base station   . . . . . . . . . . . . . . . . . . . . . . . . . . . . . . . . . . . . . . . . . .   35

Using the handset  . . . . . . . . . . . . . . . . . . . . . . . . . . . . . . . . . . . . . . . . . . . . .  35
Activating/deactivating call screening . . . . . . . . . . . . . . . . . . . . . . . . . . . . . .  38
Setting the recording parameters  . . . . . . . . . . . . . . . . . . . . . . . . . . . . . . . . .  38
Resetting fast access for the answering machine using key 1  . . . . . . . . . . .  39
Operating remotely  . . . . . . . . . . . . . . . . . . . . . . . . . . . . . . . . . . . . . . . . . . . .  39

Using the network mailbox . . . . . . . . . . . . . . . . . . . . . . . . . . . . . .   40

Configuring Fast Access for the network mailbox . . . . . . . . . . . . . . . . . . . . .  40
Viewing the network mailbox message   . . . . . . . . . . . . . . . . . . . . . . . . . . . .  40

ECO DECT . . . . . . . . . . . . . . . . . . . . . . . . . . . . . . . . . . . . . . . . . . . . .   41
Setting an appointment (calendar)  . . . . . . . . . . . . . . . . . . . . . . .   41

Displaying missed appointments, anniversaries . . . . . . . . . . . . . . . . . . . . . .  43

Setting the alarm clock  . . . . . . . . . . . . . . . . . . . . . . . . . . . . . . . . .   43
Using several handsets  . . . . . . . . . . . . . . . . . . . . . . . . . . . . . . . . .   44

Registering handsets  . . . . . . . . . . . . . . . . . . . . . . . . . . . . . . . . . . . . . . . . . . .  44
Deregistering handsets  . . . . . . . . . . . . . . . . . . . . . . . . . . . . . . . . . . . . . . . . .  44
Locating a handset ("paging")  . . . . . . . . . . . . . . . . . . . . . . . . . . . . . . . . . . . .  44
Changing the base station   . . . . . . . . . . . . . . . . . . . . . . . . . . . . . . . . . . . . . .  45
Making internal calls  . . . . . . . . . . . . . . . . . . . . . . . . . . . . . . . . . . . . . . . . . . .  45
Listening in to an external call   . . . . . . . . . . . . . . . . . . . . . . . . . . . . . . . . . . .  46
Changing the name of a handset  . . . . . . . . . . . . . . . . . . . . . . . . . . . . . . . . .  46
Changing a handset's internal number  . . . . . . . . . . . . . . . . . . . . . . . . . . . . .  46

Using a handset as a room monitor  . . . . . . . . . . . . . . . . . . . . . . .   47
Using Bluetooth devices   . . . . . . . . . . . . . . . . . . . . . . . . . . . . . . . .   48
Handset settings   . . . . . . . . . . . . . . . . . . . . . . . . . . . . . . . . . . . . . .   50

Quickly accessing functions and numbers   . . . . . . . . . . . . . . . . . . . . . . . . . .  50
Changing the display language . . . . . . . . . . . . . . . . . . . . . . . . . . . . . . . . . . .  51
Setting the display  . . . . . . . . . . . . . . . . . . . . . . . . . . . . . . . . . . . . . . . . . . . . .  51
Activating/deactivating auto answer . . . . . . . . . . . . . . . . . . . . . . . . . . . . . . .  52
Changing the handsfree/earpiece volume   . . . . . . . . . . . . . . . . . . . . . . . . . .  52
Changing ringers  . . . . . . . . . . . . . . . . . . . . . . . . . . . . . . . . . . . . . . . . . . . . . .  52
Using the Resource Directory   . . . . . . . . . . . . . . . . . . . . . . . . . . . . . . . . . . . .  54
Activating/deactivating advisory tones  . . . . . . . . . . . . . . . . . . . . . . . . . . . . .  55
Setting long-distance and area codes  . . . . . . . . . . . . . . . . . . . . . . . . . . . . . .  55
Restoring the handset default settings  . . . . . . . . . . . . . . . . . . . . . . . . . . . . .  56

Base station settings  . . . . . . . . . . . . . . . . . . . . . . . . . . . . . . . . . . .   56

Protecting against unauthorized access  . . . . . . . . . . . . . . . . . . . . . . . . . . . .  56
Activating/deactivating music on hold  . . . . . . . . . . . . . . . . . . . . . . . . . . . . .  56
Restoring the base station to the factory settings   . . . . . . . . . . . . . . . . . . . .  56

Summary of Contents for Gigaset SL785

Page 1: ...f the trademark Siemens Gigaset Communications GmbH 2009 All rights reserved Subject to availability Rights of modification reserved www gigaset com Bedienungsanleitung Mittelgrau BA_Phones_C class Orange BA_Broadband Rot BA_Phones_VoIP Hellgrau BA_Phones_Essential Weiß BA_Home Media 20 01 09 V7 Black Cyan Magenta Yellow ...

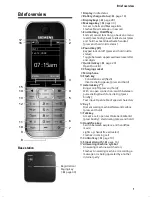
Page 2: ... call flash Insert a dialing pause press and hold 11 Asterisk key Ringer on off press and hold With an open connection switch between pulse dialing touch tone dialing press briefly Text input Open table of special characters 12 Key 1 Dial answering machine Network mailbox press and hold 13 Talk key Accept a call open Last Number Redial list press briefly start dialing press and hold 14 Handsfree k...

Page 3: ...tment page 41 Anniversary page 32 Ø Ú Alarm clock page 43 Signal strength page 16 or Eco mode symbol page 41 Answering machine switched on Bluetooth activated page 48 or ô õ Bluetooth headset data device connected Ringer switched off page 53 Keypad lock switched on page 22 Battery charging page 16 Battery charge status page 16 Number of new messages u In the list of missed appointments page 43 u I...

Page 4: ...e 19 Using the Control key 19 Using the Display keys 20 Using the keys on the keypad 20 Correcting incorrect entries 20 Using the menus 21 Activating deactivating the handset 22 Activating deactivating the keypad lock 22 Using this guide 23 Menu tree 25 Making calls 27 Making an external call 27 Ending a call 27 Accepting a call 27 Using Caller ID 28 Using the Handsfree feature 28 Switching to mut...

Page 5: ...44 Locating a handset paging 44 Changing the base station 45 Making internal calls 45 Listening in to an external call 46 Changing the name of a handset 46 Changing a handset s internal number 46 Using a handset as a room monitor 47 Using Bluetooth devices 48 Handset settings 50 Quickly accessing functions and numbers 50 Changing the display language 51 Setting the display 51 Activating deactivati...

Page 6: ...ing DTMF 57 Questions and answers 58 Protecting our environment 59 Appendix 60 Caring for your phone 60 Contact with liquid 60 Specifications 60 Writing and editing text 61 Additional functions in the PC interface 61 Industry Canada Certification 63 FCC ACTA Information 63 Safety precautions 64 End user limited warranty 66 Mounting the base station to the wall 72 Index 73 ...

Page 7: ...e headset is connected Using your telephone may affect nearby medical equipment Be aware of the technical conditions in your particular environment such as a doctor s office Do not hold the rear of the handset to your ear when it is ringing or when the handsfree function is activated Otherwise you risk serious and permanent damage to your hearing Do not install the charging cradle in bathrooms or ...

Page 8: ...that also use this technology u Synchronize your address books on your telephone mobile phone and PC with BluetoothTM or using the USB port and Gigaset QuickSync software u Save appointments and anniversaries in your phone and it will remind you of them in advance u Designate important people as VIPs so you can identify important calls from the ringer u Program the keys of your phone with importan...

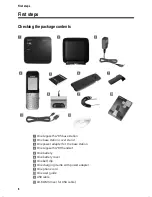
Page 9: ... station 2 One base station cover stand 3 One power adapter for the base station 4 One Gigaset SL78H handset 5 One battery 6 One battery cover 7 One belt clip 8 One charging cradle with power adapter 9 One phone cord J One user guide K USB cable L CD ROM driver for USB cable 2 1 3 5 7 6 8 4 9 K J L ...

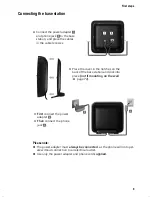
Page 10: ...electrical outlet u Use only the power adapter and phone cord supplied 1 3 2 1 1 4 Connect the power adapter 1 and phone jack 2 to the base station and place the cables in the cable recesses Place the cover in the notches on the back of the base station and click into place not if mounting on the wall page 72 First connect the power adapter 3 Then connect the phone jack 4 ...

Page 11: ...central location in your house or apartment or mount the base station on the wall page 72 Please note u Keep in mind the range of the base station It is up to 985 feet 300 m in unobstructed outdoor areas and up to 165 feet 50 m inside build ings The range is reduced when Eco mode page 41 is activated u Never expose the telephone to heat sources direct sunlight or other electrical devices u Protect...

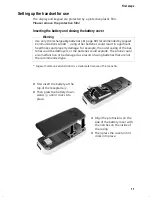
Page 12: ...isks and property damage For example the outer casing of the bat teries could be destroyed or the batteries could explode The phone could also malfunction or be damaged as a result of using batteries that are not the recommended type Gigaset Communications GmbH is a trademark licensee of Siemens AG First insert the battery at the top of the receptacle a Then press the battery down wards b until it...

Page 13: ...n in the cavity in the casing and pull the battery upwards Attaching removing the belt clip The handset has notches on each side to attach the belt clip To attach Press the belt clip onto the back of the handset so that the protrusions on the belt clip engage the notches To remove Using your right thumb apply pressure to the center right of the belt clip push the fingernail of your left index fing...

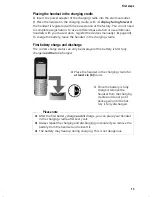
Page 14: ...set in the charging cradle First battery charge and discharge The correct charge status can only be displayed if the battery is first fully charged and then discharged Please note u After the first battery charge and discharge you can place your handset in the charging cradle after every call u Always repeat the charging and discharging procedure if you remove the battery from the handset and rein...

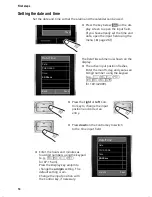
Page 15: ... display The active input position flashes Enter the month day and year as an 8 digit number using the keypad e g Q 4 2QQO for 10 14 2009 Date Time Date 00 00 0000 Time 00 00am Back Save Time Press the right or left Con trol key to change the input position and correct an entry Enter the hours and minutes as four digit numbers using the keypad e g QM 5 for 07 15 am Press the Display key am pm to c...

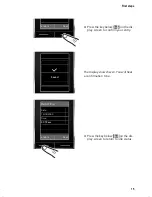
Page 16: ...ow Save on the dis play screen to confirm your entry The display shows Saved You will hear a confirmation tone Press the key below Back on the dis play screen to return to idle status am pm Save Saved Date Time Date 10 14 2009 Time 07 15am am pm Save ...

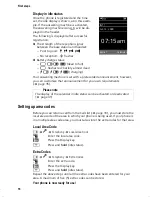
Page 17: ...r own requirements page 35 Setting up area codes Before you can return a call from the Calls list page 33 you must store the local area code of the area in which your phone is being used If your phone is in a multiple area code area you must also store the extra codes for that area Local Area Code v Ï Telephony Local Area Code Enter the local area code Save Press the Display key a Press and hold i...

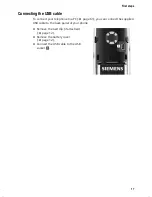
Page 18: ...the USB cable To connect your telephone to a PC page 61 you can connect the supplied USB cable to the back panel of your phone Remove the belt clip if attached page 12 Remove the battery cover page 12 Connect the USB cable to the USB socket 1 1 ...

Page 19: ...ve any questions about using your phone please read Questions and answers page 58 or contact our Customer Care team page 66 Information on is located here Setting the ringer and volume page 52 Setting the handset volume page 52 Recording your own announcement for the answering machine page 35 Setting Eco mode page 41 Operating the telephone on a PABX page 57 Registering existing Gigaset handsets t...

Page 20: ...wn line by line In input fields You can use the Control key to move the cursor up t down s right v or left u Press and hold v or u to move the cursor word by word During an external call s Open the directory u Initiate an internal consultation call t Adjust the loudspeaker volume for earpiece and handsfree mode Functions when pressing the middle of the Control key Depending on the operating situat...

Page 21: ...he keys on the keypad c Q etc Press the matching key on the handset Enter digits or letters Correcting incorrect entries You can correct incorrect characters in the input fields by navigating to the incorrect entry using the Control key You can then u Press Ñ to delete the character to the left of the cursor Press and hold Ñ to delete the word to the left of the cursor u Insert characters to the l...

Page 22: ...or the End Call key a to revert back to idle status Submenus The functions in the submenus are displayed as lists example on the right To access a function Scroll to the function with the Control key q and press OK Briefly press the Display key Back or the End Call key a to return to the previous menu level cancel the operation Reverting to idle status You can revert to idle status from anywhere i...

Page 23: ...d lock The keypad lock prevents any inadvertent use of the phone Press and hold the Pound key in idle status to activate or deactivate the keypad lock You will hear the confirmation tone When the keypad lock is activated you will see the icon on the display and a message when you press a key The keypad lock is deactivated automatically if someone calls you It is reacti vated when the call is finis...

Page 24: ... v to open the main menu Use the right left down and up Control key p to navigate to the Settings submenu Press the Display key OK to confirm your selection Press down on the Control key s until the Telephony menu appears on the display Press the Display key OK to confirm your selection Settings Date Time Audio Settings Display Language Registration Telephony Back OK Settings ò É Í Ê Ì á Î Ï Back ...

Page 25: ...cted Press the Display key Change to activate deactivate the function Telephony Auto Answer Area Codes Listening In Dialing Mode Back Change Telephony Auto Answer Area Codes Listening In Dialing Mode Back Change Press the key below Back on the display to return to the previous menu level or Press and hold the End Call key a to return to idle status ...

Page 26: ...l Lists All Calls page 33 Outgoing Calls page 33 Accepted Calls page 33 Missed Calls page 33 Ì Voice Mail Play Messages Network Mailbox page 40 Answering Machine page 35 Activation page 35 Announcements Record Announcemnt page 35 Play Announcement page 36 Delete Announcemnt page 36 Record Advisory Msg page 35 Play Advisory Message page 36 Delete Advisory Msg page 36 Recordings page 38 Call Screeni...

Page 27: ...visory Tones page 55 Music on Hold page 56 Display Screensaver page 51 Backlight page 52 Language page 51 Registration Register Handset page 44 De register Handset page 44 Select Base page 45 Telephony Auto Answer page 52 Area Codes page 55 Listening In page 46 Dialing Mode page 57 Flash Duration page 57 Local Area Code page 16 Extra Codes page 16 System Eco mode page 41 System PIN page 56 Reset H...

Page 28: ...e ways by ringing by a display on the screen and by the flashing Handsfree key d You can accept the call by Pressing the Talk key c Pressing the Handsfree key d Press the Display key Ô to forward the call to the answering machine page 37 If the handset is in the charging cradle and the Auto Answer function is activated page 52 the handset will take a call automatically when you lift it out of the ...

Page 29: ...n for example on the table in front of you This allows others to participate in the call Activating deactivating handsfree mode Activating while dialing d Enter the number and press the Handsfree key You should inform your caller that you are using the handsfree function so that they know someone else is listen ing Switching between earpiece and handsfree mode d Press the Handsfree key During a ca...

Page 30: ... son Business name and phone number dial around name and code descriptive name and PIN etc Open the Quick list in idle status by pressing the C key Length of the entries Number max 32 digits Name max 16 characters Storing a number in the directory s New Entry You can enter data in the following fields First Name Last Name Enter first name and or last name If no name is entered in any of the fields...

Page 31: ...entries insert a space or a digit in front of the first letter of the last name These entries will then move to the beginning of the directory Selecting entries in the directory and Quick list s C Open the directory or Quick list You have the following options u Use s to scroll through the entries until the name you want is selected u Enter the first letters of the name max 8 characters if necessa...

Page 32: ...Select the internal number of the receiving handset and press OK You can transfer several individual entries one after the other by responding Yes to the Entry copied Copy next entry prompt A successful transfer is confirmed by a message and confirmation tone on the receiving handset Please note u Entries with identical numbers are not overwritten on the receiving handset u The transfer is cancele...

Page 33: ...ar page 41 s s Select entry View Edit Press the Display keys one after the other s Scroll to the Anniversary line v Select On You can enter data in the following fields Anniversary Date Enter month day year in 8 digit format Anniversary Time Enter the hour minute for the reminder call in 4 digit format Anniversary Signal Select the type of signal for the reminder Save Press the Display key Deactiv...

Page 34: ...31 Delete All as in the directory page 31 Using the Answering Machine Message list You can use the Answering Machine Message list to listen to the messages that are on the answering machine Using Call lists Requirement Caller ID service subscrip tion CID page 28 Your telephone stores various types of calls u Answered calls u Outgoing calls u Missed calls u Calls recorded by the answering machine Y...

Page 35: ... sounds as soon as a new message arrives in a list The f key flashes it goes off when the key is pressed In idle status the display shows an icon for the new message The number of new entries is displayed to the right of the corresponding icon List selection The lists displayed after pressing the Mes sage key f depend on whether there are any new messages u f key does not flash no new mes sages Al...

Page 36: ...a in the following fields Activation Select On or Off to activate deactivate the answering machine Mode Select Answer Record Answer only or Alternating If the Alternating mode is selected Record from Using 4 digit format enter hours min utes for the start of the period The time must be set on the phone beforehand Record until Using 4 digit format enter hours min utes for the end of the period Save...

Page 37: ... Press the Display key to con firm the prompt Once you have deleted your announce ment the relevant prerecorded announcement will be used again Playing back messages The date and time of each message is logged provided this has been set page 14 and displayed during the playback If caller ID is activated the caller s number is displayed If the caller s number is saved in the directory the caller s ...

Page 38: ...ally Deleting all old messages During playback or pause Options Delete Old List OK Press the Display key to con firm the prompt Yes Press the Display key to con firm the prompt Deleting individual old messages During playback or pause Delete Press the Display key Answering a call from the answering machine You can answer a call while the answering machine is recording or being operated through rem...

Page 39: ...activate the function Deactivating call screening for the current recording You can switch off the function on the handset during the recording Silence Press the Display key Setting the recording parameters The answering machine has already been preset at the factory Use the handset to make customized settings v Ì Recordings You can enter data in the following fields Length Select maximum recordin...

Page 40: ...stem PIN other than 0000 page 56 u The phone you are using for remote operation has touch tone dialing DTMF meaning you hear different tones when you press the keys Alterna tively you can use a code transmitter available from your mobile phone retailer Calling the answering machine and playing back messages Dial your own number 9 When you hear your announcement press 9 and enter the system PIN You...

Page 41: ...and entering the network mailbox number v Ì Set Key 1 Network Mailbox Select and press Select Ø selected Enter the number for the net work mailbox Save Press the Display key The setting for Fast Access applies to all Gigaset SL78H handsets Calling the network mailbox Press and hold You are con nected straight to the network mailbox d Press the Handsfree key d if required You will hear the network ...

Page 42: ...age 32 are automatically recorded in the calendar You can select whether the graphical cal endar should be displayed in idle status To do this select Calendar Options Show Cal in Idle display Press Change to activate deactivate the function on Saving an appointment Requirement The date and time have already been set page 14 v Í u Today s date is selected bordered in orange u Days on which appointm...

Page 43: ... page 52 and will sound for 60 sec onds For anniversaries the name is dis played for appointments the entered text is displayed along with the date and time You can deactivate an appointment reminder Off Press the Display key to deacti vate the appointment reminder Managing appointments Editing individual appointments r q Select a day in the graphical calendar and press the Control key w Days on w...

Page 44: ...ntment reminder will delete the oldest entry Setting the alarm clock Requirement The date and time have already been set page 14 Activating deactivating the alarm clock and setting the wake up time v You can enter data in the following fields Activation Select On or Off Time Enter the wake up time in 4 digit for mat Press the Display key am pm to change the am pm setting The default setting is am ...

Page 45: ...N is 0000 A message displays indicating that a search is in progress for a base station ready for registration On the base station Within 60 seconds press and hold the Registration Paging key on the base sta tion page 1 approx 3 seconds Registering other handsets You can register other Gigaset handsets and handsets of other devices with GAP Generic Access Profile functionality as follows On the ha...

Page 46: ...external call to another handset connect u Open the list of handsets The external party hears hold music if activated page 56 s Select a handset or Call All and press OK When the internal party answers If necessary announce the external call a Press the End Call key The external call is transferred to the other handset If the internal party does not answer or the line is busy press the Display key...

Page 47: ...activate the function on Internal listening in The line is busy with an external call Your screen will display information to that effect You want to listen in to the external call c Press and hold the Talk key You can listen in to the call All parties hear a signal tone During this time this hand set displays the Conference message and it is not possible to dial another number from this handset E...

Page 48: ...e room monitor is suspended for the duration of the call but the function remains acti vated If you deactivate then reactivate the hand set the room monitor remains activated Activating the room monitor and entering the destination number v É Room Monitor You can enter data in the following fields Activation Select On to activate Alarm to Select Internal or External External number Select the numb...

Page 49: ...he same phone number Turn on the activation again and save with Save page 47 Using Bluetooth devices Your Gigaset SL78H handset can commu nicate wirelessly with other devices using Bluetooth technology Before you can use your Bluetooth devices you must first activate Bluetooth and then register the devices to the hand set You can register one Bluetooth headset to the handset You can also register ...

Page 50: ...sted devices Open list v ò Known Devices A corresponding icon appears next to each device name in the list displayed If a device is connected the correspond ing symbol ò is shown in the header of the display Viewing entries Open list s select entry Options Press the Display key View Entry Select and press OK Device name and address are displayed Back with OK Deregistering Bluetooth devices Open li...

Page 51: ...h device v ò Own Device Change Press the Display key Change the name Save Press the Display key Handset settings Your handset is preconfigured but you can change the settings to suit your indi vidual requirements Quicklyaccessingfunctionsand numbers You can assign a number or a function to each of the Digit keys Q and 2 through O The left and right Display keys have a func tion preselected by defa...

Page 52: ...Proceed as described when first assign ing the key as a Quick Dial page 50 Changing the display language You can view the display texts in different languages v Ï Language The current language is indicated by a Ø s Select language and press Select If you accidentally choose a language you do not understand v Ï s s s Press keys in sequence and confirm by selecting OK s Select the correct language a...

Page 53: ...ifferent levels In idle status t Open the menu for setting the Call Volume r Set the earpiece volume s Scroll to the Speaker line r Set the handsfree volume Save Press the Display key if neces sary to save the setting per manently Setting the volume during a call t Press the Control key r Select volume The setting will automatically be saved after approx 3 seconds if not press the Display key Save...

Page 54: ...ting the ringer You can deactivate the ringer on your handset before you answer a call or when the handset is in idle status the ringer can be deactivated permanently or just for the current call The ringer cannot be reacti vated while an external call is in progress Deactivating the ringer permanently Press and hold the Asterisk key The ó icon appears in the display Reactivating the ringer Press ...

Page 55: ...nds select entry Pictures View Press the Display key The selected picture is displayed Use the q key to scroll between the pictures If you have saved a picture in an invalid data format you will see an error message after selecting the entry Sounds The selected sound is played back immedi ately Use the q key to scroll between the sounds You can set the volume during playback Volume Press the Displ...

Page 56: ...ing tone is activated deactivated and only sounds during a call Save Press the Display key Setting long distance and area codes To transfer phone numbers e g in vCards it is essential that your area code international and local area code is saved on the phone Some of these numbers are already pre set v Ï Telephony Area Codes Check that the pre set area code is cor rect You can enter data in the fo...

Page 57: ...g a system PIN facilitates remote operation of the answering machine page 39 v Ï System System PIN Enter the current system PIN and press OK Enter your new system PIN and press OK Returning to the default system PIN If you have forgotten your system PIN you can reset the base station to the original code 000 Disconnect the power cord from the base station Hold down the Registration Pag ing key on ...

Page 58: ...0 ms 180 ms 250 ms 300 ms 600 ms 800 ms Setting pauses Changing pause after line seizure You can change the length of the pause inserted between pressing the Talk key c and sending the number v Open the main menu Q5 L Press keys Enter digit for the pause length 1 1 sec 2 3 sec 3 7 sec and press OK Changing the pause after the Flash key You can change the length of the pause if your PABX requires t...

Page 59: ...ated Activate the ringer page 53 You cannot hear a ringer dial tone from the landline network The phone cord supplied has not been used or has been replaced by a new cord with the wrong pin connections Always use the phone cord supplied or ensure that the pin connections are correct when purchasing from a retailer page 9 Error tone sounds after system PIN prompt You have entered the wrong system P...

Page 60: ...nt Service GmbH ISO 9001 Quality Certified since February 17 1994 by TÜV SÜD Manage ment Service GmbH Ecological energy consumption The use of ECO DECT page 41 saves energy and actively contributes to envi ronmental protection Disposal Batteries should not be disposed of in gen eral household waste Observe local waste disposal regulations details of which can be obtained from your local authority ...

Page 61: ...inuous advances in battery technology we regularly update the list of recommended batteries in the FAQ sec tion of the Gigaset Customer Care pages www gigaset com customercare Handset operating and charging times The operating time of your phone depends on the capacity and age of the battery as well as the way you use the device All times are maximum possible times and apply when the display back ...

Page 62: ...from Abc to 123 mode from 123 to abc mode and from abc to Abc mode upper case 1st letter uppercase all others low ercase Press the Pound key before entering the letter You can see on the display whether upper case letters lowercase letters or digits is selected Additional functions in the PC interface You can connect your handset to your computer using Bluetooth page 48 or the supplied USB cable I...

Page 63: ...the Device tab Click Firmware Update This launches the firmware update The data is initially loaded from the update server over the Internet The amount of time this takes depends on the speed of your Internet connection The display on your phone is switched off and the Message key f and Handsfree key d start flashing The update process can take up to 10 min utes not including the download time Do ...

Page 64: ...est con forme à la norme NMB 003 du Canada FCC ACTA Information Warning Changes or modifications to this unit not expressly approved by Gigaset Commu nications USA LLC could void the FCC authority to operate the equipment This includes the addition of any external antenna device This equipment complies with Part 68 of the FCC rules and the requirements adopted by the ACTA On the bottom of the base...

Page 65: ...nterference is expe rienced moving the base farther away from the TV or VCR will often reduce or eliminate the interference However there is no guarantee that interfer ence will not occur in a particular installation If this telephone system does cause harmful interference to radio or television reception which can be determined by turning the system off and on the user is encouraged to try to cor...

Page 66: ... to rain or water d If the product does not operate normally by following the operating instructions Adjust only those controls that are covered by the operating instructions because improper adjustment of other controls may result in damage and may require extensive work by a qualified technician to restore the product to normal operation e If the product has been dropped or physi cally has been ...

Page 67: ...et forth in Section 4 below Reconditioned replacement compo nents parts or materials may be used in the replacement or repair Data in the memory of the Product may be lost during repair 3 THIS LIMITED WARRANTY DOES NOT COVER AND IS VOID WITH RESPECT TO THE FOLLOWING Cosmetic damage physical damage to the surface of the Product including without limitation breakage cracks dents scratches or adhesiv...

Page 68: ...ver is greater Throughout the warranty period Support will be available 7 00 a m 7 00 p m EST Monday Saturday English and 7 00 a m 12 00 p m noon EST Monday Saturday French exclud ing National holidays Support service will be provided for you by accessing the toll free cus tomer service number 1 866 247 8758 5 LIMITATION OF WARRANTY Gigaset NAM makes no warranty or representa tion that the softwar...

Page 69: ...ENT PERMITTED BY APPLICABLE LAW IN NO EVENT SHALL GIGASET NAM SELLER OR THEIR SUPPLIERS BE LIABLE FOR ANY SPECIAL INCIDENTAL INDIRECT OR CONSEQUENTIAL DAMAGES WHATSOEVER INCLUDING BUT NOT LIMITED TO DAMAGES FOR LOSS OF PROFITS OR CONFIDENTIAL OR OTHER INFORMATION FOR BUSINESS INTER RUPTION FOR PERSONAL INJURY FOR LOSS OF PRIVACY FOR FAILURE TO MEET ANY DUTY INCLUDING OF GOOD FAITH OR OF REASON ABL...

Page 70: ...nited Nations Convention on Contracts for the International Sale of Goods If you want to learn more about Gigaset Service or for Support on your Gigaset phone visit our web site at http www gigaset com or please call 1 866 247 8758 Issued by Gigaset Communications GmbH Schlavenhorst 66 D 46395 Bocholt Gigaset Communications GmbH is a licensee of the Siemens trademark Gigaset Communications GmbH 20...

Page 71: ...ly 500 entries u Picture CID u PC interface e g for managing directory entries ringers and screensavers u Bluetooth u Room monitor www gigaset com gigasetSL78H Gigaset S67H handset u Illuminated graphical color display 65k colors u Illuminated keypad u Handsfree talking u Polyphonic ringers u Directory for approximately 250 entries u Picture CID u Headset socket u Room monitor www gigaset com giga...

Page 72: ...cture CID u PC interface e g for managing directory entries ringers and screensavers u Headset socket u Bluetooth u Room monitor u Walkie talkie function www gigaset com gigasetSL37H All accessories with the exception of batteries are available from your phone retailer Use only original accessories This prevents possible health risks and property damage and also ensures compliance with all relevan...

Page 73: ...72 Mounting the base station to the wall ion 4 16 09 2005 Mounting the base station to the wall approx 2 5 mm 48 mm Please note Mounting screws are not included in the package ...

Page 74: ...ine see also Network mailbox Appointment 41 Appointment anniversary display missed 43 Appointments activating deactivating 42 deleting 42 managing 42 Area codes extra codes 16 local area code 16 setting own area code 55 Assigning a key 50 Assigning a number key 50 Asterisk key 1 Automatic call acceptance 27 52 B Base station changing 45 connecting 9 connecting to PABX 57 power consumption 60 resto...

Page 75: ...hine 35 appointment 41 call acceptance 52 handset 22 internal listening in 46 keypad lock 22 room monitor 48 two way record 38 Delete key 20 Deleting announcement for answering machine 36 characters 20 message 37 Deregistering handset 44 Deregistering devices Bluetooth 49 Destination number room monitor 47 Dialing directory 30 mode 57 Quick Dial 50 Quick list 30 Directory 29 copying number from te...

Page 76: ... muting 28 paging 44 registering 44 registering to a different base station 45 restoring to factory settings 56 screensaver 51 setting 50 setting up 11 using room monitor 47 using several 44 Handset operating time in room monitor mode 47 Handsfree key 1 talking 28 Headset Bluetooth 48 Help 58 I Icon alarm clock 43 answering machine 35 38 battery 16 display 20 for new messages 34 keypad lock 22 new...

Page 77: ...1 Missed anniversary 43 appointment 43 calls 33 Music on hold 56 Muting handset 28 My stuff 54 N Name of a handset 46 Network mailbox 40 Number as destination for room monitor 47 copying from directory 32 copying to directory 32 displaying caller s number CID 28 entering with directory 32 saving in the directory 29 O On Off key 1 Order in directory 30 P PABX connecting base station 57 pauses 57 se...

Page 78: ...andset 31 Sensitivity room monitor 47 Service Customer Care 66 Setting date 14 26 Flash Duration 57 screensaver 51 time 14 26 Setting up handset 11 Signal tone see Advisory tones Snooze mode 43 Sound downloading 54 Sound see Ringer Special functions 57 Specifications 60 System settings 56 T Talk key 1 27 Telephone jack pin connections 61 Touch tone dialing 57 U Update 62 USB connection 17 V Viewin...

Reviews: