background image

9

First Steps

Gigaset C285 / CAN useng / A31008-M1973-R401-1-5819 / starting.fm / 12.3.10

V

e

rsion 4, 16.0

9

.2005

Range and reception indicator

Range: 

u

Up to 984 feet in the open

u

Up to 165 feet in buildings

Reception indicator:

The display shows if the handset is linked to 
the base station:

u

Ä

 is on: handset is linked to the base sta-

tion. 

u

Ä 

flashes: no reception; handset is out of 

range or not registered.

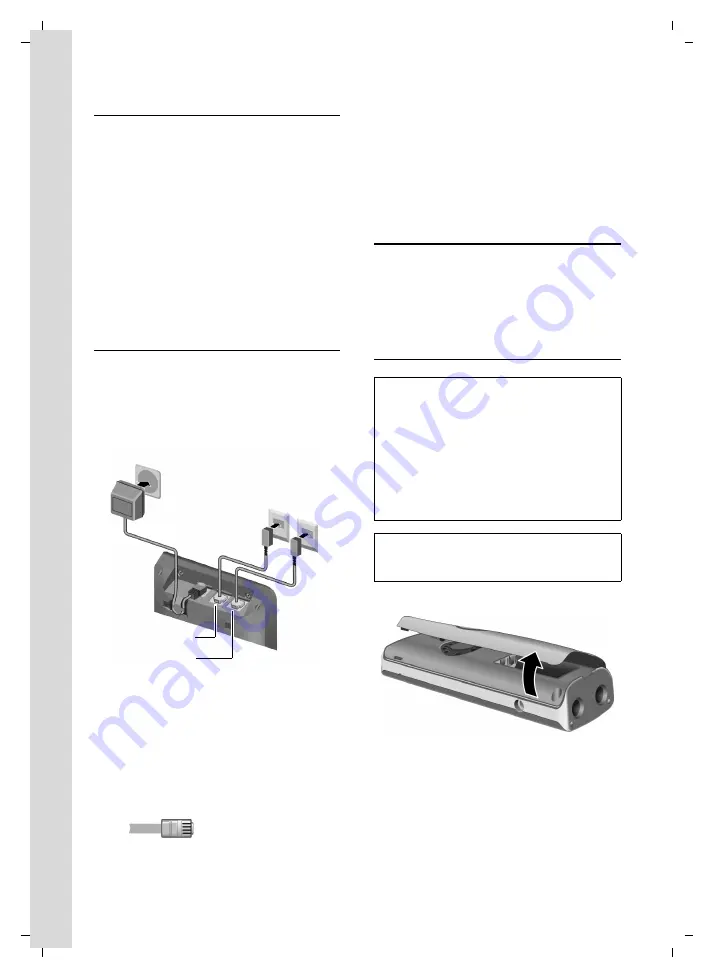
Connecting the base station

¤

First

 connect the yellow marked plug pin 

to the base station's socket (yellow 
marked) and then the AC adapter to the 
AC outlet (see below).

¤

Afterwards connect the phone jacks as 
shown below.

1 110-V power adapter
2 Back  of  the  base  station
3 Phone jacks with telephone line cords

Please note: 

u

If you want to connect your Gigaset C285 
to a 2-line telephone jack (4P4C):

– Use the telephone line cord with four 

connectors in each plug.

– Connect the telephone line cord to 

the 

TEL LINE 1

 jack of the base station.

u

The power adapter must 

always be con-

nected

, as the phone will not operate 

without an electrical supply.

u

Your answering machine is set to give a 
standard announcement.

Setting up the handset for 
use

All supplied handsets are already registered 
to the base station by factory settings. 

Carry out the following steps for each hand-
set. 

Inserting the batteries 

¤

Open the battery cover.

¤

Insert the batteries according to the cor-
rect polarity (see diagram).

1

2

3

TEL LINE 1

TEL LINE 2

Caution: 

Use only rechargeable Nickel-metal hydride 
(NiMH) UL-approved AAA batteries. Never use a 
conventional (non-rechargeable) battery or 
other battery types as this could result in signifi-
cant health risks and personal injury. For exam-
ple, the batteries could explode. The phone 
could also malfunction or be damaged as a result 
of using batteries that are not of the recom-
mended type.

Note: 

If attached, remove the belt clip before opening 
the battery cover.

Summary of Contents for Gigaset C285

Page 1: ...46395 Bocholt Manufactured by Gigaset Communications GmbH under trademark license of Siemens AG As of 1 Oct 2011 Gigaset products bearing the trademark Siemens will exclusively use the trademark Gigaset All rights reserved Subject to availability www gigaset com Gigaset Communications GmbH 2010 EZ ...

Page 2: ...n idle status or insert a dial ing pause when editing a number 10 Microphone 11 Intercom Hold Conference key Set up an internal call page 26 Switch between an external call and internal party handset base station page 28 or transfer a call during an external call page 27 Set up a conference call between an external line and an internal party handset base sta tion page 28 Press and hold the key in ...

Page 3: ... least one new message on voice mailbox Ê Ë Is shown when the respective line is off the hook in externaltalkmode in usemodeor on hold Is displayed in the Calls lists to show the line on which the call came in Ç Handsfree icon Handsfree mode activated Å Ringer off icon Ring tone volume of handset is turned off Æ Off Hook Outgoing call initiated or during a call Flashes indicates incoming call L1CA...

Page 4: ... in idle mode 8 Start Stop key with integrated LED for Line 1 Line 2 Start stop playback LED status indicator Is on when playing messages on the respective line Flashes slowly when there is at least one new message on the answering machine for the respective line Flashesrapidlywhenthemessagememory for the respective line is full 1 2 3 5 6 8 9 10 11 12 14 15 4 7 13 Ê Õ É Å Ë Õ É Å SUN 09 23 AM 01 3...

Page 5: ...Answer an incoming call for Line 1 Line 2 Make a call from Line 1 Line 2 Start a second call from Line 2 while telephon ing from Line 1 see page 26ff LED status indicator Flashes rapidly when the respective line is receiving an incoming call Flashes slowly when a handset is off the hook on the respective line Flashes very slowly when the respective line is on hold on the base station Is on when th...

Page 6: ...ation using the handset 19 Setting up the answering machine 23 Operating when on the move remote operation 24 Using the voice mailbox 25 Configuring the voice mailbox for fast access 25 Using several handsets 26 Registering and de registering handsets 26 Locating a handset paging 26 Changing the base station 26 Making internal calls 26 Accepting rejecting call waiting 27 Linking internal callers t...

Page 7: ...edical equipment so always turn your phone off before entering a hospital or doctor s office Notice to Hearing Aid Wearers This phone system is compatible with inductively coupled hearing aids Do not operate the phone in places where there is a risk of explosion such as paint workshops Do not install the base station in the bathroom The handset and base station are not splash proof see page 33 Dri...

Page 8: ...iated form This is illustrated below using Changing the dis play language as an example What you need to do is explained in the box Menu Settings Handset Language English Español Français With the handset in idle status press the rightdisplaykeytoopenthemainmenu Select Settings using the control key q press the control key at the top or bot tom Press the OK display key to confirm the function Sett...

Page 9: ...mation Have fun using your new phone First Steps Package contents u One base station Gigaset C285 u Two telephone line cords u One AC adapter for the base station with yellow marked plug u One User Guide u One Gigaset C28H handsets with battery cover u Two batteries u One belt clip Included with each additional handset u One Gigaset C28H handset with battery cover u One Gigaset charging cradle u O...

Page 10: ...nectors in each plug Connect the telephone line cord to the TEL LINE 1 jack of the base station u The power adapter must always be con nected as the phone will not operate without an electrical supply u Your answering machine is set to give a standard announcement Setting up the handset for use All supplied handsets are already registered to the base station by factory settings Carry out the follo...

Page 11: ... and troubleshooting see page 33 Setting the date and time You should set the date and time for exam ple to ensure the correct time of incoming calls is recorded Time and date can be set on the handset or on the base station To change the time and date open the input field using Menu s Settings Date Time Set Date Time Enterthetimeanddateusing10 digits for example Q M 1 5 Q 1 1 5 Q N for January 15...

Page 12: ...ine 2 Select entry and press OK Area codes To make a call using the Incoming Calls list page 17 your phone s area code must be stored If you reside in a service area where Line 1 and Line 2 have been assigned diffe rent area codes by your network provider you are able to store area codes for Line 1 and Line 2 independently of each other Menu s Settings System Area Code Line 1 Line 2 Select the lin...

Page 13: ... phone reacts differently u If you have selected Auto you can use the Talk key c or Handsfree key d for calls on both lines u If you have selected Line 1 or Line 2 you can only answer calls on the selected line with the Talk key c or Handsfree key d For calls on the other line you must use the Ckey or h key to answer the call If the handset is in the base station or charger and the Auto Answer fun...

Page 14: ... when listening to the answering machine turn handsfree on or off For how to adjust the volume see page 30 Operating the telephone Most of the keys are the same on the hand set and on the base station so that with few exceptions you can operate the base station the same way as the handset Activating deactivating the handset a Press and hold the End Call key to turn the handset on off Activating de...

Page 15: ...at a time from right to left press briefly or deletes all characters hold Returning to idle status You can return to idle status from anywhere in the menu as follows Press the End Call key a Or Do not press any key after 2 minutes the display will automatically return to idle status Changes that you have not confirmed or saved by pressing OK will not be saved An example of the display in idle stat...

Page 16: ...t by navigating to the incorrect entry using the control key You can then u Press Clear to delete the character to the left of the cursor u Insert characters by typing Entering and editing names The following rules apply when creating an entry u Control the cursor with q u Press the pound key to switch between uppercase and lowercase Entering special characters You can enter special characters usi...

Page 17: ...lete one char acter at a time from right to left press briefly or all characters press and hold Entering and editing names The following rules apply when creating an entry u To enter a letter press the corresponding numeric key as often as necessary u Use ts to move the cursor to the left or right u Characters are inserted after the cursor u Pressthepoundkey beforeentering the letter to switch bet...

Page 18: ...he Talk key or the Hands free key The number is dialed You can press the C or h key instead if you want to specify which line to use Managing entries in the Last Number Redial list k Press the key q Select the entry Menu Open menu Thefollowingfunctionscanbeselectedwith q View In the list long numbers are shown abbre viated Select View to show the whole number Copy To Dir Copy an entry to the direc...

Page 19: ...y Caller s phone number if only the num ber is transmitted External Call if no number is transmitted or the caller has not subscribed to Caller ID Withheld if the caller has withheld Caller ID You can add the number of the caller to the directory page 17 u Date and time of call if set page 10 u Line Ê or Ë behind the text shows whether the call has come in on Line 1 or Line 2 You can manage the en...

Page 20: ... messages on the respective line u Flashes slowly when there is at least one new message on the answering machine for the respective line u Flashes rapidly when the message mem ory for the respective line is full The displayof the base station may show the symbols shown here The following symbols provide information about the answering machine Symbols on the left side of the display refer to Line ...

Page 21: ... your announcement must be at least 3 seconds long Press OK to end the recording The recorded announcement will be played back automatically You can record the announcement again by repeating these steps Please note u Recording ends automatically if the max imum recording time of 60 seconds is reached u If you cancel the recording the prere corded announcement will be used u The recording is cance...

Page 22: ...ew messages 1 Date when message was recorded 2 New you have not yet listened to the message 3 01 02 The first of two messages is played 4 Time when message was recorded 5 Line on which message was recorded If you have u New messages New 2 is displayed The number of mes sages 3 only indicates the number of new messages 01 02 means that the first of two new messages is being played u Messages that y...

Page 23: ...o enter the Options menu u Repeat Repeat playback of the current message u Next Previous Jump to playback of the following or pre vious message u Delete Delete the current message Deleting messages You can delete old messages all at once or individually Deleting all old messages On the handset Menu Answer Machine Delete Old Msgs Line 1 Line 2 Confirm question Delete by pressing OK If you have no o...

Page 24: ... For call screening on the handset Screen Press the display key to start call screening Toll Saver Mode Call acceptance charge saving function for remote operation For each line you can set when you want the answering machine to respond to calls The options are 2 Rings 4 Rings 6 Rings 8 Rings as well as the cost saving setting Toll Saver When Toll Saver is set the following deter mines when the an...

Page 25: ... any new mes sageshavebeenrecorded Themessagesare then played back You can now operate the answering machine using the keypad Operating the answering machine using the keypad The following keys are used Activating the answering machine Dial the number of the line you want to activate answering machine for Allow the phone to ring until the ring back tone stops and the phone answers with a beep Ente...

Page 26: ...phonenetwork Youcannotusethe voice mailbox unless you have requested it from your network provider Configuring the voice mailbox for fast access Entering the voice mailbox number Menu Voice Mail Settings Line 1 Line 2 Enter the number of the voice mailbox and press OK The setting for fast access applies to all handsets If your network voice mail requires a pass word for access it is possible to ad...

Page 27: ...setting 0000 see page 31 q Select the handset you want to de register and press OK OK Press the display key to confirm deletion Locating a handset paging You can locate your handset using the base station PresstheRegistration Paging key on the base station briefly All handsets will ring at the same time paging even if the ringers are switched off On individual handsets you can press the display ke...

Page 28: ...internal calls see page 26 The external party hears the hold melody Use the j key to switch between the internal and external parties Ending the internal call Ask the other internal party to end the call You are reconnected to the external caller Accepting rejecting call waiting If you get an external call while conducting another external or internal call you will hear the call waiting tone short...

Page 29: ...l tone On both handsets you will see Conference on the display Calling another handset and adding it to the conference You are conducting an external call Initiate an internal call as described in the section Making internal calls see page 26 When the called handset has answered the call Conf Press the display key to start the conference On both handsets you will see Conference on the display Endi...

Page 30: ...the other party on hold C h Press the line key for the party you want to talk to The conference call is ended You will talk to the party whose line key you pressed The other party will be put on hold Handset settings Your handset is preconfigured but you can change these settings to suit your individual needs Changing the name of a handset The names INT 1 INT 2 etc are assigned automatically durin...

Page 31: ...Menu Settings Audio Settings HS Ring Volume Line 1 Line 2 Select the line for which you want to set the volume and press OK q Selectthevolumeandpress OK Ring tones You can choose between 15 different melo dies Menu Settings Audio Settings HS Ring Tones Line 1 Line 2 q Select a melody and press OK Activating deactivating the ring tone You can deactivate the ring tone on your handset before you answ...

Page 32: ...se station to adjust the volume of the base station ring tone Changing ring tone melodies You can use a registered Gigaset C28H hand set or the keys on the base station to enter this setting You can choose between 5 different melo dies Menu Settings Audio Settings Base Ring Tones q Select your preferred melody and press OK System settings The following base station settings can only be made using ...

Page 33: ...rt Long Select the flash time Short 80 ms Long 650 ms and press OK Switching temporarily to tone dialing DTMF If your PABX still operates with pulse dialing DP but you need tone dialing DTMF for a connection for example to listen to the voice mailbox you must switch to tone dial ing for the call Requirement You are conducting a call or have already dialed an external number Menu Tone Dialing OK Pr...

Page 34: ...n problems and possible solutions Troubleshooting The display is blank 1 The handset is not switched on Press a and hold the End Call key 2 The batteries are empty Charge or replace the batteries page 9 The handset does not respond to a key press The keypad lock is activated Press and hold the pound key page 1 Base Search and Ä is flashing on the display screen 1 The handset is outside the range o...

Page 35: ...aling Set your phone system to tone dialing You hear an error beep from the answering machine during remote operation The system PIN entered is incorrect Enter the system PIN again see page 31 You cannot operate the answering machine using remote operation Remote Access is not activated Activate Remote Access see page 24 The answering machine does not record messa ges has switched to announce only...

Page 36: ...e NMB 003 du Canada FCC ACTA Information Warning Changes or modifications to this unit not expressly approved by Gigaset Communica tions USA LLC could void the FCC authority to operatetheequipment Thisincludesthe addition of any external antenna device This equipment complies with Part 68 of the FCC rules and the requirements adopted by the ACTA On the bottom of the base station is a label that co...

Page 37: ...r installation If this telephone system does cause harmful interfer enceto radioortelevision reception which can be determined by turning the system off and on the user is encouraged to try to correct the interfer ence by one or more of the following measures 1 Reorient or relocate the receiving antenna 2 Increase the separation between the base sta tion and receiver 3 Connect the base station int...

Page 38: ...y the operating instructions because improper adjustment of other controls may result in damage and may requireextensivework by aqualifiedtechnician to restore the product to normal operation e If the product has been dropped or physically has been damaged f If the product exhibits a distinct change in per formance 13 Avoid using a telephone other than a cordless type during a thunderstorm There m...

Page 39: ...face of the Product including without limita tion breakage cracks dents scratches or adhesive marks on the LCD screen or outside casing of the Product Products which have been repaired main tained or modified including the antenna by anyone other than Gigaset NAM or a Gigaset NAM approved repair facility or that have been improperly installed Cost of installation removal or reinstallation Damage d...

Page 40: ... ited warranty is as set forth above Except for any refund elected by Gigaset NAM YOU ARE NOT ENTITLED TO ANY DAMAGES INCLUDING BUT NOT LIMITED TO CONSEQUENTIAL DAMAGES if the Product does not meet the limited warranty and to the maximum extent allowed by applica ble law even if any remedy fails of its essential purpose The terms below Exclusion of Inciden tal Consequential and Certain Other Damag...

Page 41: ...Y OF SUCH DAMAGES REPAIR OR REPLACEMENT AS PROVIDED UNDER THE WAR RANTY IS YOUR SOLE AND EXCLUSIVE REMEDY FOR BREACH OF THE LIMITED WARRANTY 9 LIMITATION OF LIABILITY AND REMEDIES NOTWITHSTANDING ANY DAMAGES THAT YOU MIGHT INCUR FOR ANY REASON WHATSOEVER INCLUDING WITHOUT LIMITATION ALL DAM AGES REFERENCED ABOVE AND ALL DIRECT OR GENERAL DAMAGES THE ENTIRE LIABILITY OF GIGASET NAM SELLER AND ANY O...

Page 42: ... page 17 Delete List page 17 Answer Machine Play Line 1 page 22 Line 2 Ans On Off Line 1 On page 20 Off Line 2 On Off Answer Mode Line 1 Answer Rec page 21 Answer Only Line 2 Answer Rec Answer Only Record OGM Line 1 Answer Rec page 20 Answer Only Line 2 Answer Rec Answer Only Delete Old Msgs page 22 Settings Ring Delay Line 1 page 23 Line 2 Call Screening page 23 Remote Access page 24 Voice Langua...

Page 43: ...ine 1 Line 2 Base Ring Tones Line 1 Line 2 Key Touch Tone page 31 Registration Register HS page 26 Unregister HS page 26 Select Base page 26 Handset Handset Name page 29 Language page 29 Display Contr page 29 Auto Answer page 30 Line Setting Auto page 11 Line 1 Line 2 System Listening In page 28 Change PIN page 31 Area Code Line 1 page 11 Line 2 Dialing Mode Line 1 page 32 Line 2 Flash Duration Li...

Page 44: ... Line 2 Answer Rec Answer Only Record OGM Line 1 Answer Rec page 20 Answer Only Line 2 Answer Rec Answer Only Settings Ring Delay Line 1 page 23 Line 2 Call Screening page 23 Remote Access page 24 Voice Language Line 1 page 23 Line 2 Voice Mail Call VM Line 1 page 25 Line 2 Settings Line 1 page 25 Line 2 Settings Date Time Set Date Time page 10 Set Format Audio Settings Base Ring Tones Line 1 page...

Page 45: ...ting up 8 connecting the device 9 display contrast 31 display language 31 PABX relevant settings 32 range 9 ring tone melody 31 ring tone volume 31 setting 31 settings 31 system PIN 31 Battery charge status 1 fitting 9 recommended batteries 34 Best base station 26 C Call answering 12 conference call 28 ending 12 external 12 internal 26 picking up from answering machine 23 transferring connecting 2...

Page 46: ...te Entry selecting menu 7 selecting from directory 16 status Calls list 18 writing editing correcting 15 Erase key 3 Example for menu input 7 External conference call 29 starting second external call 28 toggling between two calls 29 two simultaneous calls 28 F Fast access voice mailbox 25 Fast access voice mailbox 25 Flash time 32 Format of Date Time 10 H Handset activating deactivating 13 auto an...

Page 47: ...ey 1 30 start stop key with LED 3 Talk key 1 12 talk flash key 4 L Last number redial list 17 Line keys 1 Line keys with LEDs 4 Line settings 11 Liquid 33 List Calls list call history 17 missed calls 18 type 18 Listening in 28 Listening in during recording 23 Listening In function see internal conference Locating handset 26 Lock keypad 13 Loudspeaker volume handset 30 M Making calls answering a ca...

Page 48: ...Setting up base station 8 Settings auto answer 30 base station 31 date time 10 dialing mode 32 display contrast base station 31 display contrast handset 29 display language base station 31 display language handset 29 flash time 32 for connecting to PABX 32 handset 29 line settings 11 loudspeaker volume handset 30 restoring default settings 32 ring tone melody base station 31 ring tone melody hands...

Reviews: