Document No: IOM-002
Issue Date:
24/09/2020
Revision:
6
Page:
26 of 42
Unrestricted
lip around the through hole is facing forwards toward the connector front end and the key is in-line
with the keyway in the flange.
To secure the two halves together, Insert the 2-off location dowels into the holes in the flange and
press fit until flush with the face of the flange.
A M6 grub screw is supplied for tightening the flange to the connector body. Apply Loctite 243, screw
into the M6 tapped hole on the bottom face of the flange and tighten to 3.5 Nm (2.58 lbf.ft).
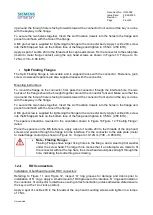
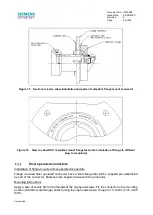
Apply a spot of Loctite 243 to the threads of the cap head screws. Fix the connector to the stab plate
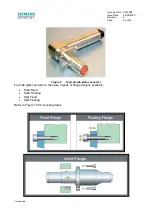
(metal to metal flange contact) using the cap head screws as shown in Figure 10. Torque to 10-
12Nm (7.38
– 8.85 lbf.ft).
•
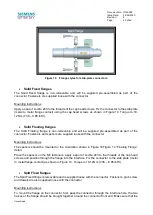
Split Floating Flanges
The Split Floating flange is removable and is supplied loose with the connector. Fasteners, grub
screw, dowels and spacers are also supplied loose with the connector.
Mounting instructions
To mount the flange on the connector, first, pass the connector through the interface hole, the two
halves of the flange should be brought together around the connector font end. Make sure that the
lip around the through hole is facing forwards toward the connector front end and the key is in-line
with the keyway in the flange.
To secure the two halves together, Insert the 2-off location dowels into the holes in the flange and
press fit until flush with the face of the flange.
A M6 grub screw is supplied for tightening the flange to the connector body. Apply Loctite 243, screw
into the M6 tapped hole on the bottom face of the flange and tighten to 3.5 Nm (2.58 lbf.ft)..
The spacers should be mounted in the orientation shown in Figure 10Figure 14
“Floating Flange”
detail.
Place the spacers on the M6 fasteners, apply a spot of Loctite 243 to the threads of the cap head
screws and position through the flange into the interface. Fix the connector to the stab plate (metal
to metal flange contact) as shown in Figure 14. Torque to 10-12Nm (7.38
– 8.85 lbf.ft).
•
Note - Floating Flanges
Floating Flanges have larger fixing holes in the flange, and a steel top hat washer
under the screw head. The larger hole means that if an attempt were made to fit
the connector without the top hats, the screw head would pass straight through the
hole, indicating that something was missing.
ROV connectors
Installation of bulkhead mounted ROV connectors
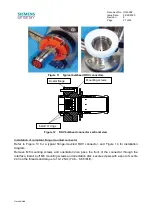
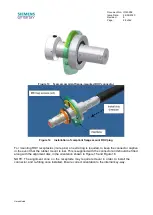
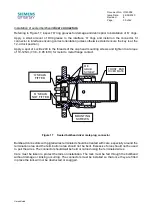
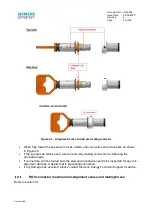
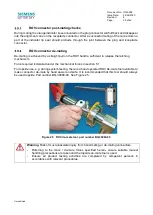
Referring to Figure 11 and Figure 12, i
nspect ‘O’ ring grooves for damage and debris prior to
installation of ‘O’ rings. Apply a small amount of DC4 grease to the interface ‘O’ rings and install on
the connector, fit connector to interface ensuring correct orientation (unless otherwise stated ensure
the key is at the 12-
o’clock position).
Apply a spot of Loctite 243 to the threads of the cap head mounting screws and tighten to a torque
of 7 Nm.

