background image

A24205-A334-B839 (Edition 14)        


s


P/N 315-035100-14 


15 


INSTALLATION 

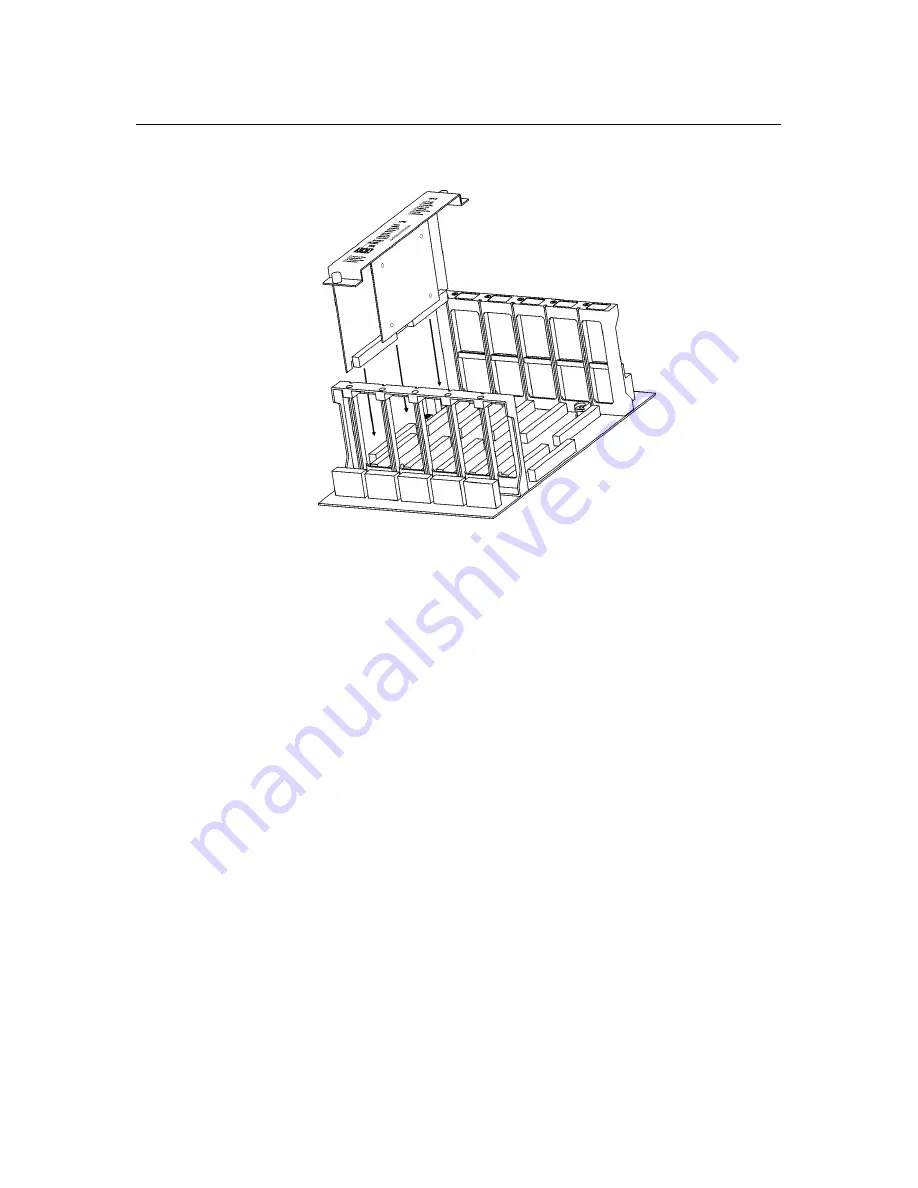
The DAC-NET plugs perpendicularly into one slot in the CC-5/CC-2 cardcage 
via two 96-pin DIN connectors and can occupy any slot in the cardcage.  


Figure 15 
Installing the DAC-NET 


Insert the DAC-NET card into the card guides right side up (lettering on 
the front panel is legible) 

Slide the card in until the card edge connectors contact the receptacles 
on the motherboard.  

Verify that the DIN connectors of the card and the card-cage aligned 
properly. The card can only plug in one direction to the card cage, if it 
does not align, DO NOT FORCE the card. 

Place thumbs on the front panel adjacent to the captive screws and 
gently apply even pressure on the card until the connectors seat in the 
receptacles on the motherboard.  

Secure with the captive screws. 

Power up the system and verify that the DAC-NET power LED turns ON. 


Summary of Contents for DAC-NET

Page 1: ...s CAN module has a fixed CAN address 100 and provides two inputs One is for the microphone located at the LVM and the other connects the internal telephone system Additionally the LPB provides one output for the monitor speaker located at the LVM For more information refer to the LPB Installation Instructions P N 315 035200 A24205 A334 B836 Features The D NET is supervised for open short and groun...

Page 2: ... Style 7 ULC DCLC Class B The node with the lowest node number master sends the data stream from Main Out to Main In at the next node The last node combines Main In with Return Out and returns the data stream back When the data stream comes back to the node with the lowest node number this node combines Return In with Main Out and sends it to Main In of the next node Figure 2 DAC NET D NET Class B...

Page 3: ...en LEDs for the DAC NET and one D NET address switch and four LEDs for the D NET For the optionally mounted LPB there is one reset switch and eight LEDs as shown in Figure 1 A reset switch is located on the top of the front panel Pushing the reset switch re initializes the DAC NET operation The LEDs follow the reset switch Their functions are defined as follows DAC NET POWER Green Normally ON When...

Page 4: ... open circuit or short circuit D NET TRBL _ MAIN IN Yellow Normally OFF When illuminated indicates RETURN OUT that the DAC NET has detected a trouble on Main In GND FAULT Yellow Normally OFF When illuminated indicates that the DAC NET has detected a ground fault on one of its field wires before the node TRBL _ MAIN OUT Yellow Normally OFF When illuminated indicates RETURN IN that the DAC NET has d...

Page 5: ...e front panel Refer to Figure 1 for the location of the switch The address at the DAC NET front panel must be the same as the address selected in the Zeus Programming Tool To increment each digit of the address press the button above the desired digit to decrement each digit press the button below the desired digit The range of allowable network addresses is from 0 to 9 left digit and allowable no...

Page 6: ... 17 19 21 23 18 20 22 24 17 19 21 23 18 20 22 24 Do not use Do not use Do not use FIRST DAC NET LAST DAC NET Do not use ONE SLOT OF CC 5 CC 2 Do not use ONE SLOT OF CC 5 CC 2 Do not use 1 3 5 7 2 4 6 8 11 13 15 12 14 16 1 3 5 7 2 4 6 8 11 13 15 12 14 16 1 3 5 7 2 4 6 8 11 13 15 12 14 16 9 10 RESISTOR 3 3K P N 140 03721 US CA C24235 A1 K14 GE 9 10 RESISTOR 3 3K P N 140 03721 US CA C24235 A1 K14 GE ...

Page 7: ...limited 2 Use twisted pair 3 Terminate shields at the entrance of the enclosure 4 18AWG Ø 0 5m Min 12 AWG 2 5mm Max 5 The two pairs between the nodes can be in one cable 6 Max cable length between DAC NETs 300m 38 Ø 0 6mm 21 Ø 0 8mm with cat 3 cable as J Y ST Y 7 Max cable length between DAC NETs 900m 157 Ø 0 51mm with cat 5 cable as J 02YS ST Y 8 Max cable length between DAC NETs 700m 30 AWG 18 1...

Page 8: ...MI PMI 2 PMI 3 has it already inside Install an ASI terminator into the 60 pin connector on the PSC 12 Analog Audio BUS Install the Analog Audio cable into the 10 pin connector of the PMI PMI 2 PMI 3 Install the other end of the Analog Audio cable into one 10 pin connector of the LVM If there is a FMT install a further Analog Audio cable into the second 10 pin connector of the LVM and the other en...

Page 9: ... CAN TERMINATOR P N 110 134215 C24235 A1 K2 FMT TERMINATION RESISTOR C24235 A1 K18 PMI PMI 2 PMI 3 FMT shipped with the DAC NET shipped with the FMT ASI termination resistors are inside the PMI PMI 2 PMI 3 A separate ASI terminator is not required LVM P5 P4 P2 P3 CC 5 DAC NET C A N P4 L V M P3 P1 P7 P7 3 1 120 TERMINATION RESISTOR P N 140 034723 US CA C24235 A1 K12 DE S ASI TERMINATOR C24235 A1 K1...

Page 10: ...6 7 8 9 0 S1 1 5 3 7 2 6 4 8 S2 1 5 3 7 2 6 4 8 OCM 16 1 2 3 4 5 6 7 8 1 2 3 4 5 6 7 8 9 10 11 12 13 14 15 16 9 10 11 12 13 14 15 16 1 2 3 4 5 6 7 8 9 0 1 2 3 4 5 6 7 8 9 0 TB2 TB1 P2 P3 TB3 TB4 SIM 16 1 _ 2 TB4 TB2 H N GND P12 _ P9 1 2 3 4 5 6 7 8 9 0 1 2 3 4 5 6 7 8 9 0 1 2 3 4 5 6 7 8 9 0 1 2 3 4 5 6 7 8 9 0 LCM 8 oder SCM 8 LCM 8 oder SCM 8 1 2 3 4 5 6 7 8 9 0 1 2 3 4 5 6 7 8 9 0 FCM 6 P1 P2 P...

Page 11: ... Panel with RNI DETAIL A a a a b b b MIC MIC CAN CAN 6 5 4 3 2 1 TB2 RNI TB3 TB4 TB5 TB6 SPEAKER HNET or Class B Class X SPEAKER TB1 TB3 1 6 7 12 a a a b b b CAN MIC MIC CAN SPEAKER SPEAKER PSC 12 FMT FMT NOT SUPERVISED SUPERVISED CLASS B ULC DCLB SUPERVISED CLASS B 22 AWG MIN 12 AWG MAX 15 Ωs MAX PER PAIR USE TWISTED PAIR Figure 12 Remote Control Panel Detail A ...

Page 12: ...A24205 A334 B839 Edition 14 s P N 315 035100 14 12 Figure 13 Multiple Remote Control Panels ...

Page 13: ...PEAKER SPEAKER a a a a a a a a a b b b b b b b b b 6 5 4 3 2 1 TB1 TB3 1 6 7 12 CAN MIC MIC CAN SPEAKER SPEAKER PSC 12 a a a b b b DETAIL A HNET or Class B Class X HNET or Class B Class X FMT FMT FMT SUPERVISED CLASS B NOT SUPERVISED SUPERVISED CLASS B ULC DCLB 22 AWG MIN 12 AWG MAX 15 Ωs MAX PER PAIR USE TWISTED PAIR Figure 14 Multiple Remote Control Panels Detail A ...

Page 14: ... Can Termination Resistor 120 Ohms C24235 A1 K12 P N 140 034723 1 External Alarm EOL Resistor 3 3K Ohms C24235 A1 K14 P N 140 034721 1 External Alarm Resistor 680 Ohms C24235 A1 K13 Not Available 1 Anti Interference Capacitor 6 8µF 100V bipolar C24235 A1 K19 Not Available ELECTRICAL RATINGS Power Consumption DAC NET 24V Back Plane Current 230 mA 24V Screw Terminal Current 0 6 2V Back Plane Current...

Page 15: ...e Slide the card in until the card edge connectors contact the receptacles on the motherboard Verify that the DIN connectors of the card and the card cage aligned properly The card can only plug in one direction to the card cage if it does not align DO NOT FORCE the card Place thumbs on the front panel adjacent to the captive screws and gently apply even pressure on the card until the connectors s...

Page 16: ...hensive state of the art security concept that is customized to individual security needs Such a security concept may result in additional site specific preventive action to ensure that the building comfort fire safety security management or physical security system for your site are operated in a secure manner These measures may include but are not limited to separating networks physically protec...

Reviews: