background image

Color monitor MCM 1755 NTD

12 - English

A26361-K472-Z100-2-5E19

Connecting the monitor

See your PC's operating manual for details of the connectors on the system unit.

!

Please note the information provided in the chapter "

Safety

" at the

beginning of this manual.

Do not cover the ventilation openings of the monitor.

If you are assembling monitors beside each other, there must be a
minimum distance of 30 cm between monitors of the same constructional
type, to avoid image distortion. With different monitors, the distance must
be increased, if necessary.

The system unit's power plug must be pulled out!

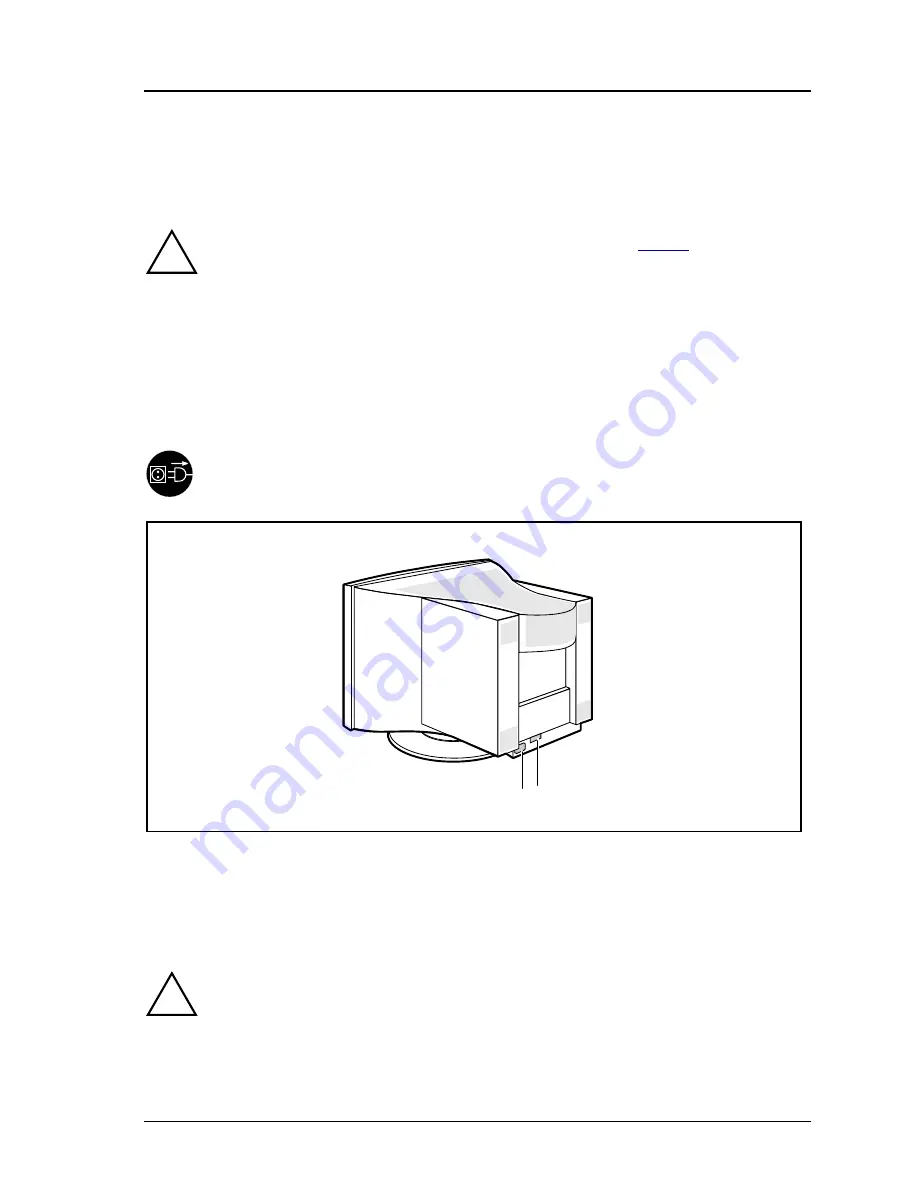
1 2

1 = Power connector

2 = D-SUB connector (15-pin)

Ê 

Be sure that the monitor and the system unit are switched off.

The data cable supplied has two 15-pin D-SUB connectors for connection to the
monitor and to the system unit.

!

CE conformance and optimum picture quality are guaranteed only if you
use the data cable supplied.

Ê 

Connect one of the connectors of the data cable to the D-SUB connector on
the monitor (2) and secure the connector by tightening the safety screws.

Summary of Contents for MCM 1755 NTD

Page 1: ...TD Bildschirm Moniteur Monitor Skärm Beeldscherm Bildschirm Moniteur Monitor Skärm Beeldscherm Operating Manual Manuel d utilisation Instrucciones de servicio Istruzioni per l uso Användarmanual Gebruikshandleiding ...

Page 2: ...le è stato stampato su carta da riciclaggio Denna handbok är tryckt på recyclingpapper Dit handboek werd op recycling papier gedrukt Herausgegeben von Published by Siemens Nixdorf Informationssysteme AG D 33094 Paderborn D 81730 München Bestell Nr Order No A26361 K472 Z100 3 5E19 A26361 K472 Z100 3 5E19 A26361 K472 Z100 3 5E19 A26361 K472 Z100 3 5E19 Printed in Korea AG 0597 05 97 A26361 K472 Z100...

Page 3: ...hes Siemens Nixdorf Informationssysteme AG Redaktion OEC BS2 OS ID4 Otto Hahn Ring 6 D 81730 München Is there any technical problem or other question you need clarified Please contact one of our IT Service Shops your sales partner your sales office anything you want to tell us about this manual Please send us your comments quoting the order number of the manual Siemens Nixdorf Informationssysteme ...

Page 4: ......

Page 5: ...MCM 1755 NTD Operating Manual January 1997 edition ...

Page 6: ...aining Center Beratungsservice D 81730 München VESA DDC and DPMS are registered trademarks of Video Electronics Standards Association Microsoft MS MS DOS and Windows are registered trademarks of Microsoft Corporation Copyright ã Siemens Nixdorf Informationssysteme AG 1997 The reproduction transmission or use of this documents or contents is not permitted without express written authority Offenders...

Page 7: ...nt 10 Installing an ergonomic video workstation 11 Connecting the monitor 12 Operation of the monitor 14 Switching the monitor on 14 Switching the monitor off 14 Notes on power management 15 Changing the monitor settings 16 Activating the factory settings 18 Degaussing the screen 18 Displaying stored settings 19 Notes on ergonomic color adjustment 20 Cleaning the monitor 21 Transporting the monito...

Page 8: ......

Page 9: ...ISO 9241 3 compliance with the recommendations in accordance with TCO 95 This Operating Manual contains important information you require to start up and run your monitor The monitor interworks closely with the monitor controller CRT controller graphics card of your PC It processes the data supplied to it by the monitor controller The monitor controller the associated driver software is responsibl...

Page 10: ...lar attention to texts marked with this symbol Failure to observe this warning endangers your life destroys the system or may lead to loss of data i This symbol is followed by supplementary information and tips Ê Texts which follow this symbol describe activities that must be performed in the order shown Quotation marks indicate names of chapters and highlighted text ...

Page 11: ...installation site During installation and before operating the device observe the instructions on environmental conditions in the chapter Technical data and the chapter Installing an ergonomic video workstation To ensure adequate ventilation the monitor may only be operated with the monitor foot installed The color monitor must not be exposed to strong magnetic fields e g caused by magnetic paper ...

Page 12: ...office or our customer service Only qualified technicians may repair the device Unauthorized opening or incorrect repair may greatly endanger the user electric shock fire risk Tampering with the device in particular adjusting the high voltage or installing a different type of CRT tube may result in a large amount of X ray radiation being emitted Devices modified in this way no longer comply with t...

Page 13: ...illion annually These savings could also prevent the emission of 20 million tons of carbon dioxide into the atmosphere the equivalent of 5 million automobiles The EPA as a matter of policy seeks only to promote energy efficiency and does not endorse any particular company or its products CE certificate This device complies with the requirements of the EEC directive 89 336 EEC Electromagnetic compa...

Page 14: ...omic design and emission This unit lies within the limit values set by TCO 95 for low frequency electromagnetic fields electrostatic fields and power consumption It also complies with the requirements of ergonomic design ISO 9241 3 and safety EN 60950 The low frequency electromagnetic emissions more than comply with the recommendations of the Swedish Institute for Radiation Protection Stockholm in...

Page 15: ...ncouraged to try to correct the interference by one or more of the following measures Reorient or relocate the receiving antenna Increase the separation between equipment and the receiver Connect the equipment into an outlet on a circuit different from that to which the receiver is connected Consult the dealer or an experienced radio TV technician for help Siemens Nixdorf Informationssysteme AG is...

Page 16: ...e has to be HAR certified or VDE certified The mark HAR or VDE will appear on the outer sheath or on the insulation of one of the inner conductors For devices which are mounted on a desk or table type SVT or SJT cable sets may be used For devices which sit on the floor only SJT type cable sets may be used The cable set must be selected according to the current rating for your device ...

Page 17: ...onmentally friendly disposal or specialized recycling It will be possible to return the device on completion of its useful life and that providing it is returned in a condition corresponding to its original function the device will be forwarded for reuse or recuperation of materials Any components not recuperated will be disposed of in an environmentally acceptable manner Parts that cannot be recy...

Page 18: ...etails in the delivery note A complete consignment consists of one monitor one data cable one power cable a warranty booklet this Operating Manual Should you discover that the equipment has been damaged during transport or that the consignment does not correspond to the delivery note notify your local sales office immediately i It is recommended not to throw away the original packing material It m...

Page 19: ...ideo workstation Window Avoid direct and reflected glare Avoid glare from electric lighting 30 30 65 65 0 60 0 edge of desk permissible viewing sector permissible reaching sector 600 mm permissible reaching sector 600 mm preferable viewing sector permissible viewing sector Position the keyboard where it is easiest to reach Position the monitor for optimum viewing approx 90 and more approx 90 Keep ...

Page 20: ...e constructional type to avoid image distortion With different monitors the distance must be increased if necessary The system unit s power plug must be pulled out 1 2 1 Power connector 2 D SUB connector 15 pin Ê Be sure that the monitor and the system unit are switched off The data cable supplied has two 15 pin D SUB connectors for connection to the monitor and to the system unit CE conformance a...

Page 21: ...plied into the power connector 1 of the monitor Ê Plug the power cable into the monitor connector at the rear of the system unit Ê Plug in the system unit s power plug i When you start working with your monitor for the first time you should install the appropriate graphics drivers for your application software Details of how to do this are provided in the documentation on your monitor controller t...

Page 22: ...Power lamp 3 ON OFF switch Switching the monitor on Ê Press the ON OFF switch 3 The power lamp 2 lights up green when the system unit is turned on i If your PC has a power management function energy saving mode you should read the notes on power management of the monitor in this chapter Switching the monitor off Ê Press the ON OFF switch 3 The power lamp 2 is dark ...

Page 23: ... power consumption The power lamp of the monitor changes color to indicate the status change If there is still no input power consumption is further reduced OFF mode Once an input is made at the PC the screen contents are redrawn and full power is restored The length of the individual stages is determined by the power management system of the PC For detailed information on how energy saving mode o...

Page 24: ...Degauss 7 Arrow buttons 8 Brightness 9 Contrast The controls are labeled with symbols and are explained below i Some buttons have two assignments The second assignment is active when you press these buttons twice Adjusting the brightness and contrast You will increase the life of your screen if you adjust the contrast and brightness to low or medium Adjusting the brightness Increasing the brightne...

Page 25: ... Ê Press the arrow buttons or until you have achieved the result you require All modifications are automatically stored if no button is pressed for several seconds The window on the screen is then masked out and the power lamp once again glows green Adjusting the horizontal or vertical position Press the Position button once Use the or button to shift the picture to the left or right Use the or bu...

Page 26: ...icture position and edges in the predefined operating modes Hold down the factory settings button for a few seconds until the power lamp switches from orange to green While this is happening a color bar which extends to the right is displayed on the screen Degaussing the screen If color distortions occur the screen must be degaussed Press the Degauss button briefly If you hold the button down for ...

Page 27: ... displayed in a window If no button is pressed for several seconds the window will be masked out and the power lamp will glow green again Press the Position button twice A window containing the stored settings will then be displayed Use arrow button or to scroll Press the button one or more times to display the factory settings preset mode ...

Page 28: ... colors for characters and background and giving the primary colors full modulation you can obtain very suitable color combinations see the following table Back ground Character color color black white purple blue cyan green yellow red black white purple blue cyan green yellow red Color combination very suitable light background colors are only suitable for devices which are operated with a refres...

Page 29: ... the ventilation areas of the monitor are free Wipe the monitor housing with a dry cloth If the monitor is particularly dirty use a cloth which has been moistened in mild domestic detergent and then carefully wrung out Transporting the monitor When transporting the monitor ensure that it is not exposed to strong magnetic fields Transport the monitor with care and only in its original packaging or ...

Page 30: ...ccessories power cable 1 8 m Storable display modes 18 8 of which are preset Electrical data Video Synchronization Line frequency Refresh rate Video band width Power supply analog positive 0 7 Vpp 75 Ω TTL 30 kHz 69 kHz multi scanning 50 Hz 160 Hz 110 MHz switches automatically 100 V 127 V 50 Hz 60 Hz 3 Hz 2 A 200 V 240 V 50 Hz 60 Hz 3 Hz 1 A Power consumption see power management 120 W ON Normal ...

Page 31: ...ndard Association Display Data Channel is used as the communications interface between the monitor and the PC If your PC is equipped with a VESA DDC compatible VGA interface it can automatically read the data for ensuring optimum operation from your monitor and select the appropriate settings i If the monitor MCM 1755 NTD is not yet displayed in the list of monitors you can select one of the follo...

Page 32: ... Hz 640 x 480 720 x 400 640 x 480 720 x 400 640 x 480 800 x 600 800 x 600 1024 x 768 For ergonomic reasons we recommend a refresh rate of at least 75 Hz and a maximum resolution of 1024 x 768 pixels i The display position and size have been set to optimum values at the factory for the operating modes listed above Depending on the monitor controller used it may be necessary to change these settings...

Page 33: ...6 10 11 15 Pin Meaning Pin Meaning 1 Red video 9 Not assigned 2 Green video 10 Logic ground 3 Blue video 11 Monitor ground 4 Monitor ground 12 Serial DDC data line SDA 5 DCC return 13 H sync 6 Red video ground 14 V sync 7 Green video ground 15 Serial DDC clock line 8 Blue video ground SCL ...

Page 34: ...ss the monitor Ê Briefly press the degauss button see Operation of the monitor CHECK SIGNAL CABLE display appears The data cable is not connected or is incorrectly connected to the monitor or the system unit Ê Check the connectors No display power lamp does not light Possible causes Monitor ON OFF switch is not switched on System unit is not switched on Power cable not plugged into system unit Ê C...

Reviews: