


4
Getting Started
This device features a browser-based web application, which controls audio and network properties. Upon completing this basic setup process, you will
be able to:
• Access the web application to customize audio settings, signal routing, and network properties
• Use Dante™ Controller software to connect with other Dante devices and pass audio
• Access additional configuration information
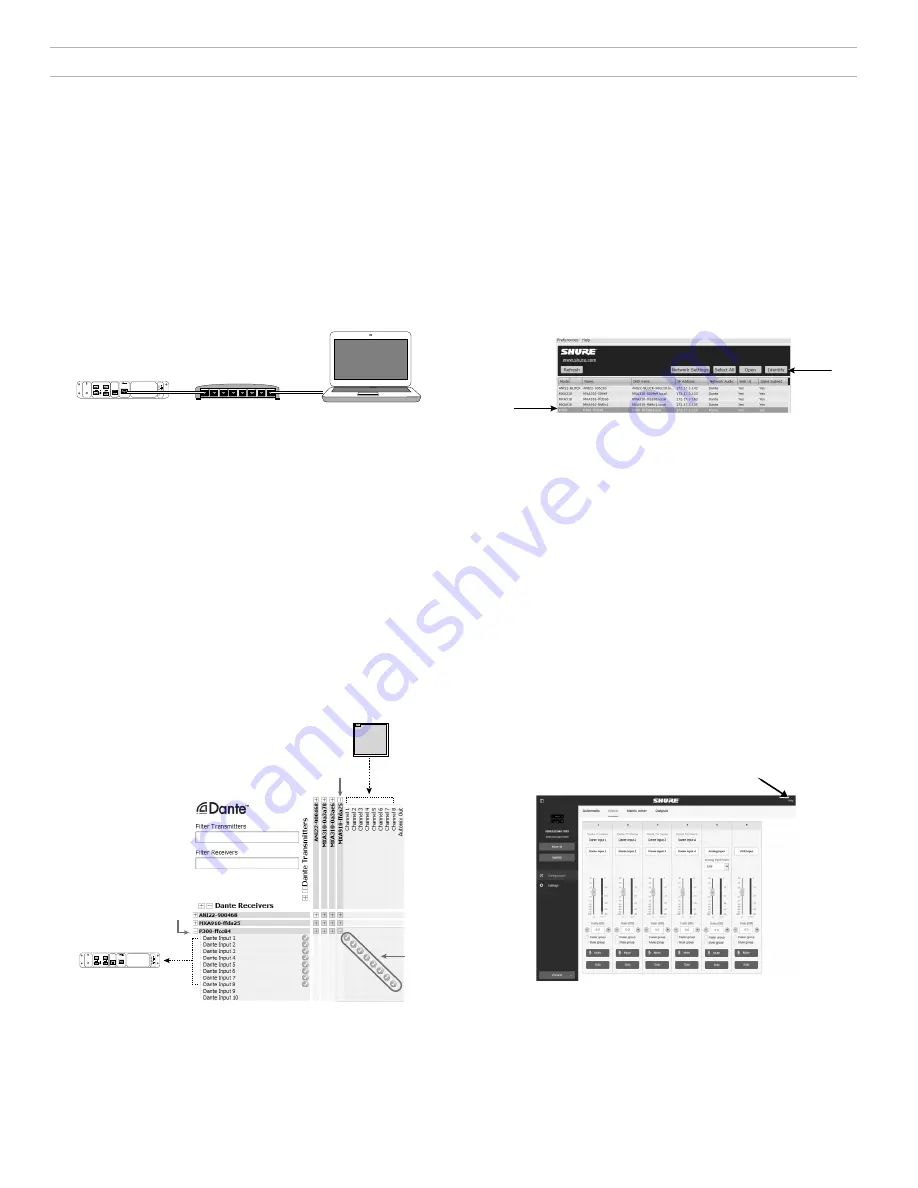
Step 1: Connect to a Network
1. Use an Ethernet cable (CAT5e or higher) to con-
nect the P300 to a network switch.
Note:
The network switch must provide Power over Ethernet Plus (PoE+). Make
sure to connect to a PoE+ port, since many switches do not supply power on all
ports.
2. Connect a computer to the network switch with an Ethernet cable
reset
input
output
usb
P300
Network Switch
Computer
Step 2: Access the Web Application
1. Download and install the
Shure Device Discovery
application
(http://www.shure.com)
2. Open the Shure Device Discovery application
3. Double-click the device to open the web application.
Tip:
If setting up multiple Shure devices, use the Identify button in the application
to flash the lights on the device.
Select the
device
Identify
Step 3: Connect Devices in Dante Controller
Software
1. Download and install Dante Controller Software
from http://www.audinate.com
2. Use Dante Controller to create connections with other Dante devices.
Important:
For Shure devices with integrated automatic mixing (such as
the MXA910), connect independent channels to the P300 Dante input
channels to ensure effective acoustic echo cancellation.
Note:
Refer to the Dante Controller user guide for more information
on channel routing (available at http://www.audinate.com/resources/
technical-documentation)
Example: Connecting the P300 and Shure MXA910
reset
input
output
usb
MXA910
P300
1. Find the MXA910 in the list of Dante transmitters, and
select the plus sign (+) to show all channels.
2. Find the P300 in the list of Dante receivers, and
select the plus sign (+) to show all channels.
3. Connect channels 1-8 from the MXA910 to Dante input
channels 1-8 on the P300. Do not use the automix
output from the MXA910 into the P300.
Step 4: Configure Audio
The final configuration steps will vary, depending on the signal processing
required and hardware connected to the P300. These steps provide a
general guideline. Specific steps are included in the system examples.
1. Connect analog, USB, and mobile audio devices
2. Route signals in the matrix mixer
3. Adjust input and output levels in the input and output tabs
4. Turn on digital signal processing blocks as needed
5. Set the AEC reference channel by opening the AEC menu in the
schematic view or inputs tab and selecting a channel from the
pull-down menu. Use the channel that carries audio to loudspeak-
ers as the AEC reference.
Analog -- To Speaker
is the most
common channel for this application, in configurations using an
analog loudspeaker system or the built-in speaker on a display.
More comprehensive information is available in the help section of the
web application.
Access the help section
Summary of Contents for INTELLIMIX P300
Page 2: ......
Page 13: ...13 1 2 3 4 5 6 7 8 9 2 2 3 3 10 11 12 13 14 15 16 MAINS 17 70 dB A 18 I 19 20 21...
Page 23: ...23 1 2 3 4 5 6 7 8 9 10 11 12 13 14 15 16 MAINS 17 70dB A 18 CLASS I MAINS 19 20 21...
Page 33: ...33 1 2 3 4 5 6 7 8 9 10 11 12 13 14 15 16 17 70dB A 18 I 19 20 21...
Page 43: ...43 1 2 3 4 5 6 7 8 9 10 11 12 13 14 15 16 17 70dB A 18 I 19 20 21...
Page 63: ......