background image


34 


Energetic XL 

Product code: 43169 

8.


Maintenance 


Safety Instructions for Maintenance 


DANGER 
Electric shock caused by dangerous voltage inside
 

Disconnect power supply before servicing or cleaning. 


WARNING 
Laser radiation 
Avoid exposure to beam. 

This device is a class 3B laser device according to the classification in NEN-EN-IEC 60825-1:2014. 

Maintenance can be carried out by instructed or skilled persons. Service shall be carried out only by 
skilled persons. Contact your Highlite International dealer for more information. 


Preventive Maintenance 


Attention 
Before each use, examine the device visually for any defects. 

Make sure that: 


All screws used for installing the device or parts of the device are tightly fastened and are not 
corroded. 


The safety devices are not damaged. 


There are no deformations on housings, fixations and installation points. 


The lens is not cracked or damaged. 


The power cables are not damaged and do not show any material fatigue. 


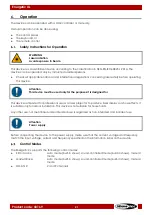
Basic Cleaning Instructions 


WARNING 
Laser radiation 
Avoid exposure to beam 

To avoid laser emission, remove the key before cleaning the device. 

The external lens of the device must be cleaned periodically in order to optimize the laser output. The 
cleaning schedule depends on the conditions at the site where the device is installed. When smoke or 
fog machines are used at the site, the device will need more frequent cleaning. On the other hand, if the 
device is installed in well-ventilated area, it will need less frequent cleaning. To establish a cleaning 
schedule, examine the device at regular intervals during the first 100 hours of operation. 

To clean the device, follow the steps below: 


Disconnect the device from the electrical power supply. 


Allow the device to cool down for at least 15 minutes. 


Remove the dust collected on the external surface with dry compressed air and a soft brush. 


Clean the lens with a damp cloth. Use a mild detergent solution. 

Summary of Contents for 43169

Page 1: ...Energetic XL Highlite International B V Vestastraat 2 6468 EX Kerkrade the Netherlands Product code 43169 USER MANUAL ENGLISH V1 ...

Page 2: ...sal of the device Non observance of the instructions in this user manual may result in serious injuries and damage of property 2021 Showtec All rights reserved No part of this document may be copied published or otherwise reproduced without the prior written consent of Highlite International Design and product specifications are subject to change without prior notice For the latest version of this...

Page 3: ...nstallation 14 Personal Protective Equipment 15 Installation Site Requirements 15 Rigging 15 Angle Adjustment 16 Connecting to Power Supply 16 5 Setup 17 Warnings and Precautions 17 Stand alone Setup 17 DMX Connection 17 DMX 512 Protocol 17 DMX Cables 18 Master Slave Setup 19 DMX Linking 20 DMX Addressing 20 6 Operation 21 Safety Instructions for Operation 21 Control Modes 21 Starting the Device 2...

Page 4: ...Maintenance 34 Preventive Maintenance 34 Basic Cleaning Instructions 34 Corrective Maintenance 35 Replacing the Fuse 35 9 Deinstallation Transportation and Storage 36 Instructions for Deinstallation 36 Instructions for Transportation 36 Storage 36 10 Disposal 36 11 Approval 36 ...

Page 5: ...ser projector to produce laser displays or show effects It is suitable only for indoor installation This device is not suitable for households Any other use not mentioned under intended use is regarded as non intended and incorrect use Product Lifespan This device is not designed for permanent operation Disconnect the device from the electrical power supply when the device is not in operation This...

Page 6: ...y result in minor or moderate injury Attention Indicates important information for the correct operation and use of the product Attention Indicates that eye protection must be used Important Read and observe the instructions in this document Electrical hazard Laser beam hazard Provides important information about the disposal of this product Labels This device is a class 3B laser device and is pro...

Page 7: ...all screws are tightly fastened Disconnect the device from electrical power supply before service and maintenance and when the device is not in use DANGER Electric shock caused by short circuit This device falls under IEC protection class I Make sure that the device is electrically connected to ground earth Connect the device only to a socket outlet with ground earth connection Do not cover the gr...

Page 8: ...area of the extension cords and power cables is sufficient for the required power consumption of the device Attention General safety Do not insert objects into the air vents Do not connect the device to a dimmer pack Do not switch the device on and off in short intervals This decreases the device s life Do not shake the device Avoid brute force when installing or operating the device If the device...

Page 9: ...ut by instructed or skilled persons Service shall be carried out only by skilled persons Contact your Highlite International dealer for more information This product may not be used by ordinary persons Users operators and installers should have received sufficient training in laser safety to be able to accurately assure that the MPE is not exceeded in spectator occupied areas and that the required...

Page 10: ...ated All controls including scan failure safeguards and emergency stop controls are properly working Warning signs and barriers are in place as appropriate All components are securely mounted and locked into position The device should be secured and protected against misalignment or maladjustment between alignment completion and the beginning of the laser display or show Safety Devices This device...

Page 11: ... creates 48 powerful beams Two rows of 8 RGB LEDs on the top and bottom of the fixture create stunning matrix effect Last but not least the red and green laser with 8 different grating effects create a variety of cool laser effect The Showtec Energetic is the right solution for a wide range of applications It is delivered with a remote control Front View Fig 03 01 Mounting bracket 02 Cooling Fan 0...

Page 12: ...icrophone USB Port for future software updates Safety eye 3 pin DMX connector OUT 3 pin DMX connector IN IEC C14 power connector IN 100 240 V Fuse T1 6 A 250 V Ground earth connection Key switch Remote interlock connector Control panel 4 digit LED display control buttons and LED indicators ...

Page 13: ... and control Control Stand alone auto manual sound controlled Master Slave auto manual sound controlled DMX 512 DMX channels 2 and 9 channels Control panel 4 digit LED display control buttons and LED indicators Connections Power connections IEC C14 power connector IN 100 240 V Data connections 3 pin DMX connectors IN OUT Signal pinouts pin 1 ground pin 2 pin 3 Construction Housing Metal Color Blac...

Page 14: ...13 Energetic XL Product code 43169 Dimensions Fig 05 Fig 06 ...

Page 15: ...ational and local safety regulations concerning rigging and trussing The device should be installed in such a way that there is at least 3 m distance in height and 2 5 m laterally between the laser beam that exceeds the spectator MPE and the surface where spectators are expected to stand Fig 07 If the laser display or show is not under the continuous control of an operator who can immediately term...

Page 16: ...ted to a truss or other rigging structure Make sure that all loads are within the pre determined limits of the supporting structure CAUTION Restrict the access under the work area during rigging and or derigging To mount the device follow the steps below Use a clamp to attach the device to the supporting structure as shown in Fig 09 Make sure that the device cannot move freely Secure the device wi...

Page 17: ...ock caused by short circuit The device accepts AC mains power at 100 240 V and 50 60 Hz Do not supply power at any other voltage or frequency to the device This device falls under IEC protection class I Make sure that the device is always electrically connected to the ground earth Before connecting the device to the socket outlet Make sure that the power supply matches the input voltage specified ...

Page 18: ... 512 controller or to run synchronized shows of two or more devices set in a master slave operating mode The Energetic XL has 3 pin DMX signal IN and OUT connectors The pin assignment is as follows 3 pin pin 1 ground pin 2 pin 3 Devices on a serial data link must be daisy chained in a single line The number of devices that you can control on one data link is limited by the combined number of the D...

Page 19: ...You can purchase DMX cables directly from your Highlite International dealer or make your own cables If you use XLR audio cables for DMX data transmission this may lead to signal degradation and unreliable operation of the DMX network When you make your own DMX cables make sure that you connect the pins and wires correctly as shown in Fig 11 Fig 11 ...

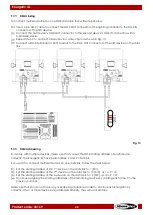
Page 20: ...the second device s DMX IN connector with a 3 pin DMX cable Repeat step 1 to connect all devices as shown in Fig 12 Connect a DMX terminator 120 Ω resistor to the DMX OUT connector of the last device in the setup Set the first device on the data link as a master device See 6 6 6 System Settings on page 27 for more information Set the remaining devices as slave devices See 6 6 5 Slave Mode on page ...

Page 21: ...a setup with multiple devices make sure that you set the DMX starting address of each device correctly The Energetic XL has 2 personalities 2 and 9 channels If you want to connect multiple devices on one data link follow the steps below Set the starting address of the 1st device on the data link to 1 001 Set the starting address of the 2nd device on the data link to 10 010 as 1 9 10 Set the starti...

Page 22: ...he purposes it is designed for This device is intended for professional use as a laser projector to produce laser displays or show effects It is suitable only for indoor installation This device is not suitable for households Any other use not mentioned under intended use is regarded as non intended and incorrect use Attention Power supply Before connecting the device to the power supply make sure...

Page 23: ...e interlock connector you cannot operate the device The device will power up but it will not produce a laser beam The remote interlock is not supplied You can purchase a remote interlock from your Highlite International dealer Check your local regulations as in some countries it is not allowed to operate the device without a remote interlock Connect the device to the socket outlet with the power p...

Page 24: ...23 Energetic XL Product code 43169 Menu Overview ...

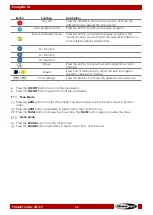
Page 25: ...ol Control Panel Operation A DMX LED indicator red B LED display C Slave LED indicator yellow D Sound LED indicator green E ENTER button F DOWN button G UP button H MODE button I Auto LED indicator blue Fig 14 Use the MENU button to exit the current submenu to return to the main menu and to navigate through the main menu Use the UP DOWN buttons to navigate through the menus or to increase decrease...

Page 26: ...ange is 01 99 from low to high speed Music Mode In this menu you can activate sound controlled mode Press the ENTER button to enter music mode Press the UP DOWN buttons to select one of the 7 sound controlled programs Press the ENTER button to confirm the selection The device plays the show reacting to the beat of music Color Mode In this menu you can activate color mode In this menu you can manua...

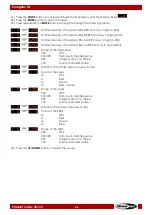
Page 27: ... Wash LEDs WHITE from low to high 0 255 Strobe of the Wash LEDs 000 OFF 001 098 from low to high frequency 099 full light output no strobe 100 sound controlled strobe Rotation of the Wash LEDs from slow to fast Colors of the Laser L0 OFF L1 Red L2 Green L3 Red Green Strobe of the Laser 000 OFF 001 098 from low to high frequency 099 full light output no strobe 100 sound controlled strobe Rotation o...

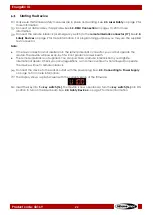
Page 28: ...he device will show its current DMX address Press the Enter button again to open the submenu Press the UP DOWN buttons to select your desired DMX Mode You can choose 2 or 9 channels Choose the desired configuration and press the Enter button to open the submenu Press the Up and Down buttons to set the desired DMX address If you choose the configuration the adjustment range is between If you choose...

Page 29: ...to choose between 10 If you choose the display will be displayed normally 11 If you choose the display will be displayed reversed 12 If you have chosen press the Enter button to activate the IR mode 13 If you choose the included IR remote control will not work 14 If you choose the included IR remote control will be activated 15 If you have chosen press the Enter button to activate the sound contro...

Page 30: ...death The battery is already installed in the remote control It is protected against discharge by a transparent plastic foil Remove the plastic foil before using the remote control for the first time When replacing the battery make sure that the polarity is correct Incorrect polarity may damage the remote control To operate the device with the IR remote control Enable IR remote control operation i...

Page 31: ...ams or color change Speed Press one of the buttons to adjust the built in program speed 0 slowest 9 fastest Color settings Press the buttons to choose the desired built in LED color Press the ON OFF button to turn on the laser beam Press the ON OFF button again to turn off the laser beam Show Mode Press the AUTO button to enter show mode The device plays back the built in shows in random order Pre...

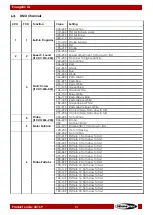
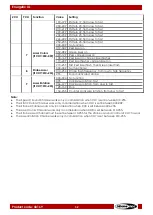
Page 32: ...low to fast 231 255 7 color chase from slow to fast 4 Strobe If CH3 006 255 000 005 No function 006 020 Strobe 5 Motor Rotation 000 Not functional 001 127 Shake effect from slow to fast 128 255 Motor indexing 6 Strobe Patterns 000 009 No function 010 019 Pattern 1 from slow to fast 020 029 Pattern 2 from slow to fast 030 039 Pattern 3 from slow to fast 040 049 Pattern 4 from slow to fast 050 059 P...

Page 33: ... 000 009 Not functional 010 254 Strobe flash frequency from low to high frequency 255 Sound activated strobe 9 Laser Rotation If CH7 010 255 000 004 No function 005 Clockwise rotation fast 006 127 Clockwise rotation from slow to fast 128 133 Stop 134 255 Counter clockwise rotation from slow to fast Note The Speed Sound Channel works only in combination when CH1 is set between 010 255 The Static Co...

Page 34: ...y settings See 6 6 6 System Settings on page 27 The device does not respond to DMX control The controller is not connected Connect the controller The device is not in DMX mode Activate DMX mode from the main menu The signal is reversed The 3 pin 5 pin DMX OUT of the controller does not match the DMX IN of the device Install a phase reversing cable between the controller and the device The controll...

Page 35: ... lens is not cracked or damaged The power cables are not damaged and do not show any material fatigue Basic Cleaning Instructions WARNING Laser radiation Avoid exposure to beam To avoid laser emission remove the key before cleaning the device The external lens of the device must be cleaned periodically in order to optimize the laser output The cleaning schedule depends on the conditions at the sit...

Page 36: ...rcuit Do not bypass the thermostatic switch or fuses For replacement use fuses of the same type and rating only Power surges short circuit or incorrect electrical power supply may cause a fuse to burn out If the fuse burns out the device will not function anymore If this happens follow the steps below 01 Disconnect the device from the electrical power supply 02 Allow the device to cool down for at...

Page 37: ...Clean the device before storing Follow the cleaning instructions in chapter 8 2 1 Basic Cleaning Instructions on page 34 Store the device in the original packaging if possible 10 Disposal Correct disposal of this product Waste Electrical and Electronic Equipment This symbol on the product its packaging or documents indicates that the product shall not be treated as household waste Dispose of this ...

Page 38: ...37 Energetic XL Product code 43169 ...

Page 39: ...38 Energetic XL Product code 43169 ...

Page 40: ... 2021 Showtec ...

Reviews: