SHOWTEC 41370 Micro Spot Manual Download Page 5


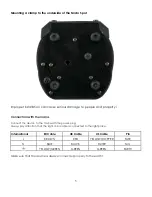
Only operate the fixture after having checked that the housing is firmly closed and all screws are 
tightly fastened. 


Only operate the device after having familiarized with its functions. 


Avoid flames and do not put close to flammable liquids or gases. 


Always replace the lamp, when it is damaged or deformed due to the heat. 


Always keep case closed while operating. 


Always allow free air space of at least 50 cm around the unit for ventilation. 


Always disconnect power from the mains, when device is not used, before cleaning or when 
replacing lamp! Only handle the power-cord by the plug. Never pull out the plug by tugging the 
power-cord. 


Make sure that the device is not exposed to extreme heat, moisture or dust. 


Make sure that the available voltage is not higher than stated on the rear panel. 


Make sure that the power-cord is never crimped or damaged. Check the device and the power-
cord from time to time. 


If the lens is obviously damaged, it has to be replaced. So that its functions are not impaired, due to 
cracks or deep scratches. 


If device is dropped or struck, disconnect mains power supply immediately. Have a qualified 
engineer inspect for safety before operating. 


If the device has been exposed to drastic temperature fluctuation (e.g. after transportation), do not 
switch it on immediately. The arising condensation water might damage your device. Leave the 
device switched off until it has reached room temperature. 


If your Showtec device fails to work properly, discontinue use immediately. Pack the unit securely 
(preferably in the original packing material), and return it to your Showtec dealer for service. 


For adult use only. Movinghead must be installed out of the reach of children. Never leave the unit 
running unattended. 


For replacement use lamps and fuses of same type and rating only. 


Allow time to cool down, before replacing lamp.  


This device falls under protection class I. Therefore it is essential to connect the yellow/green 
conductor to earth. 


During the initial start-up some smoke or smell may arise. This is a normal process and does not 
necessarily mean that the device is defective. 


Repairs, servicing and electric connection must be carried out by a qualified technician. 


WARRANTY: Till one year after date of purchase. 


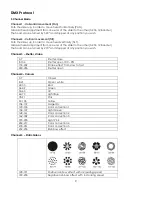
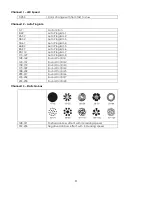
OPERATING DETERMINATIONS 


This device is not designed for permanent operation. Consistent operation breaks will ensure that the device 
will serve you for a long time without defects. 
 
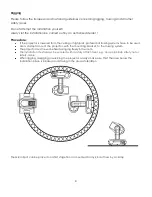
The minimum distance between light-output and the illuminated surface must be more than 1.3 meter. 
 
The maximum ambient temperature 

t

a

 must never be exceeded. 

 
If this device is operated in any other way, than the one described in this manual, the product may suffer 
damages and the


warranty becomes void.  

Any other operation may lead to dangers like short-circuit, burns, electric shock, lamp explosion, crash etc. 
 

You endanger your own safety and the safety of others! 
 

CAUTION ! EYEDAMAGES !. 

Avoid looking directly into the light source. 

(meant especially for epileptics) !


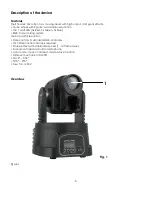
Summary of Contents for 41370 Micro Spot

Page 1: ...Micro Spot ORDERCODE 41370...

Page 2: ...Showtec for more excellent lighting products We design and manufacture professional light equipment for the entertainment industry New products are being launched regularly We work hard to keep you o...

Page 3: ...atures and Overview Backside Set Up and Operation One Micro Spot Multiple Micro Spots DMX Protocol 5 Channel Mode 13 Channel Mode Control Panel Control Mode DMX addressing Functions control panel Stan...

Page 4: ...ins with particular caution Never remove warning or informative labels from the unit Never use anything to cover the ground contact Never run the device without lamp Never ignite the lamp if the objec...

Page 5: ...t has reached room temperature If your Showtec device fails to work properly discontinue use immediately Pack the unit securely preferably in the original packing material and return it to your Showte...

Page 6: ...have to be used Use a clamp to mount the projector with the mounting bracket to the trussing system The projector must never be fixed swinging freely in the room The installation must always be secure...

Page 7: ...the mains Connect the device to the mains with the power plug Always pay attention that the right color cable is connected to the right place International EU Cable UK Cable US Cable Pin L BROWN RED Y...

Page 8: ...Red 5x Green 5x Blue RGB Colour mixing system 16 bit pan tilt resolution DMX control via standard DMX controller 13 5 DMX control channels required Strobe effect with adjustable speed 1 10 flashes se...

Page 9: ...7 Backside Fig 2 2 3 4 5 2 IEC Connector Fuse 1A 250V 3 DMX signal connector IN 4 Remote control 5 DMX signal connector OUT...

Page 10: ...ten the effect light onto firm trussing Use a 30 kg rated or stronger C clamp fastened onto the Micro Spot Leave at least 1 meter on all sides for air circulation 2 Use a 3 p XLR cable to connect the...

Page 11: ...can be turned by 270 and stopped at any position you wish Channel 3 Shutter strobe 0 7 Shutter close 8 134 Shutter open 100 0 135 239 Strobe effect from slow to fast 240 255 Shutter open Channel 4 Co...

Page 12: ...at any position you wish Channel 4 Tilt fine 16 bit Channel 5 Pan Tilt Speed 0 255 Pan Tilt controllable speed with decreasing Channel 6 Shutter strobe 0 7 Shutter close 8 134 Shutter open 100 0 135 2...

Page 13: ...Program 7 113 127 Auto Program 8 128 142 Sound Control 1 143 157 Sound Control 2 158 172 Sound Control 3 173 187 Sound Control 4 188 202 Sound Control 5 203 217 Sound Control 6 218 232 Sound Control...

Page 14: ...s of the second Micro Spot should be 1 13 14 014 the DMX address of the third Micro Spot should be 14 13 27 027 etc Please be sure that you don t have any overlapping channels in order to control each...

Page 15: ...lay will shows DMX or master slave mode that you selected before Pan mode Positive Pan mode Negative MODE 4 Press the MODE ESC button until the display shows and set the desired function via UP DOWN b...

Page 16: ...scan angle for TILT just for Master Slave and sound control Press the MODE ESC button until the display shows Select the desired function using the UP DOWN buttons Press the ENTER button confirm the f...

Page 17: ...slave address only one fixture can be connected To the fixture as the master or slave see Addressing menu If the master fixture resets or runs a test program all slaves will execute these acts too Yo...

Page 18: ...r supply cables must not show any damages or material fatigue The Showtec Micro Spot requires almost no maintenance However you should keep the unit clean Otherwise the fixture s light output will be...

Page 19: ...the steps below in sequence until a solution is found Once the unit operates properly do not carry out following steps If the light effect does not operate properly refer servicing to a technician Re...

Page 20: ...g in output jack of the last fixture on the link Incorrect addressing of the fixtures Check address setting One of the fixtures is defective and disturbs data transmission on the link Bypass one fixtu...

Page 21: ...are anti reflection coated High luminous efficiency parabolic system Strobe effect with variable speed 1 flash 10 flashes sec DMX control via standard DMX controller Sound controlled via built in micr...

Page 22: ...2007 Showtec...

Reviews: