ShoreStation SS1062 Service Manual Download Page 8

Midwest Industries, Inc.   

Ida Grove, IA  51445 

800.859.3028 

www.shorestation.com 


 0003231

Page 9 


REV A  1/25/05

SS10621 Bill of Materials

ShoreStation

 Wheel Assembly

STEP 12: 

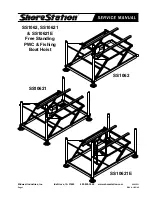
Install  the  brace  tubes  (Item  #2,  Diagram  IV, 

page 8) by inserting a 3/8” X 5” hex bolt through 

a 3/8” flat washer, then through one end of the 

brace tube and down through the lower frame. 

Secure with a 3/8” flange lock nut. Attach the 

other end of the brace tube to the upright post 

by inserting a 3/8” X 4-1/2” hex bolt through a  

3/8” flat washer. Insert the bolt through the hole 

provided in the upright post, and then through 

the end of the brace tube. Secure with a 3/8” 

hex flange lock nut. Tighten both ends. Repeat 

on the other brace tube.

STEP 13: 

Secure  a  pulley  assembly  to  the  front  cross 

member  by  inserting  a  3/8”  X  1-3/8”  X  3-1/4”  

U-bolt  in  the  hole  of  the  pulley  clevis,  then  

inserting it through the holes provided in the front 

cross  member  (Detail  H  &  I,  pages  6  &  8).  

S e c u r e   t o   t h e   c r o s s   m e m b e r   w i t h 

3/8”  hex  flange  lock  nuts.  Tighten  until  two  

threads  of  the  U-bolts  are  exposed  through  

the nuts. Repeat on the other pulley on the other  

end of the front platform.

SS1062 & SS10621 WINCH INSTALLATION:
STEP 14: 

Locate  the  winch  and  mounting  plate  

(Diagram IV and Detail K, page 8). Attach the 

winch  to  the  mounting  plate  using  three  3/8” 

X 1” hex bolts and hex flange lock nuts. Tighten. 

Attach the top of the mounting plate to the winch 

post by inserting a 3/8” X 4-1/2” hex bolt through 

a  3/8”  flat  washer  and  then  inserting  the  bolt 

through the hole provided at the top of the winch 

post.  With  the  bolt  fully  inserted,  slip  the  top  

center hole in the mounting bracket over the bolt 

and secure in place with a 3/8” flat washer and 

3/8” hex flange lock nut. Secure the bottom of 

the bracket to the post using a 3/8” X 3-7/8” X  

4-5/8” round U-bolt, and hex flange lock nuts. 

Tighten.

Summary of Contents for SS1062

Page 1: ...Midwest Industries Inc Ida Grove IA 51445 800 859 3028 www shorestation com 0003231 Page 1 REV A 1 25 05 SS1062 SS10621 SS10621E Free Standing PWC Fishing Boat Hoist SS10621 SS10621E SS1062...

Page 2: ...lower frames on a at surface Diagram V page 3 STEP 3 Open leg bundle 68154 Some assembly of the component parts has been factory assembled Diagram V Page 3 The two upright posts are identical except...

Page 3: ...Midwest Industries Inc Ida Grove IA 51445 800 859 3028 www shorestation com 0003231 Page 3 REV A 1 25 05 SS1062 Lower Frame Assembly...

Page 4: ...Midwest Industries Inc Ida Grove IA 51445 800 859 3028 www shorestation com 0003231 Page 4 REV A 1 25 05 SS10621 SS10621E Lower Frame Assembly...

Page 5: ...aluminum base pad channel clamp Ref 10 to the square base pad Ref 1 with two 3 8 X 3 4 carriage bolts and 3 8 hex flange nuts Detail A Tighten Repeat on other base pad STEP 5 Attach the base pad asse...

Page 6: ...Midwest Industries Inc Ida Grove IA 51445 800 859 3028 www shorestation com 0003231 Page 6 REV A 1 25 05 Platform Assembly...

Page 7: ...Midwest Industries Inc Ida Grove IA 51445 800 859 3028 www shorestation com 0003231 Page 8 REV A 1 25 05 SS10621 Assembly...

Page 8: ...e pulley clevis then inserting it through the holes provided in the front cross member Detail H I pages 6 8 S e c u r e t o t h e c r o s s m e m b e r w i t h 3 8 hex flange lock nuts Tighten until t...

Page 9: ...one of the U bolt yokes provided on the bolt so that it ts the diameter of the upright post Slip the winch mounting bracket with winch attached onto the bolt using the top hole of the mounting bracket...

Page 10: ...Midwest Industries Inc Ida Grove IA 51445 800 859 3028 www shorestation com 0003231 Page 11 REV A 1 25 05 SS1226 Electrive Drive Assembly...

Reviews: