-15-
Model W1715 (For Machines Mfd. Since 2/19)
SE
TU
P
Assembly
Before beginning the assembly process, refer to
Items.
Needed.for.Setup
and gather everything you need.
Ensure all parts have been properly cleaned of any
heavy-duty rust-preventative applied at the factory (if
applicable). Be sure to complete all steps in the assembly
procedure prior to performing the
Test.Run
.
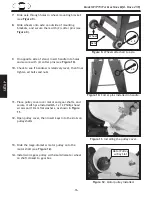
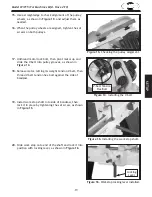
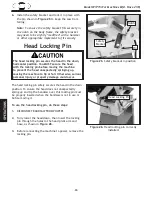
Figure.7.
Long braces attached to legs.
Long
Brace
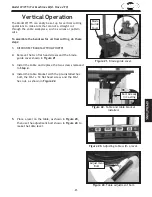
Figure.6.
Short braces attached to legs.
Short
Braces
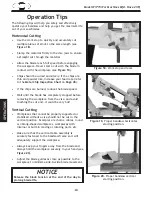
Figure.5.
Attaching legs to bandsaw.
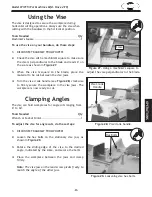
Figure.8.
Bracket attached to legs.
Wheel-
Mounting
Bracket
Although the main components of the SHOP FOX
®
W1715
are assembled at the factory, some assembly is required.
The following series of instructions are the recommended
sequence best suited for the machine assembly.
To.assemble.the.bandsaw,.do.these.steps:
1.
Install head-locking pin (refer to
Page.22
).
2.
With help of an assistant, lift bandsaw onto a pair of
closely spaced sawhorses or other suitable support
(see
Figure
5
).
3.
Attach legs to bandsaw with (8) M8-1.25 x 25 hex
bolts, (8) 8mm flat washers, (8) 8mm lock washers,
and (8) M8-1.25 hex nuts (see
Figure
5
).
Note:
At this time, tighten with a 14mm wrench
or socket just enough to secure the parts. Final
tightening will take place when the stand is fully
assembled.
4.
Attach short brace to legs with (4) M8-1.25 x 16
carriage bolts, (4) 8mm flat washers, (4) 8mm lock
washers, and (4) M8-1.25 hex nuts (see
Figure
6
).
5.
Remove bandsaw from sawhorses and attach long
braces to legs with (4) M8-1.25 x 16 carriage bolts,
(4) 8mm flat washers, (4) 8mm lock washers, and (4)
M8-1.25 hex nuts (see
Figure
7
).
6.
Attach wheel-mounting bracket to bottom of two
legs with (2) M6-1 x 12 hex bolts, (4) 6mm flat
washers, (2) 6mm lock washers, and (2) M6-1 hex
nuts, as shown in
Figure
8
.
x 8
x 4
x 2
Summary of Contents for W1715
Page 45: ...Model W1715 For Machines Mfd Since 9 17 ...
Page 48: ......


