


19
18
日本語
/English
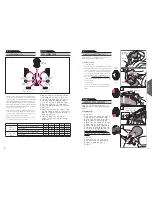
内装の取り付け方
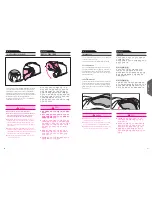
1. チンストラップカバーの取り付け
チンストラップカバーは左右で形状が異なりま
す。取り付けの際は、図を参照し、左右を確か
めてからチンストラップに通し、カチッと音が
するまでホックをはめ込みます。
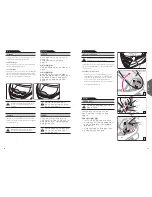
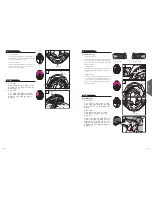
2. センターパッドの取り付け
前頭部のプレートの端をブラケットに合わせ
(図 8)、隙間に合わせて取り付けます(図 9)。
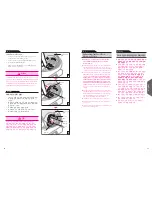
3. イヤーパッドの取り付け
イヤーパッドは、左右兼用です。取り付けると
きは、図 11 のように (A) の部分をセンターパッ
ドと衝撃吸収ライナーの間に挟み、プレート部
分の 4 か所の爪を、それぞれチークベースの切
り欠き部分に差し込んで、イヤーパッドを固定
します。反対側も、同じ要領で取り付けます。
Installing Interior Parts
1. Installing the Chinstrap Covers
The chinstrap covers have different shapes on
the right and left sides of the helmet. Referring
to the drawing, identify the right and left sides.
Pass the chinstrap through the cover and fasten
the snap until it clicks in place.
2. Installing the Center Pad
Adjust the side of the front plate to bracket
(Drawing 8), and slide and insert the plate into a
gap of bracket (Drawing 9).
3. Installing the Ear Pads
The ear pads are interchangeable for right and
left sides. Place ear pad section (A) between the
center pad and the impact absorbing liner as per
Drawing 11. Insert the 4 clasps on the plate in
the notches of the cheek base. Fix the ear pad
in place. Install the other ear pad in the same
manner.
日本語
English
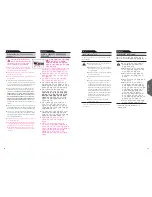
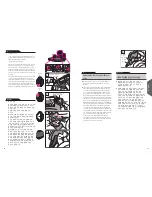
3. センターパッドの取り外し
後頭部のホックを 2 か所外してから(図5)、
前頭部のプレートをセンターから引き剥がすよ
うにして(図6)、センターパッドを取り外し
ます。
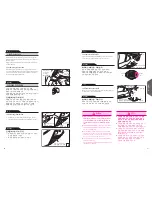
4. チンストラップカバーの取り外し
チンストラップカバーを取り外すには、チーク
パッドを取り外してからチンストラップカバー
のホックを外し、チンストラップから引き抜き
ます(図 7)。反対側も、同じ要領で取り外します。
3. Removing the Center Pad
Remove the center pad by unsnapping 2 snaps
at the rear of the helmet first (Drawing 5), and
pull the front portion of the center pad from
center part as per Drawing 6.
4. Removing the Chinstrap Covers
Remove the cheek pad then unfasten the
chinstrap cover snap. Remove the cover from
the chinstrap (Drawing 7). Remove the other
chinstrap cover in the same manner.
日本語
English
9
8
10
(A)
11
6
5
7
前
Front
後
Rear
ホック
Hook
ホック
Hook
プレート
Plate
プレート
Plate
チンストラップ
Chinstrap
ホック
Hook
チンストラップカバー
Chinstrap Cover
チンストラップカバー(右)
Chinstrap Cover (R)
チンストラップカバー(左)
Chinstrap Cover (L)