background image

       Shining Technology CitiDISK HDV Quick Usage Guide v8.0                         Shining Technology CitiDISK HDV Quick Usage Guide v8.0              

Quick Play Last Captured Clip 


Play All Captured Clips 


Choosing Favorable DV Video File Format
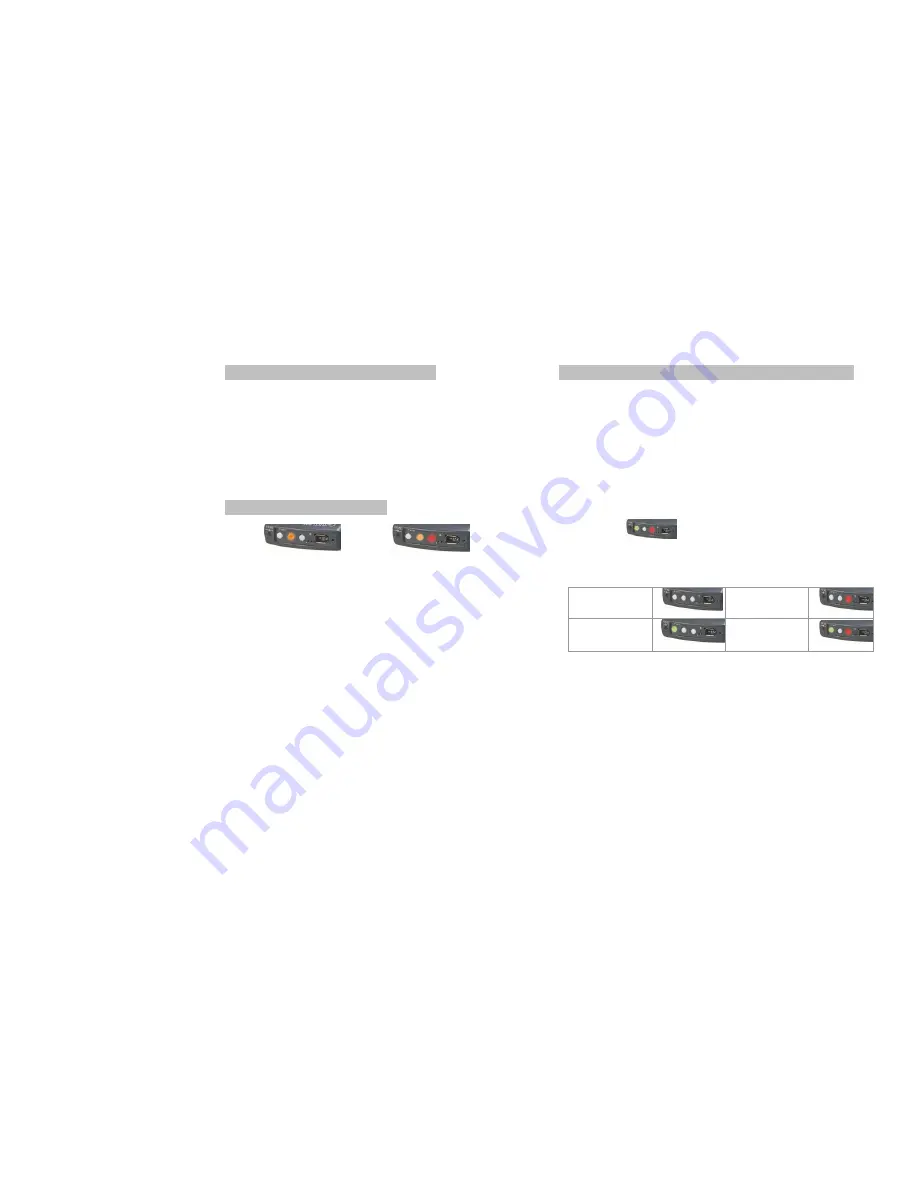


Note:

 This paragraph is for choosing the video file format for the 

FW1256B (no middle “

orange

” light), FW1256C and 

FW1256H when DV recording is selected, which is not 
suitable for earlier released DV FW1256A models.    


Operate the following steps only when the external power adapter is 
plugged into the unit and it is not connected to a computer or 
camcorder. DO NOT turn off the unit before the sequence is 
completed.   


1. Look at the front panel of the CitiDISK HDV. 
2. Turn on the power of the CitiDISK HDV.  Wait until both lights 

start to blink.


3. Press and hold the “

RED”

 button for over 5 seconds.  Currently 

stored file formats will display the light combinations illustrated 
below.  “Raw DV” is set as the default from the factory.


Raw DV 
(Clipxxyy.dv)


Windows AVI2 
(Clipxxyy.avi) 


QuickTime MOV 
(Clipxxyy.mov) 


User Defined ** 


** Refer to the user manual’s “How to customize User Defined file 

format” section; the manufacturer default is set  to “Canopus 
AVI2”.    

4. Choose next file format by toggling the “

RED”

 button.    

5. Once the file format is determined, stop toggling and wait for 

10 seconds. Both buttons will go off and stay off for 3 seconds. 

6. The CitiDISK HDV will start writing the new file format 

information into internal memory.  Both lights will blink rapidly 
for approximate 10 seconds during the writing process.   

7. Once the file format is completed, both lights will blink 

normally to indicate the writing process is successful. The 
CitiDISK HDV is now ready to capture video using the 
programmed file format.   User MUST turn off the power before 
programming a new format again.  


• 

Connect the FireWire cable (4-pin end) to the camcorder’s 

iLink port.   

• 

Connect the FireWire cable (6-pin end) to the CitiDISK HDV. 

• 

Set the camera to “VCR” mode.   

• 

Toggle the middle “QPlay” button to play the last captured clip 

and subsequently the light will turn solid 

ORANGE

 when 

playing.  Once the last captured clip ends, the light will 
automatically turn off. 

• 

Connect the FireWire cable (4-pin end) to the camcorder’s iLink 

port.   

• 

Connect the FireWire cable (6-pin end) to the CitiDISK HDV. 

• 

Set the camera to “VCR” mode. 

• 

Press and hold the middle 

QPLAY


button for over 3 seconds and

the 

ORANGE

 light will start to blink.    

The last captured clip will play from beginning to end first, then 
it will play from beginning to end of the first recorded clip of 
the “Media” folder. Additional clips will play in the sequence 
they were captured. 

You can reverse the order of the playback sequence by 
toggling the “

REC

” button. The “

RED

” light blinks if reverse 

direction is selected. Press the “

REC

” button again to reset to 

normal order. 

• 

Toggle the middle 

ORANGE

 button once to abort playing the 

current clip and to jump forward to the next clip (Only if “

RED

” 

light is off). It jumps backward if ”

 RED

” light is blinking. 

• 

Press and hold the middle 

ORANGE

 button for over 3 seconds 

to stop the “PlayAll” function. 

Jump Forward 

Jump Backward 

P8 

P9 

Summary of Contents for CitiDISK HDV FW1256H

Page 1: ...carrying pouch One Quick Usage Guide this document Product Registration and Technical Support http www shining com Disclaimer All of the companies and product names mentioned in this manual are the registered trademarks of their owners All of the information in this booklet is subject to change without notice CitiDISK HDV Quick Usage Guide Edit Instantly No Capturing Required It is highly recommen...

Page 2: ... proves defective during this warranty period contact your manufacturer s customer support in order to obtain a Return Authorization Number BE SURE TO HAVE YOUR PROOF OF PURCHASE ON HAND WHEN CALLING RETURN REQUESTS CANNOT BE PROCESSED WITHOUT PROOF OF PURCHASE Do not drop jar bump shock the unit or expose to sources of excessive vibration Keep in mind that CitiDISK HDV uses a 2 5 hard drive which...

Page 3: ...HDV suggested by the manufacturer Shooting Video to the CitiDISK HDV Simultaneously with Tape 1 Fully charge the unit s internal battery 2 Choose the favorable native file format for your editing system 3 Securely connect the CitiDISK HDV to the camcorder or mount the external battery unit together with camcorder 4 Insert the tape and control the HDV recording from the camcorder s REC button or ma...

Page 4: ...nfig sub menu Click on User Config will display the next screen Plug in the 4 pin FireWire connector into the camcorder iLink port vertically Run the FireWire cable through the handstrap and secure it Make sure the FireWire cable is slightly tightened by the strap Zip the pouch halfway leaving the top portion of pouch open for the FireWire cable Run buckle across belt and buckle it up Slide the Ci...

Page 5: ...l Rechargeable Battery Powering On Off the CitiDISK HDV Power on Toggle the PWR button closest to the external power adapter input once When the internal battery has less than 5 minutes of power remaining this power status light will start to blink and will stop recording before shutting off the unit completely Power off Toggle the GREEN PWR button again Turning on the battery Use a sharp pencil t...

Page 6: ...chronizes itself to the system 6 Double click the CitiDISK HDV firmware uploader icon on the desktop to launch the program You ll see the following window On the top is the uploader version number i e v1 6 Current installed firmware date code will be shown at the very bottom Make sure the HW Rev is Fw1256H R1 Connect the FireWire cable 4 pin end to the camcorder s iLink port Connect the FireWire c...

Page 7: ...sk space of the CitiDISK HDV Quick Erase Button and Utility Programs Note All of the files inside the Media folder are subject to be erased It is suggested by the manufacturer that you back up the clips to an internal hard disk first and erase the clips with the Quick Erase function instead of dragging them into the Recycle Bin and emptying it later Editing Software Native File Format Suggested Ke...

Page 8: ...blink rapidly for approximate 10 seconds during the writing process 7 Once the file format is completed both lights will blink normally to indicate the writing process is successful The CitiDISK HDV is now ready to capture video using the programmed file format User MUST turn off the power before programming a new format again Connect the FireWire cable 4 pin end to the camcorder s iLink port Conn...

Reviews: