background image

ENGLISH

59

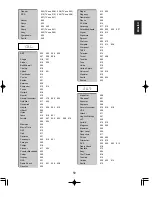
Quasar

004 (TV use 008) 028 (TV use 042)

RCA 

013 (TV use 012) 004 (TV use 008)

027 (TV use 041)

Sansui

000

Sanyo

023

Sear

000

005

Sharp

027 (TV use 041)

Sony

002 (TV use 000)

Symphonic

000

Zenith

000

ABC

002

003

009

030

007

006

008

Allegro

018

021

Archer

018

026

Bell&Howell

009

Century

018

Citizen

018

021

Comtronics

014

Contec

011

Easten

001

Emerson

026

Everquest

010

014

Focus

022

Garrard

018

Gemini

010

General Instrument

033

276

006

034

GoldStar

017

040

Goodmind

026

Hamlin

012

020

004

013

Hitachi

006

Hytex

007

Jasco

010

018

021

Jerrold

002

007

033

032

009

010

006

034

Memolex

000

Movie Time

015

NSC

015

Oak

011

Optimus

031 

Panasonic

000

016

031

Paragon

000

Philips

018

Pioneer

017

025

Popular Mechanics

022

Pulsar

000

Quasar

000

RCA

031

Radio Shack

010

021

026

028

Recoton

022

CBL

Regal

012

020

Regency

001

Rembrandt

006

Runco

000

SL Marx

014

Smasung

017

014

Scientific Atlanta

003

023

030

027

Signal

010

014

Signature

006

Sprucer

031

Starcom

002

010

Stargate

010

014

026

Starquest

010

TV86

015

Teleview

014

Tocom

007

008

Toshiba

000

Tusa

010

Unika

018

United Artists

007

Universal

153

019

Viewstar

015

Zenith

000

024

Zentek

022

AlphaStar

008

Chaparral

001

Echostar

009

Expreevu

009

General Instrument

016

015

018

HTS

009

Hitachi

011

Hughes Net.Sys

007

JVC

009

Jerrold

016

015

Megavox

006

005

Memorex

006

Next Level

006

Panasonic

017

Philips

006

005

Primestar

016

015

RCA

003

000

002

012

Radio Shack

018

Realistic

014

Sony

004

Star Choice

018

Toshiba

010

Uniden

006

005

014

Zenith

013

S A T

Summary of Contents for ASW-670

Page 1: ......

Page 2: ...e and thinner come in contact with the set Never disassemble or modify the set in any way Note to CATV System Installer This reminder is provided to call the CATV system installer s attention to Artic...

Page 3: ...ience receptacles and the point where they exit from the product 14 Outdoor Antenna Grounding If an outside antenna or cable system is connected to the product be sure the antenna or cable system is g...

Page 4: ...E AND HANDLING OF DISCS 18 DEFINITION OF TERMS 19 BASIC PLAYBACK 20 DISPLAYING DISC INFORMATION DURING PLAYBACK 23 PLAYING THE DESIRED SECTION OF DISC 24 PLAYING A SPECIFIC ITEM DVD Video only 26 REPE...

Page 5: ...DIGITAL AUDIO RECORDING WITH MD RECORDER 45 SETTING THE CLOCK 46 OPERATING THE SLEEP TIMER 47 OPERATING THE TIMER 47 ADJUSTING THE BRIGHTNESS OF THE DISPLAY 50 Troubleshooting Guide 51 Specifications...

Page 6: ...r cords are commercially available cords 1 CONNECTING ANTENNAs Change the position of the FM indoor antenna until you get the best reception of your favorite FM stations Place the AM loop antenna as f...

Page 7: ...he picture will not be shown When the progressive video signals are input into non progressive COMPONENT VIDEO INs of your TV the picture may not be shown normally too Therefore when the progressive C...

Page 8: ...e DIGITAL IN of an amplifier which does not contain the Dolby Digital or DTS decoder etc which processes the bitstream digital you should set the SPDIF Output to SPDIF PCM If not loud noise or no soun...

Page 9: ...NE BALANCE SELECT button 5 PRESET TUNING UP DOWN FORWARD BACKWARD SKIP buttons 6 PLAY PAUSE button FLUORESCENT DISPLAY 7 STOP button 8 OPEN CLOSE button 9 PHONES jack 10 STANDBY indicator 11 DISC TRAY...

Page 10: ...ton DISPLAY button DIMMER button MENU button TOP MENU button CURSOR CONTROL ENTER buttons TONE BALANCE SELECT button POWER button FUNCTION SELECT buttons NUMERIC 0 9 10 buttons REPEAT button STOP butt...

Page 11: ...setup code is correct When your component is not turned off repeat the above steps 2 to 4 trying each code for your component until you find one that works Notes If the SET LED did not flicker twice...

Page 12: ...h component other than this unit you wish to control For details refer to ENTERING A SETUP CODE on page 11 2 Turn on the component you want to operate 3 Press the DEVICE button on the remote control c...

Page 13: ...alkaline batteries Remove the cover Load two batteries AAA size 1 5V matching the polarity When the remote control does not operate the old batteries should be replaced In this case load new batterie...

Page 14: ...nt speakers because the frequency range of the front speakers is 140Hz 20kHz adjust the crossover frequency to 140Hz or slightly higher The crossover frequency adjustment determines the highest freque...

Page 15: ...subwoofer refer to OPERATION OF ACTIVE SUBWOOFER on page 14 Each time the FUNCTION SELECT button on the front panel the input source changes as follows DVD FM AM TAPE AUX frequency display MUTE flick...

Page 16: ...only when listening via the headphones Listening modes Dolby Virtual Speaker This mode creates a virtual surround sound field as few as two front speakers and subwoofer allowing you to experience list...

Page 17: ...y discs such as DVD AUDIO SACD CD ROM DVD RW DVD RAM DVD ROM etc other than those listed above Playing them may generate noise and damage speakers CD R CD RW and DVD R discs will play only if they are...

Page 18: ...UT MP3 DISCS CARE AND HANDLING OF DISCS This unit can play back MP3 files on a private CD R CD RW disc or commercial CD Notes Some discs may not be played back because of the disc characteristics or r...

Page 19: ...ods of time for instance a whole movie can be recorded DVD Video has a structure consisting of two 0 6 mm thin discs which are adhered to each other Since the thinner the disc the higher the density a...

Page 20: ...tray by force may damage it s mechanism Open the disc tray to load a disc with the printed side up then close it 2 Note When you play a DVD Video that contains a menu or a MP3 disc the menu display m...

Page 21: ...to clear the menu display A TV screen may be burned out if a static picture is displayed for a long time in the stop or the pause mode etc To prevent this set the Screen Saver to ON refer to When sele...

Page 22: ...ss the corresponding NUMERIC buttons 0 9 10 then the selected track will be played Examples For 3 For 10 For 21 In case of MP3 disc press the corresponding NUMERIC buttons 0 9 and press the ENTER butt...

Page 23: ...1 2 normal playback SF Slow advance playback SR Slow reverse playback To return to normal playback press the PLAY PAUSE button DISPLAYING DISC INFORMATION DURING PLAYBACK The unit features the on scr...

Page 24: ...e all cleared Note Depending on the disc a search playback will not work or may work differently Then the search menu is displayed on the TV screen for several seconds To cancel the search function pr...

Page 25: ...clearing the numbers entered before playback Each time the CLEAR button is pressed the numbers entered are cleared one by one in the opposite order In case of CD or MP3 disc 1 During playback press t...

Page 26: ...he desired title then press the ENTER or PLAY PAUSE button 2 When using a title menu If some DVD Videos which contain more than one title may have the menu like as a list of the titles the TITLE butto...

Page 27: ...repeat repeat A B etc Note The repeat playback may not work correctly on some DVD Videos and MP3 discs Repeating the desired part 1 During playback at the beginning of the part you want to repeat pres...

Page 28: ...e Start on the bottom of the program menu then press the ENTER button 4 Play will start in the programmed order After all the programmed tracks have been played it enters the stop mode and the program...

Page 29: ...acks To clear one by one During programming press the CURSOR buttons to select the tracks to be cleared then press the CLEAR button Then the selected track is cleared To clear all programmed tracks Du...

Page 30: ...different language from the selected one at the initial settings For details refer to When selecting the Audio Subtitle or Disc Menu on page 38 This operation works only with discs on which multiple s...

Page 31: ...n works only at scenes recorded from multiple angles CHANGING THE CAMERA ANGLE DVD Video only ZOOMING IN OUT A SCENE DVD Video only During playback or in the still picture mode press the ZOOM button 1...

Page 32: ...tputting either conventional interlacing video signal or progressively scanned video signal that can reproduce high density pictures with less flicker When the COMPONENT VIDEO OUTs of this unit are co...

Page 33: ...it Setup to exit from the setup mode press the ENTER button For the setting details see page in Note During setting operation only the buttons required for setting of DVD operation buttons will functi...

Page 34: ...see or the picture quality may be poor Only in this case change the video signal format to another For details about the video signal format of your TV monitor or the discs refer to the operating inst...

Page 35: ...er etc You should set the SPDIF Output to SPDIF PCM to convert Dolby Digital or DTS bitstream etc to linear PCM 2 channel of 48 kHz 16bit and to output it If the SPDIF Output is not set correctly loud...

Page 36: ...ted or the power is turned off during playback of DVD Video When DVD is selected as an input source again or the power is turned on playback will resume from that point 2 Press the CURSOR button to se...

Page 37: ...o select the item menu 2 Press the CURSOR button to select the setting menu Each time the CURSOR or button is pressed the setting menu or the item menu is selected 3 Press the CURSOR buttons to select...

Page 38: ...udio 3 Press the CURSOR buttons to select the preferred language then press the ENTER button The selected language is colored You can select one of languages listed in the language menu When you want...

Page 39: ...ng code which is not listed in DVD Language Code List is input press the ENTER button to return to the previous menu then perform the step 3 again Continued 4 Press the CURSOR button to select the ite...

Page 40: ...us menu screen is displayed If you input a wrong password it will not return to the previous menu In this case input the password again While displaying the password input screen when the SETUP button...

Page 41: ...the password If you forgot your password input 3308 that has been set to at factory 1 Press the CURSOR buttons to select the Password 2 Press the CURSOR buttons to select the Change then press the EN...

Page 42: ...or button is pressed the setting menu or the item menu is selected Then the settings are reset to initial settings and the setup mode is canceled 2 Press the CURSOR button to select the setting menu t...

Page 43: ...on repeatedly to select FM or AM band Operation of Tuner Auto tuning Manual tuning is useful when you already know the frequency of the desired station After selecting the desired band with pressing t...

Page 44: ...place After selecting the tuner with pressing the FM AM button or FUNCTION button select the desired preset number Tuning to preset stations 3 Select the desired preset number 1 30 and press the PROGR...

Page 45: ...DIGITAL OUT of the unit is connected to the DIGITAL IN of an MD recorder or CD recorder you can enjoy high quality sound of digital recording Refer to CONNECTING AUDIO VIDEO COMPONENTs and CONNECTING...

Page 46: ...d When the time has not been set yet or the time is cleared due to the electricity failure etc the time display flickers To display the current operation status press the TIME ADJUST button again Note...

Page 47: ...he SLEEP TIMER button for more than 2 seconds to enter the timer setting mode 2 Select the timer on mode and press the SLEEP TIMER button TMR OFF or TMR ON is displayed To cancel the timer setting mod...

Page 48: ...ff time are the same when the SLEEP TIMER button is pressed ERROR is displayed In this case perform the above steps 3 and 4 to set the time correctly 5 Press the CURSOR buttons to select the desired i...

Page 49: ...bove steps 2 and 3 Timer function cannot play back MP3 discs To play back a DVD Video set the timer of your TV as desired too When selecting FM or AM Tune in the desired station If you do not specify...

Page 50: ...mode changes as follows TMR ON Timer on mode lights up TMR OFF Timer off mode goes off Then the timer is deactivated 2 Select the timer off mode 3 To confirm your selection press the SLEEP TIMER butt...

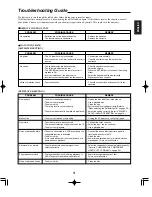
Page 51: ...No picture Noisy or distorted picture Abnormal or no picture Slight pause of picture Noise or distorted sound The disc is loaded upside down The disc is not playable The disc is dirty The rating leve...

Page 52: ...connected correctly Check the speaker connections Connect them correctly according to the channel left and right and the polarity and PROBLEM POSSIBLE CAUSE REMEDY No power No sound even though the PO...

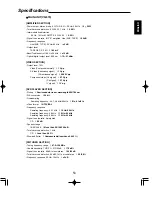
Page 53: ...signal 0 7 Vp p Y signal 1 Vp p DVD PLAYER SECTION Pickup Semiconductor laser wavelength 650 780 nm D A conversion 24 bit Oversampling Sampling frequency 44 1 48 kHz 96 kHz 8 fs 8 fs 4 fs Video forma...

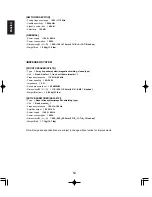
Page 54: ...woofer 1 1inch soft dome tweeter 1 Frequency response 140 Hz 20 kHz Power handling 25 30 W Impedance 6 Sound pressure level 82 dB W M Dimensions W H D 110 220 100 mm 4 1 4 8 5 8 4 inches Weight Net un...

Page 55: ...8277 8279 8285 8377 8365 7168 8382 8372 8378 8388 8373 8375 8376 8379 6983 8385 8387 8386 Code Language 8476 8471 8465 8484 8469 8472 6679 8473 8479 8482 8475 8487 8575 8582 8590 8673 8679 6789 8779...

Page 56: ...Futuretech 027 GE 007 008 030 041 029 025 004 015 038 040 Gibralter 002 005 003 Goldstar 005 025 003 011 T V Gradiente 009 011 Grunpy 027 026 Hallmark 025 Harley Davidson 026 Harman Kardon 010 Havard...

Page 57: ...wood 014 026 006 V C R Proscan 007 Proton 025 032 Pulsar 002 003 Quasar 008 042 021 RCA 007 008 041 003 013 015 037 038 039 040 Radio Shack 007 019 021 027 005 025 003 011 006 Realistic 019 021 027 00...

Page 58: ...Samsung 023 010 033 Sanky 027 007 Sansui 000 014 021 026 024 Sanyo 012 023 017 011 Scott 020 010 018 009 Sears 004 005 012 000 008 017 011 Semp 010 Sharp 027 Shintom 015 Shogun 023 Singer 015 Sony 004...

Page 59: ...31 Paragon 000 Philips 018 Pioneer 017 025 Popular Mechanics 022 Pulsar 000 Quasar 000 RCA 031 Radio Shack 010 021 026 028 Recoton 022 CBL Regal 012 020 Regency 001 Rembrandt 006 Runco 000 SL Marx 014...

Page 60: ......

Reviews: